
Install the Enclosure
Before You Begin
-
Inspect the item(s):
- Photograph any damage that may have occurred during shipping.
- Verify the received goods against the packing list.
If there is any damage or shortages, you must contact Tormach within 30 days of receipt.
- Read the packing list and locate all items.
-
Clean all chips and swarf from the:
- Chip basket
- Chip pans
- Machine
The procedure to install the enclosure uses many screws. If you start with a clean machine, it's easier and safer to find and pick up any screws that might drop during the procedure.
- Verify that the coolant tank and chip basket are under the Machine Stand.
- If previously installed, you must first remove the stainless steel wear guard from the chip pans, and set it aside for later installation.
-
Inspect the item(s):
- Photograph any damage that may have occurred during shipping.
- Verify the received goods against the packing list.
If there is any damage or shortages, you must contact Tormach within 30 days of receipt.
- Read the packing list and locate all items.
-
Clean all chips and swarf from the:
- Chip basket
- Chip pan
- Machine
The procedure to install the enclosure uses many screws. If you start with a clean machine, it's easier and safer to find and pick up any screws that might drop during the procedure.
Required Tools
- Metric hex wrench set
- Permanent marker
- Shears or knife
- Adjustable wrench
- Electric drill
- Flat-blade screwdriver, small
- Permanent marker
- Phillips screwdriver
- Tap handle
Install the Enclosure Panels
To install the enclosure panels, work from the left to the right of the machine.
To make it easier to install all components, don't install the side windows until later in the procedure.
Keep all screws one quarter-turn loose while installing the enclosure panels. This makes aligning panels easier. Once you're done installing the enclosure, fully tighten all screws.
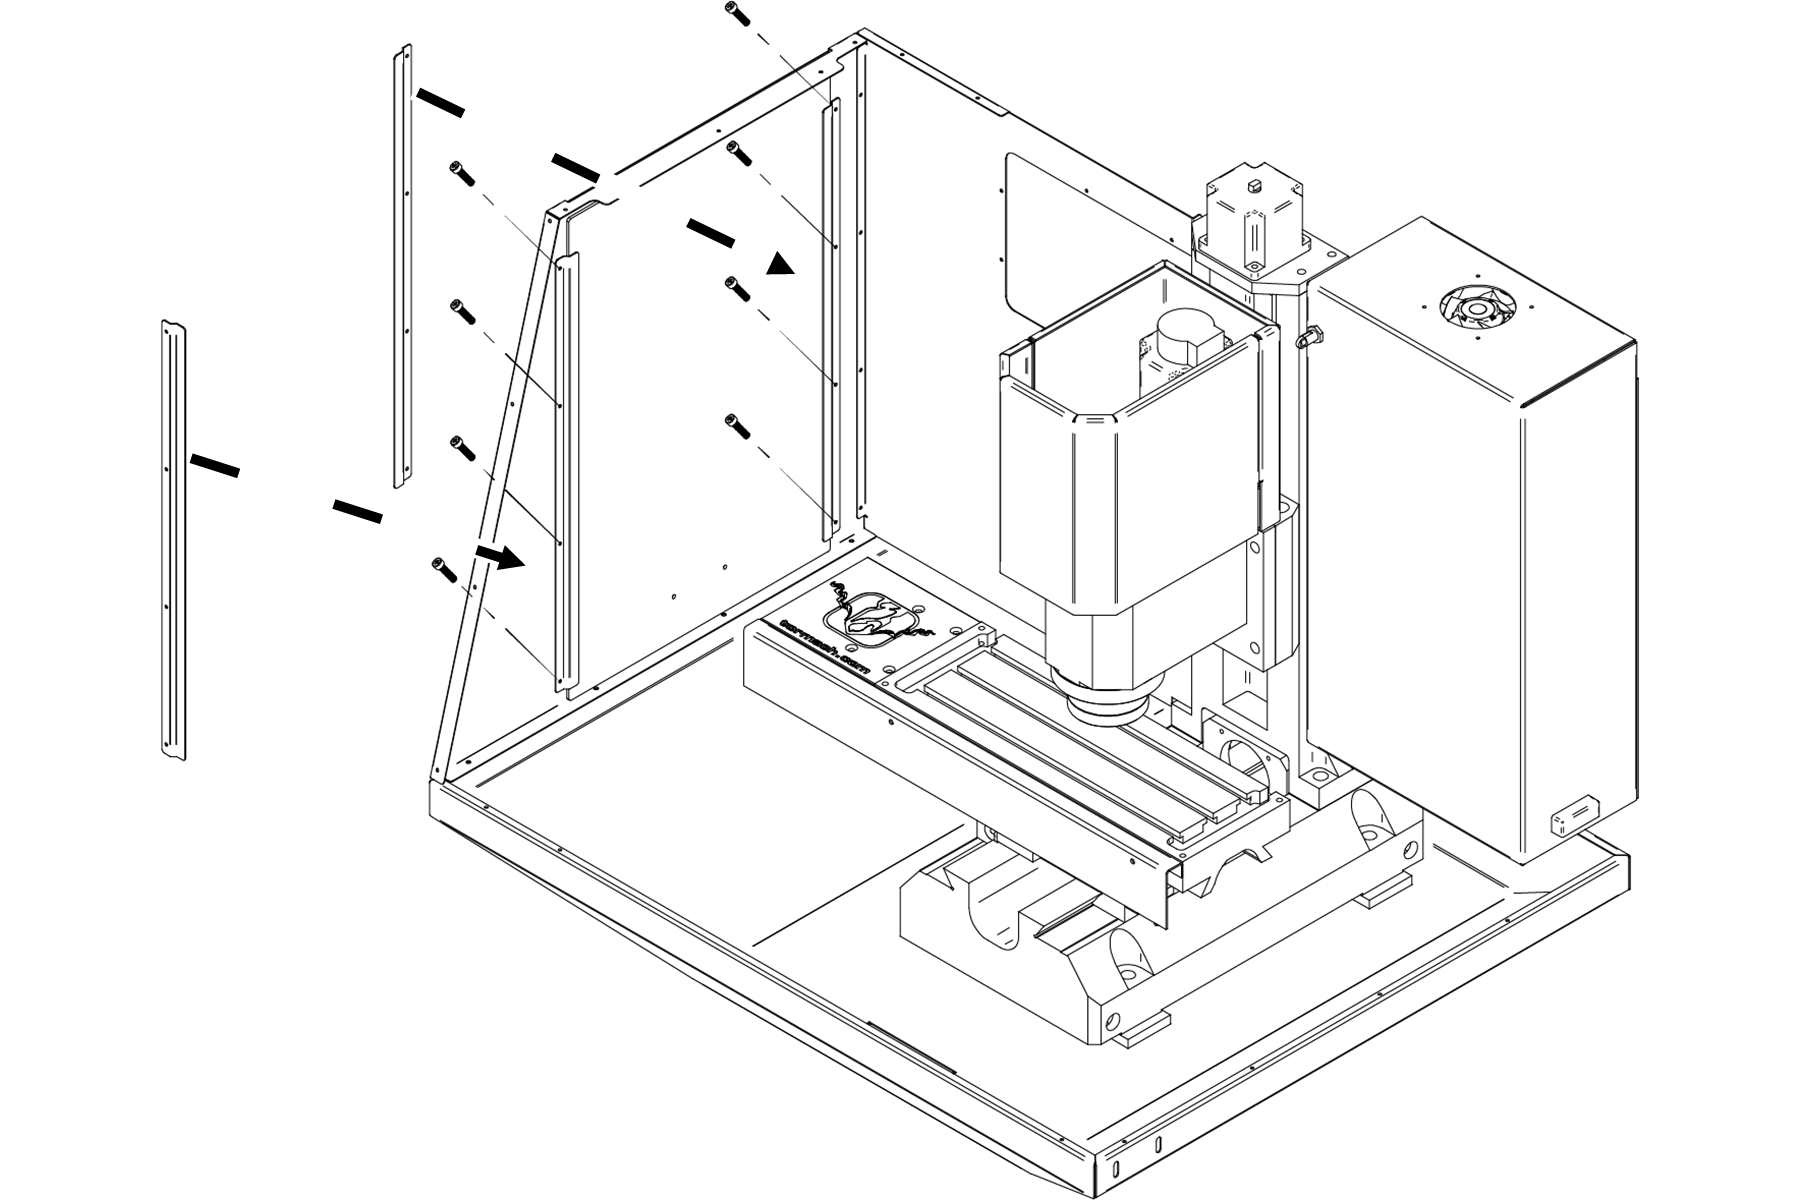
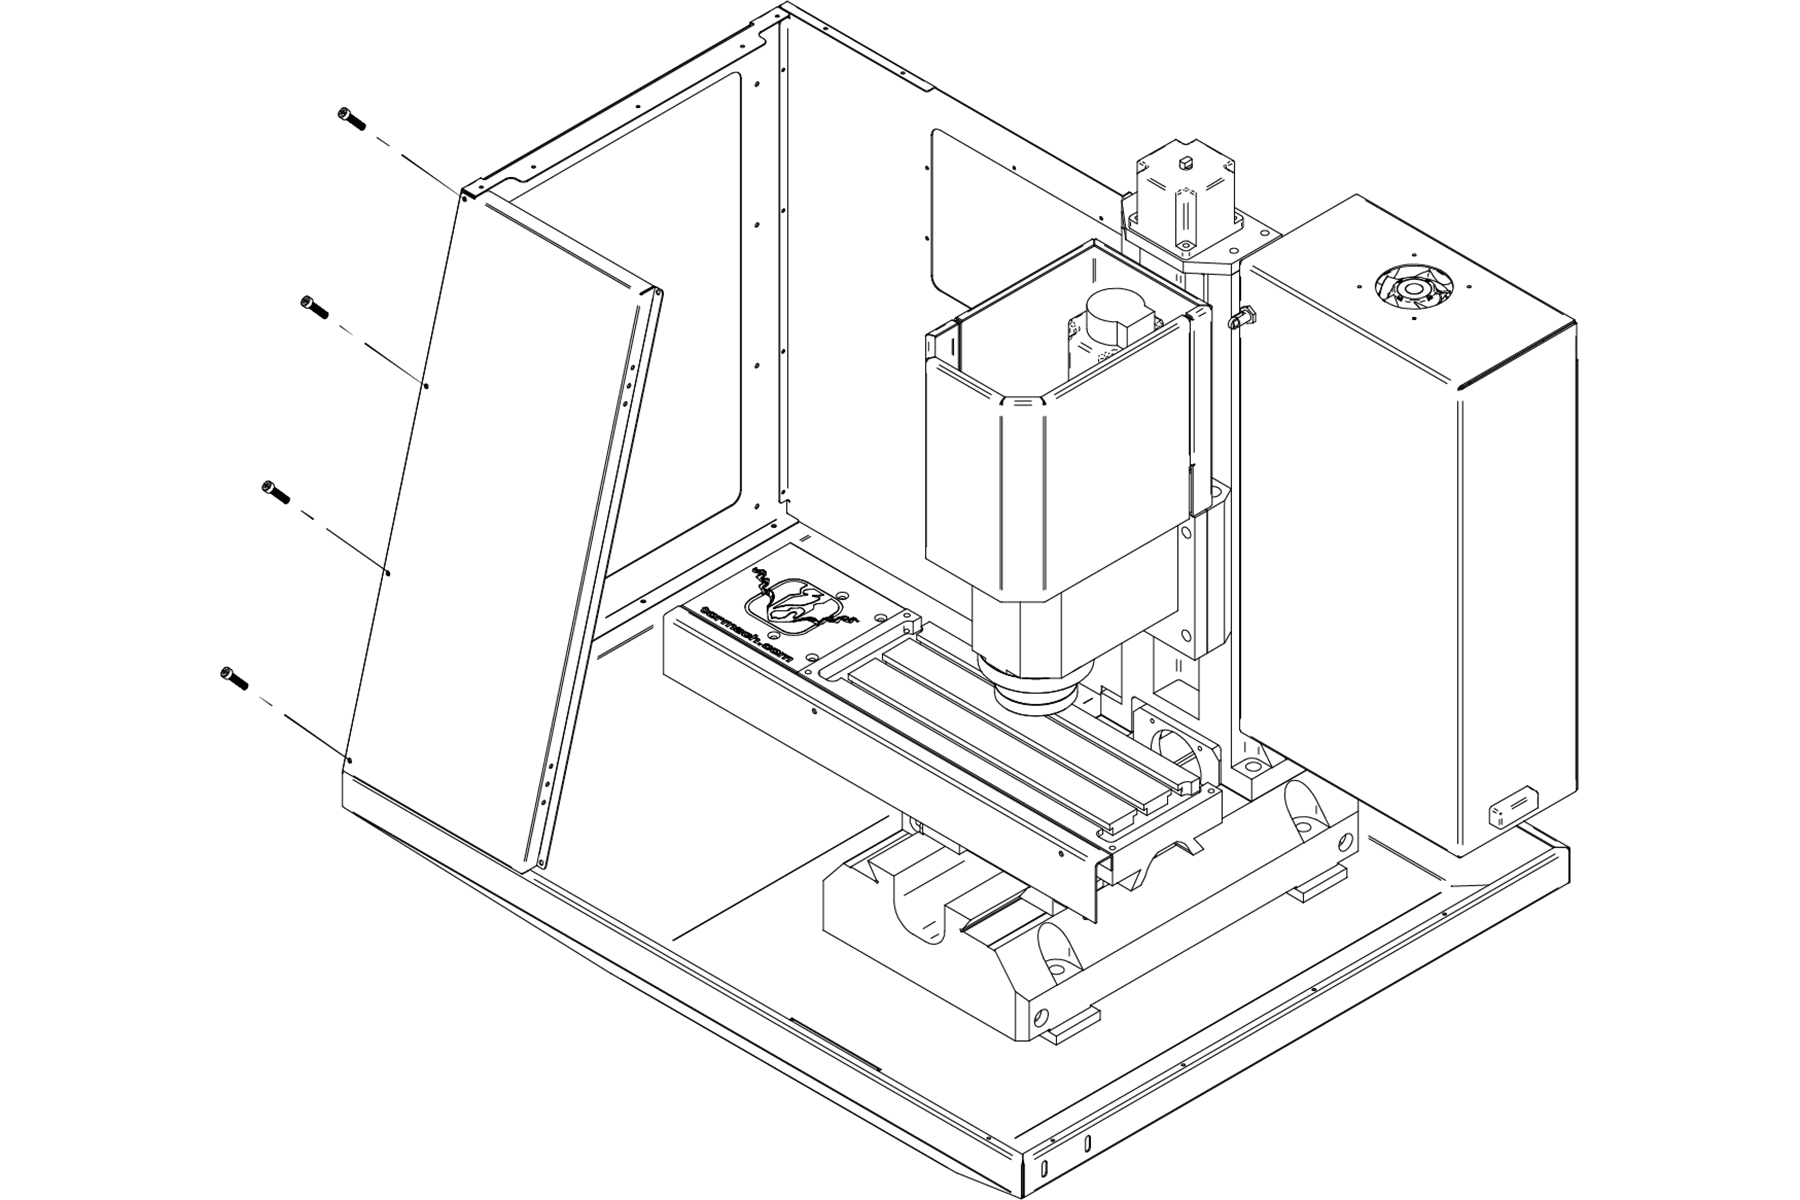
Install the Left Rear Panel
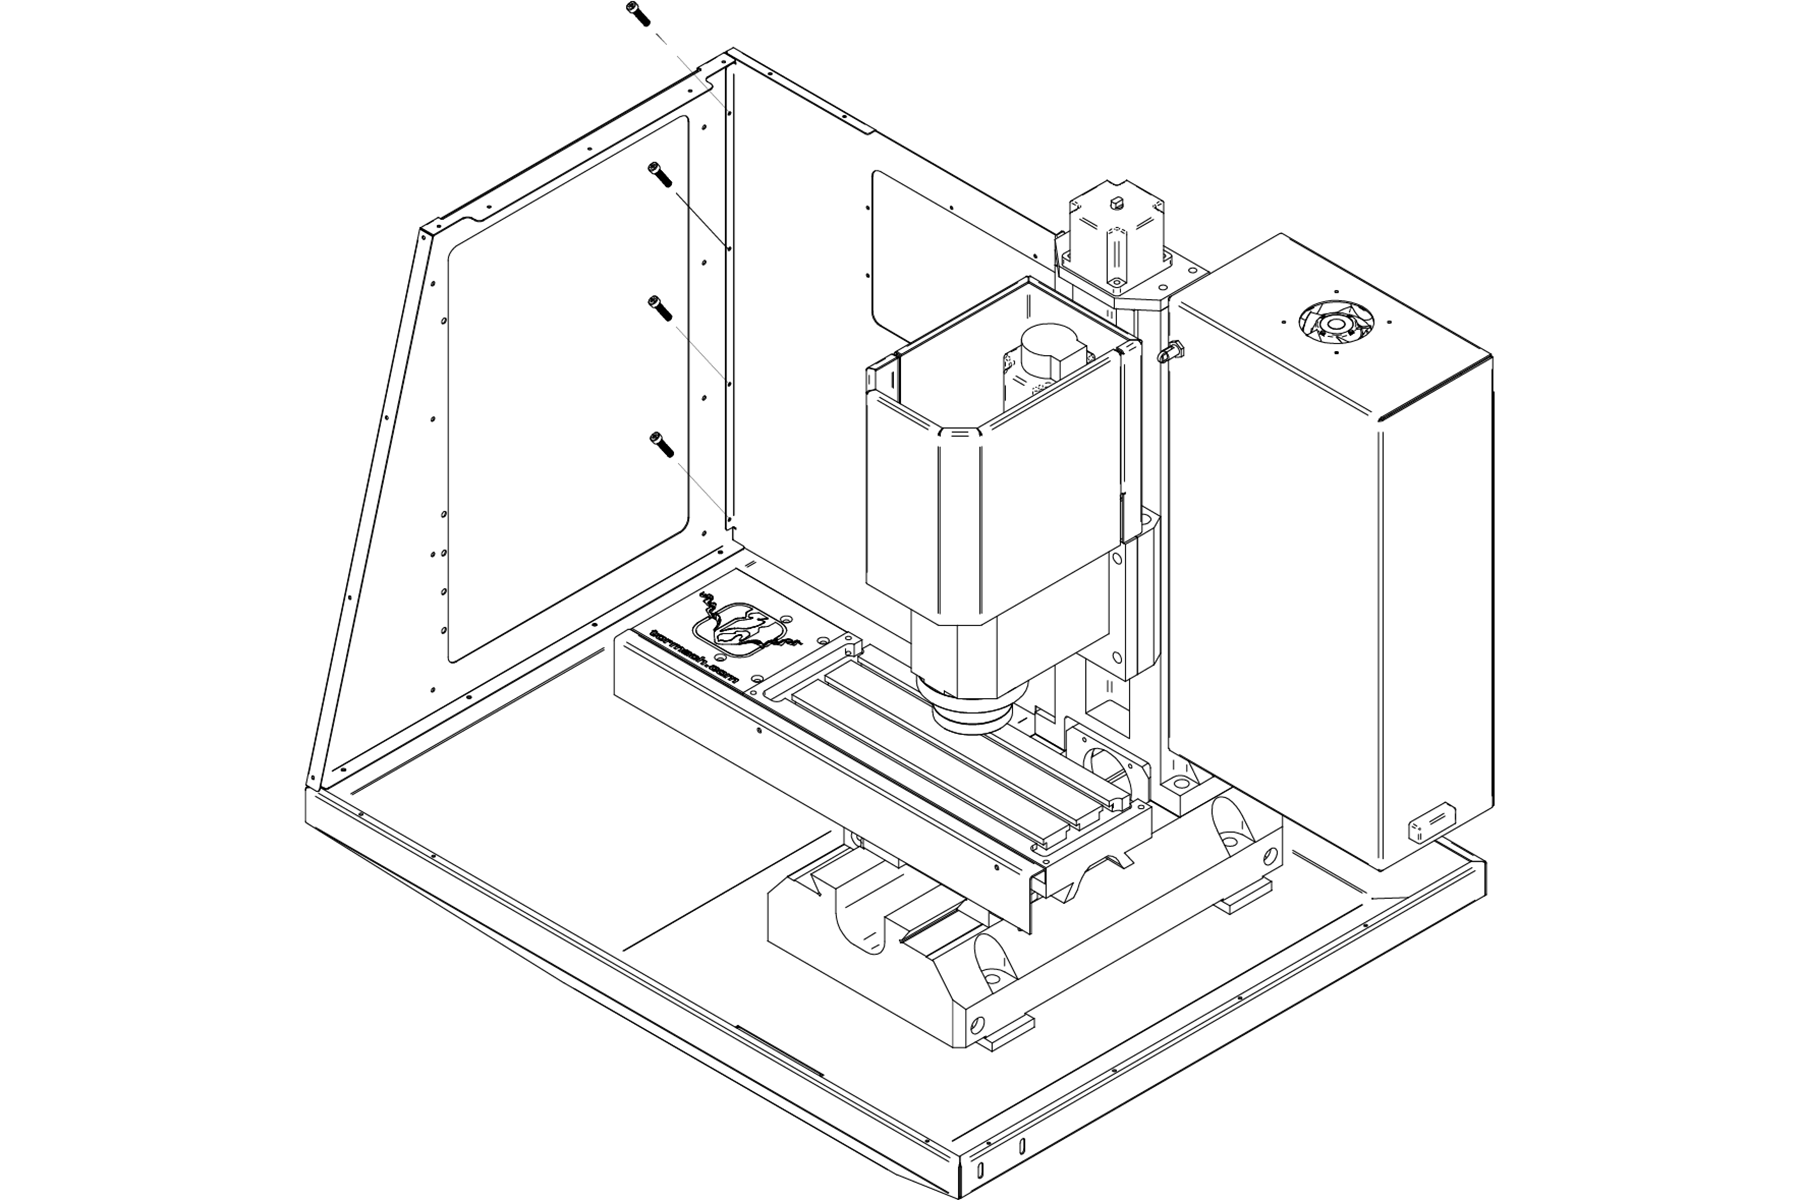
- Attach the column cover to the machine column with three M6 × 1.0 - 12 screws.
- Attach the left rear panel to the column cover with
-
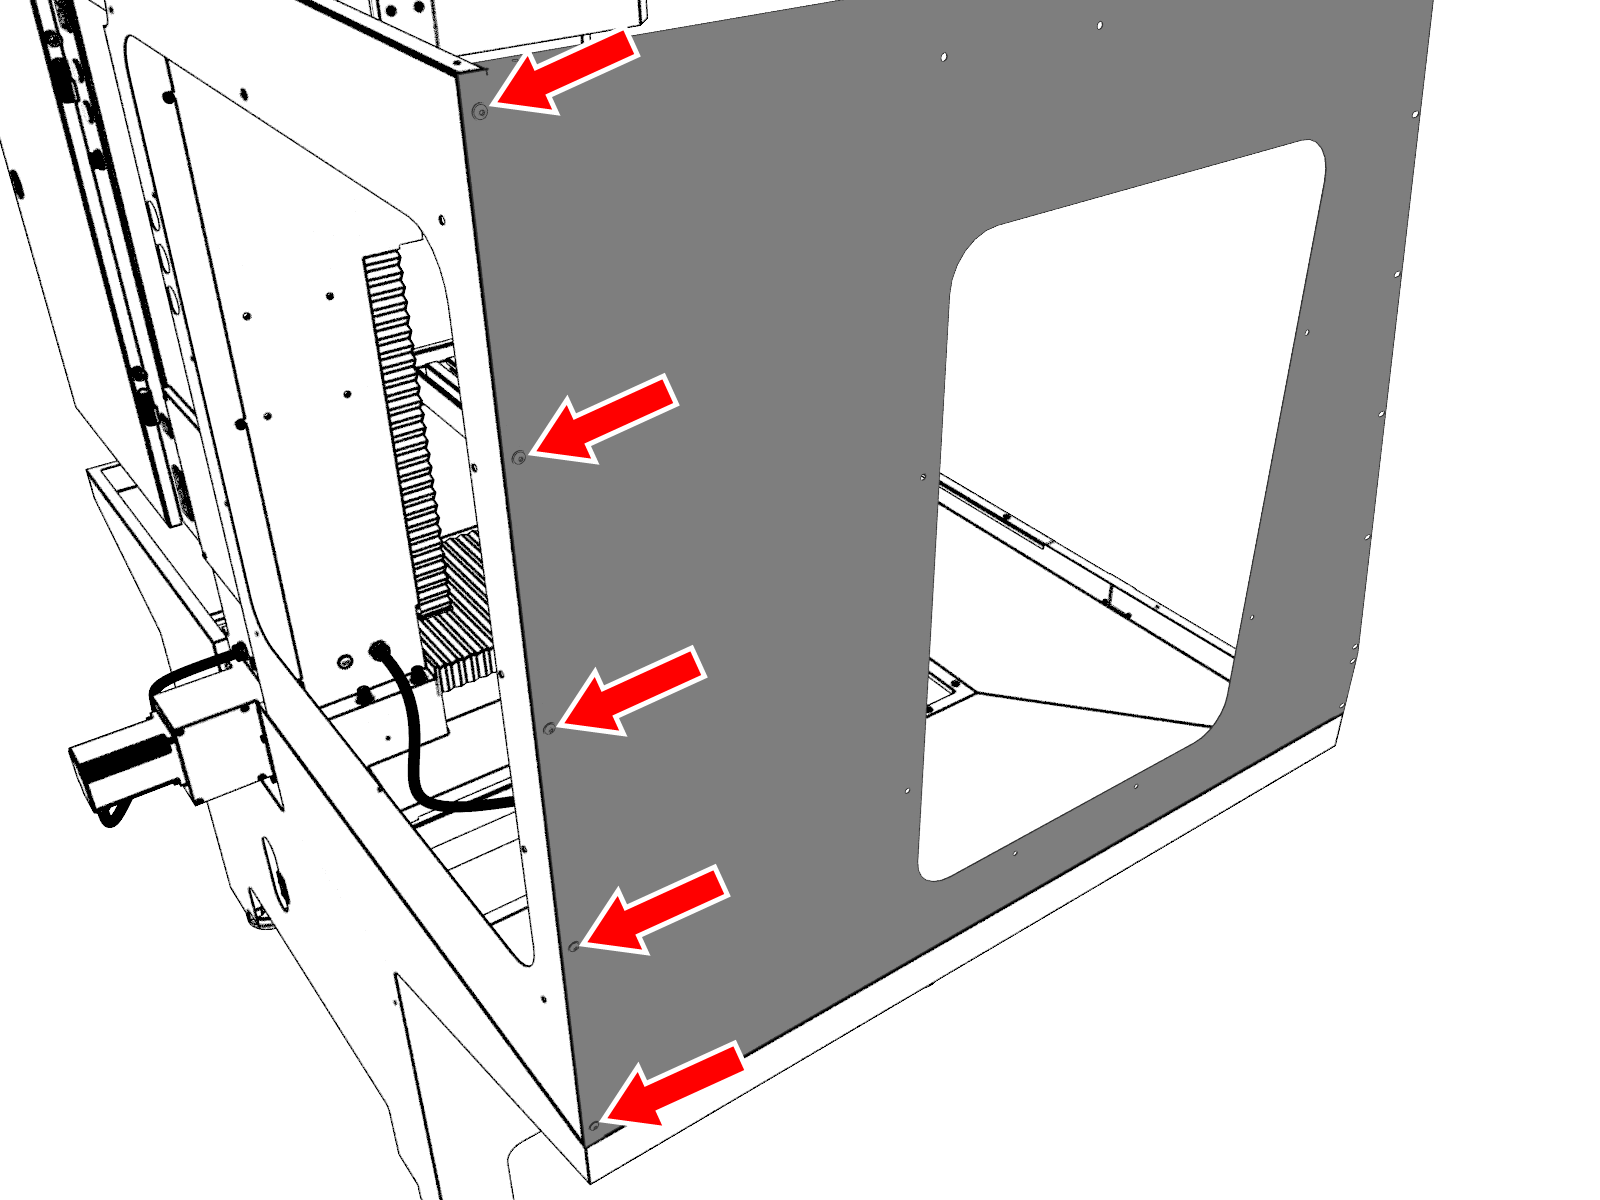
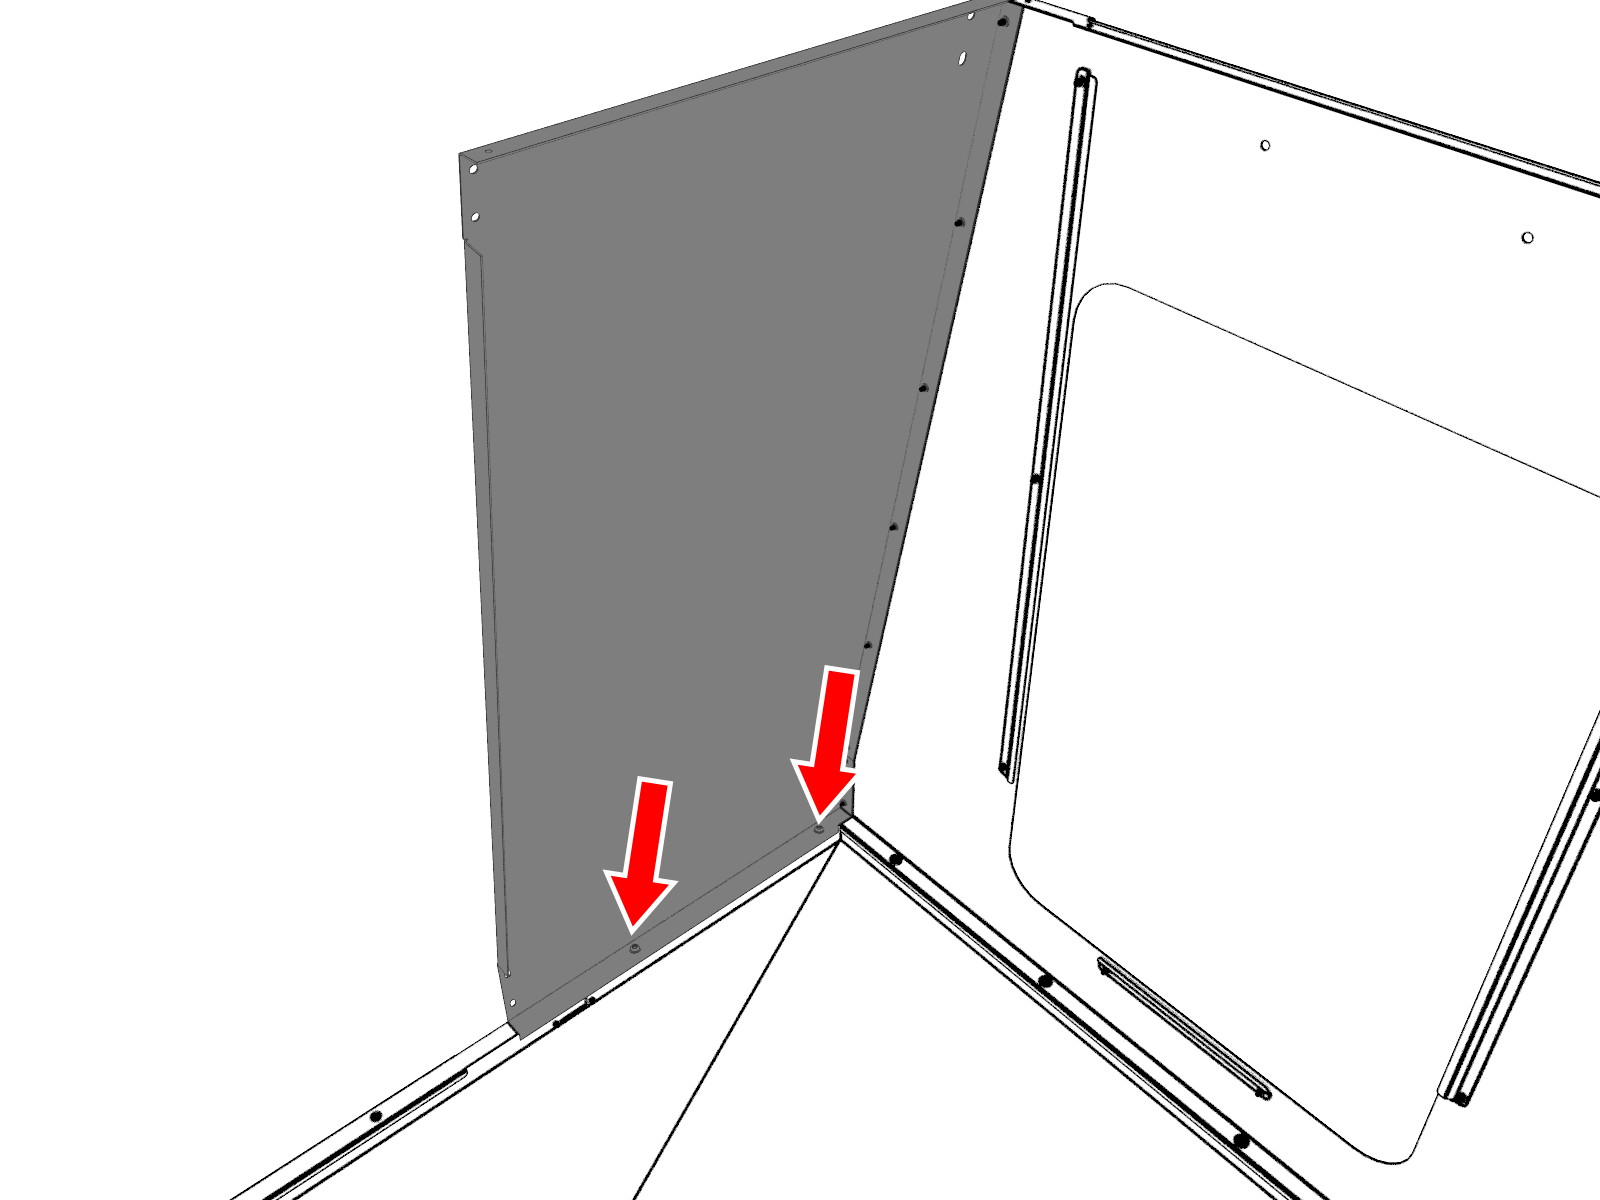
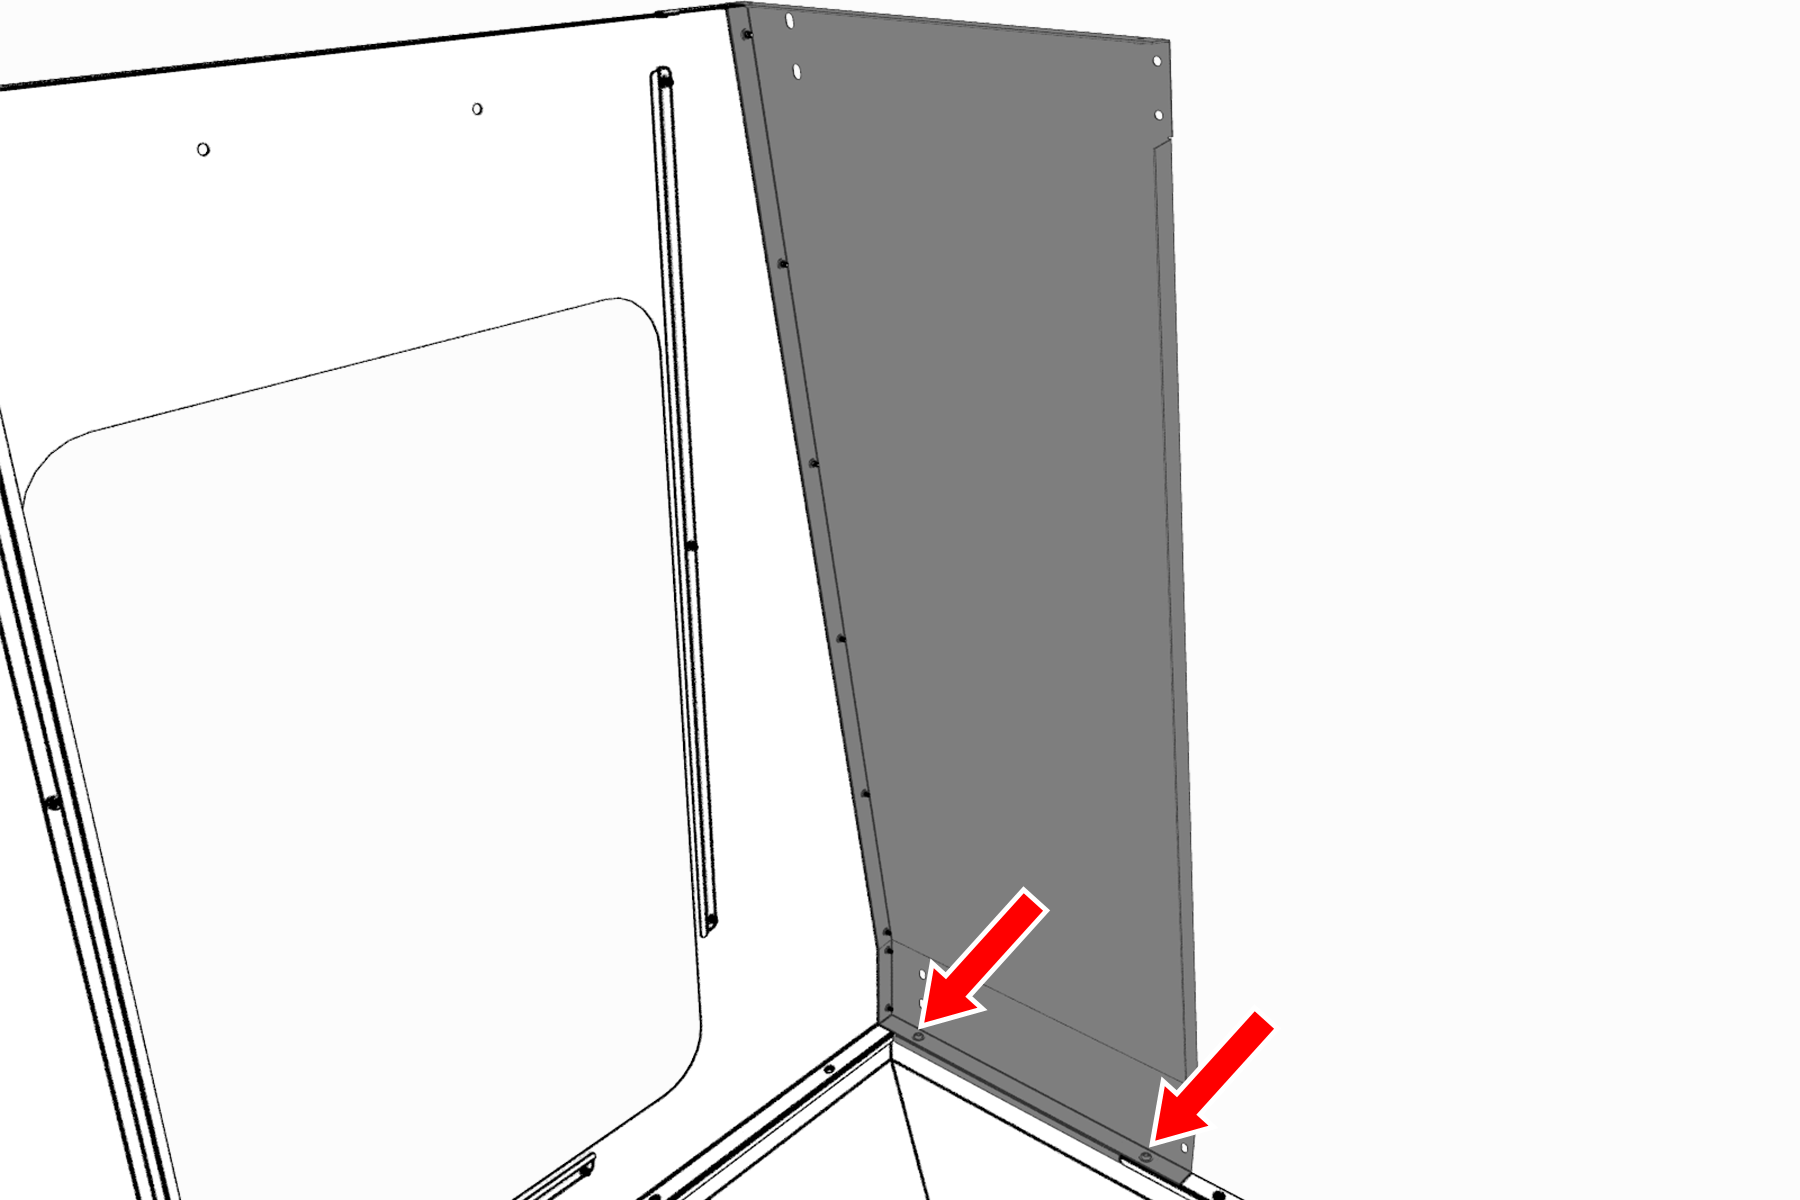
Attach the left rear panel to the left chip pan with three M6 × 1.0 - 12 screws.

Left rear panel attached to the left chip pan.
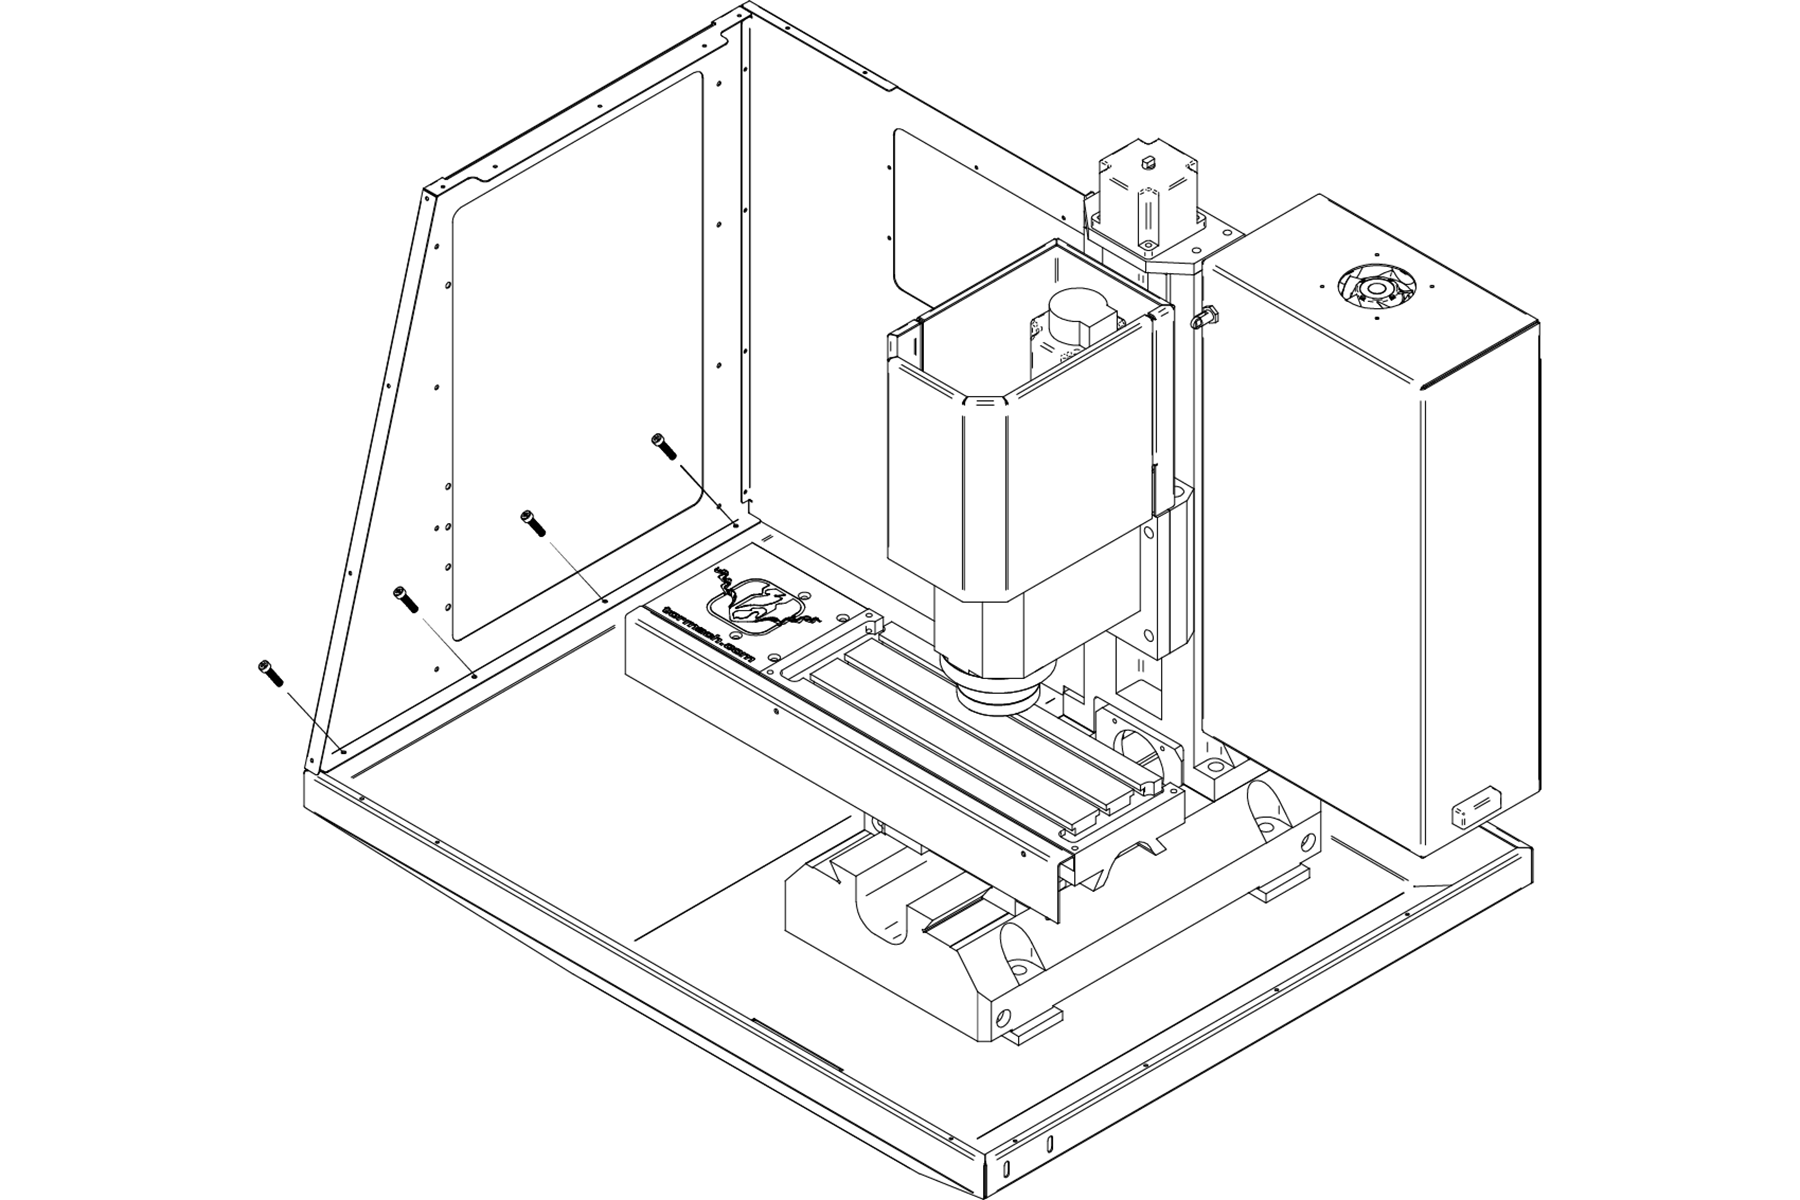
- Attach the column cover to the machine column with three M6 × 1.0 - 12 screws.
- Attach the left rear panel to the column cover with
-
Attach the left rear panel to the left chip pan with three M6 × 1.0 - 12 screws.
Left rear panel attached to the left chip pan.
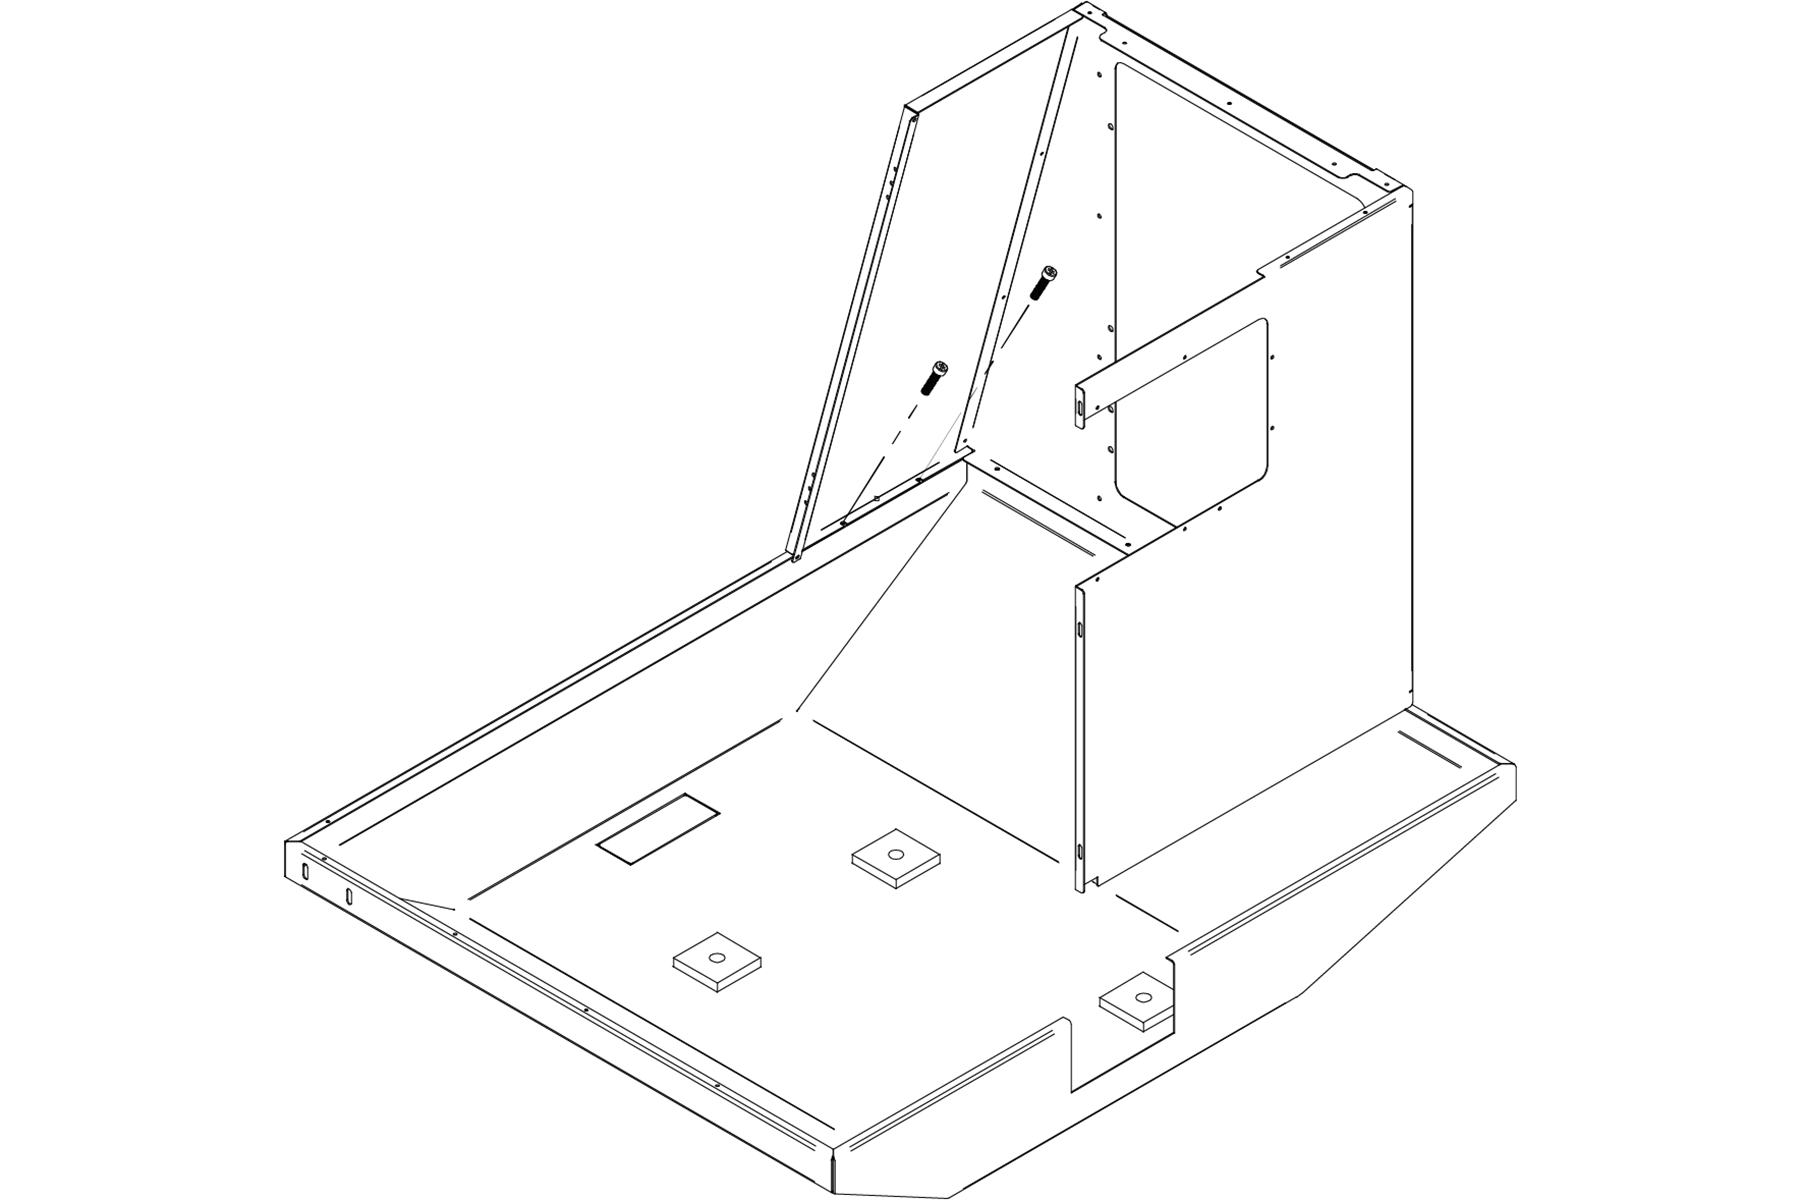
- Loosen the four bolts that secure the machine to the chip pan. This allows for correct positioning of the enclosure.
-
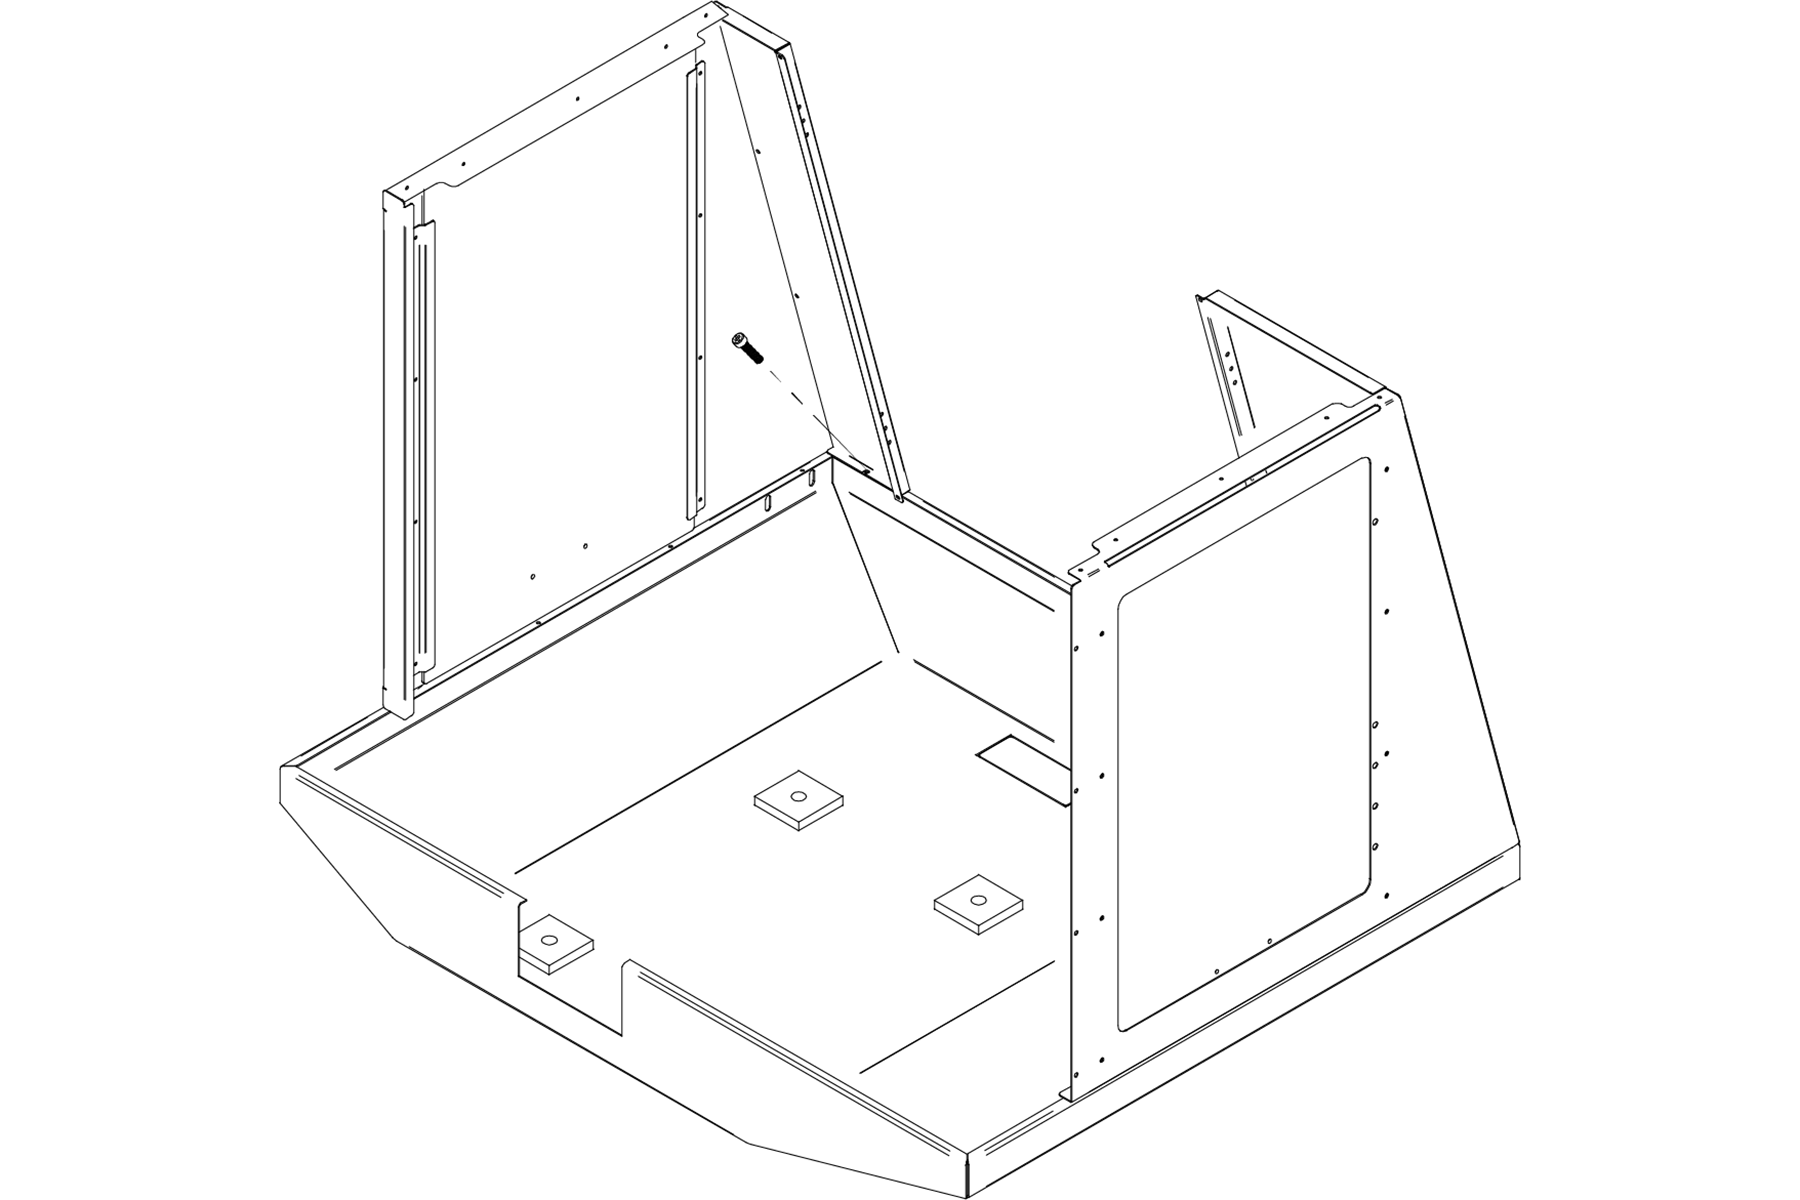
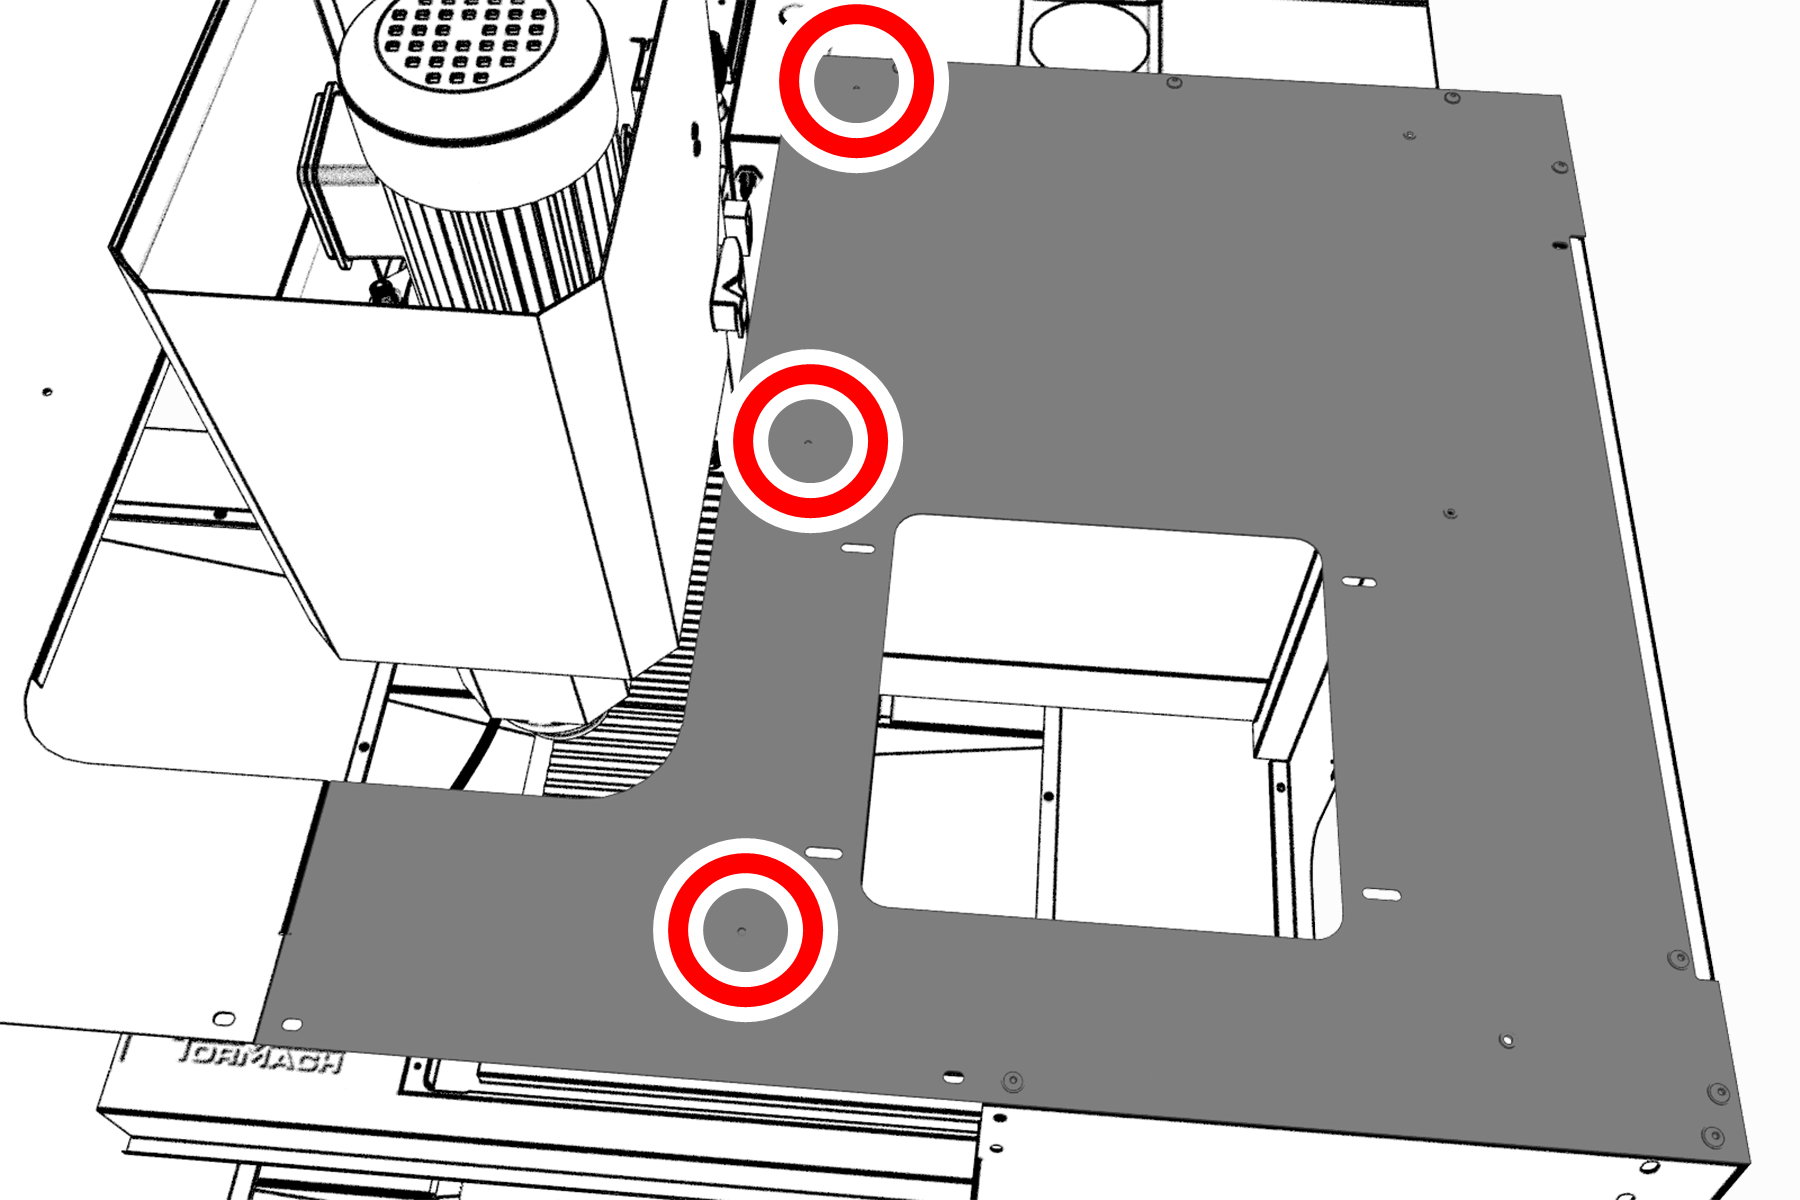
Put a strip of butyl tape on the top of the chip pan in the locations shown in the following image.

Locations for butyl tape on the top of the chip pan.
-
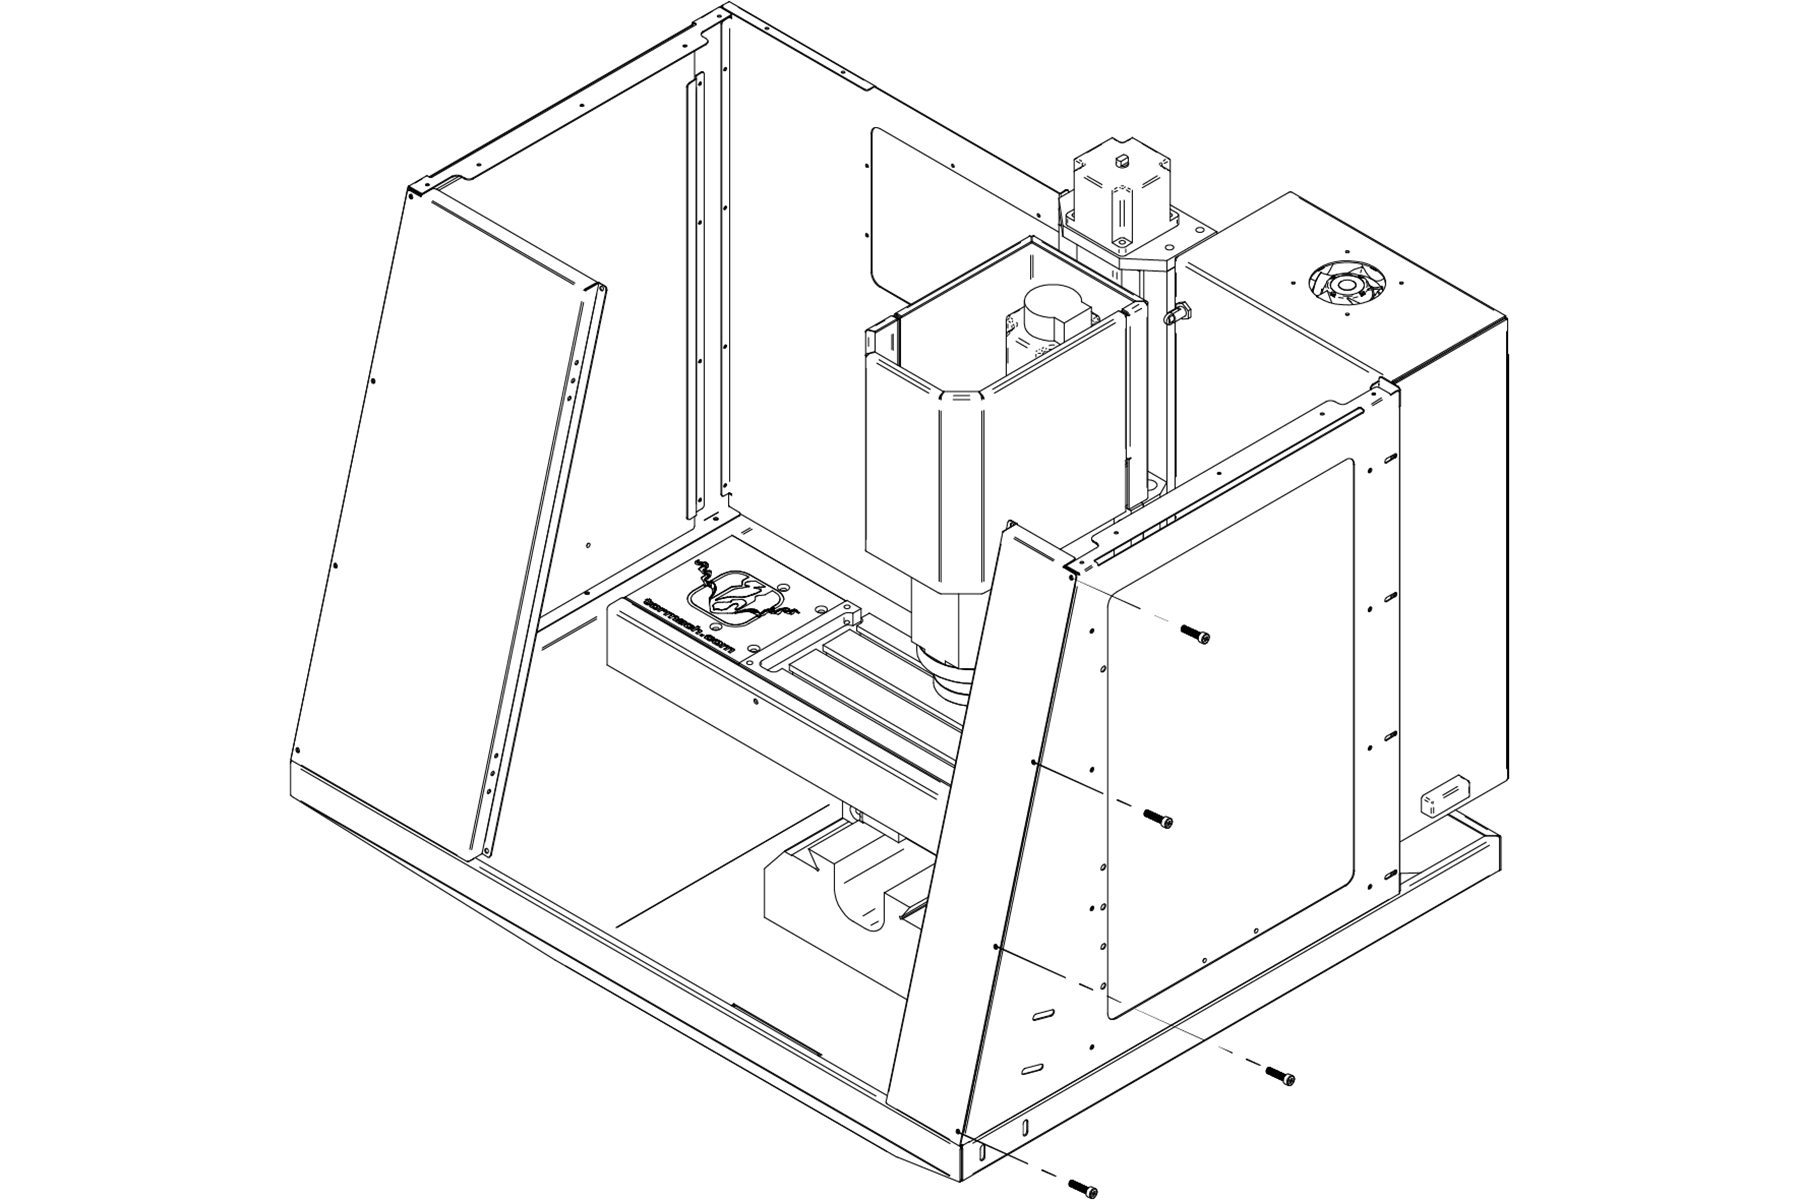
Attach the ATC cover to the opening on the inside of the left rear panel with seven 10-32 × 3/8-inch Phillips screws. The screw heads must face the inside of the left back panel when it's installed.

ATC cover attached to the opening on the inside of the left rear panel.
If the screw heads aren't facing inside, the screws could interfere with the oil line routing.
- Serial Numbers 80003-80075 Only If your machine's serial number is between 80003 and 80075, you must drill and tap three holes on the machine column before you install the left rear panel. Complete the following steps:
- Use the left back panel as a template: put it on the left rear side of the chip pan, and mark the three holes on the machine column.
- Set the left rear panel aside.
- Make three hole locations in the machine column with the #21 drill and 10-32 tap (both provided).
-
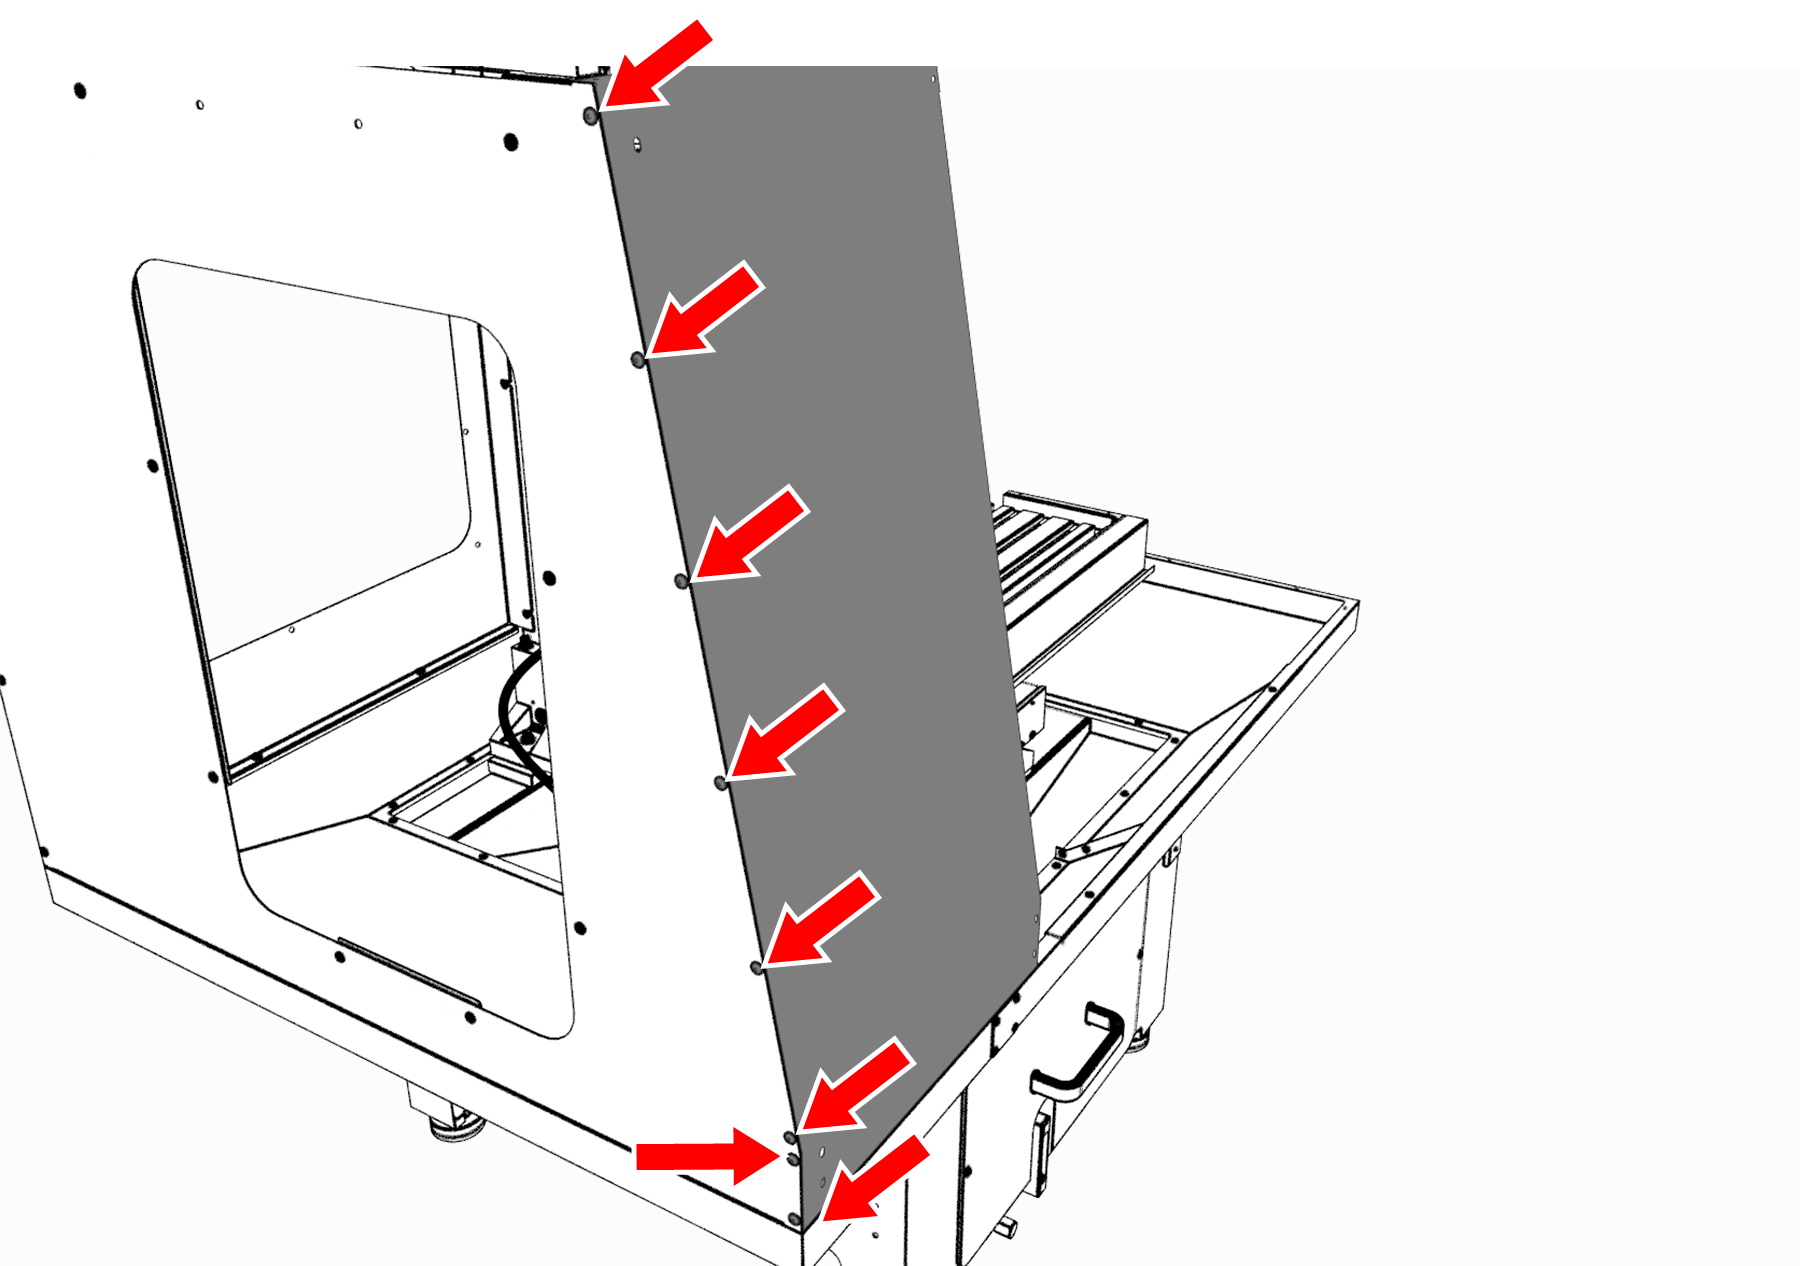
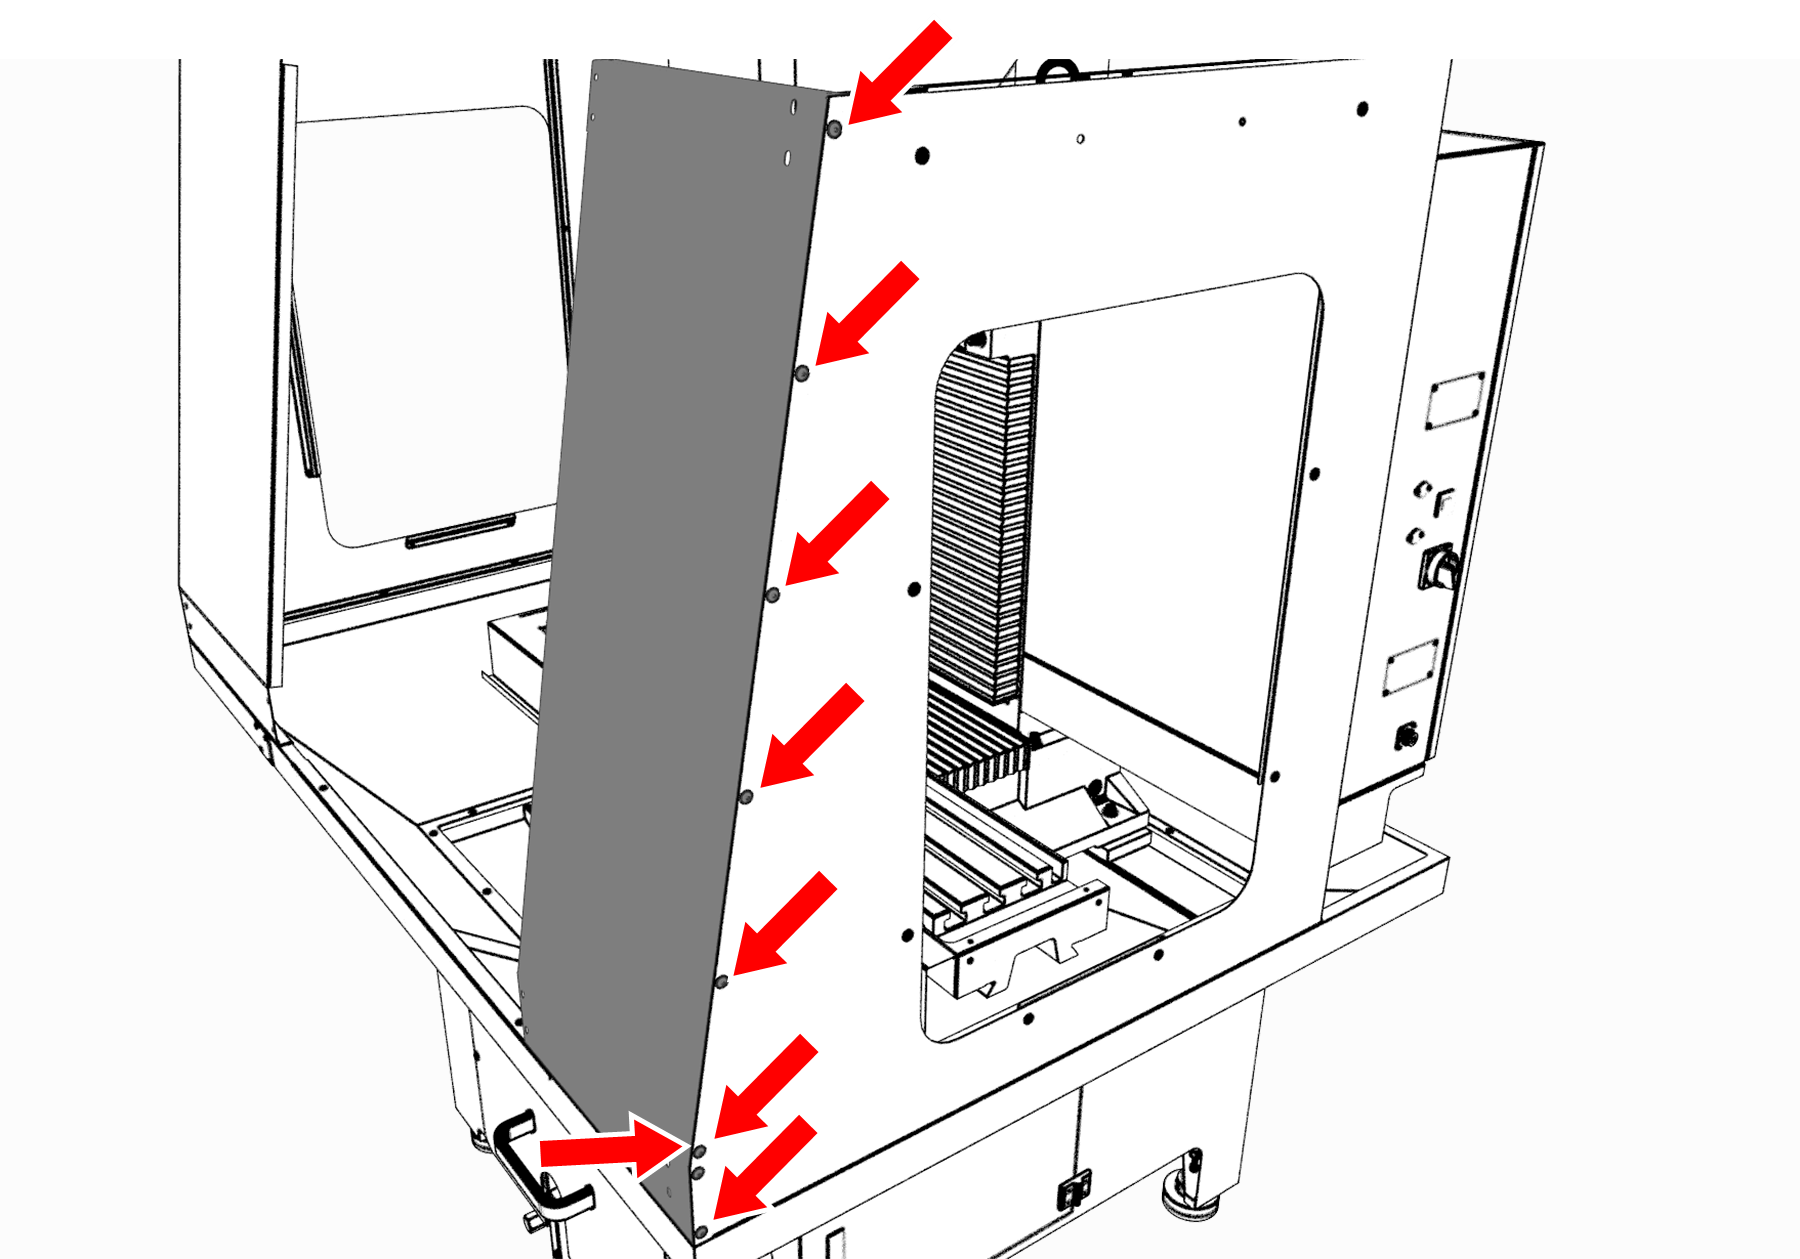
Attach the left rear panel to the machine column with three 10-32 × 3/8-inch Phillips screws.

Left rear panel attached to the machine column.
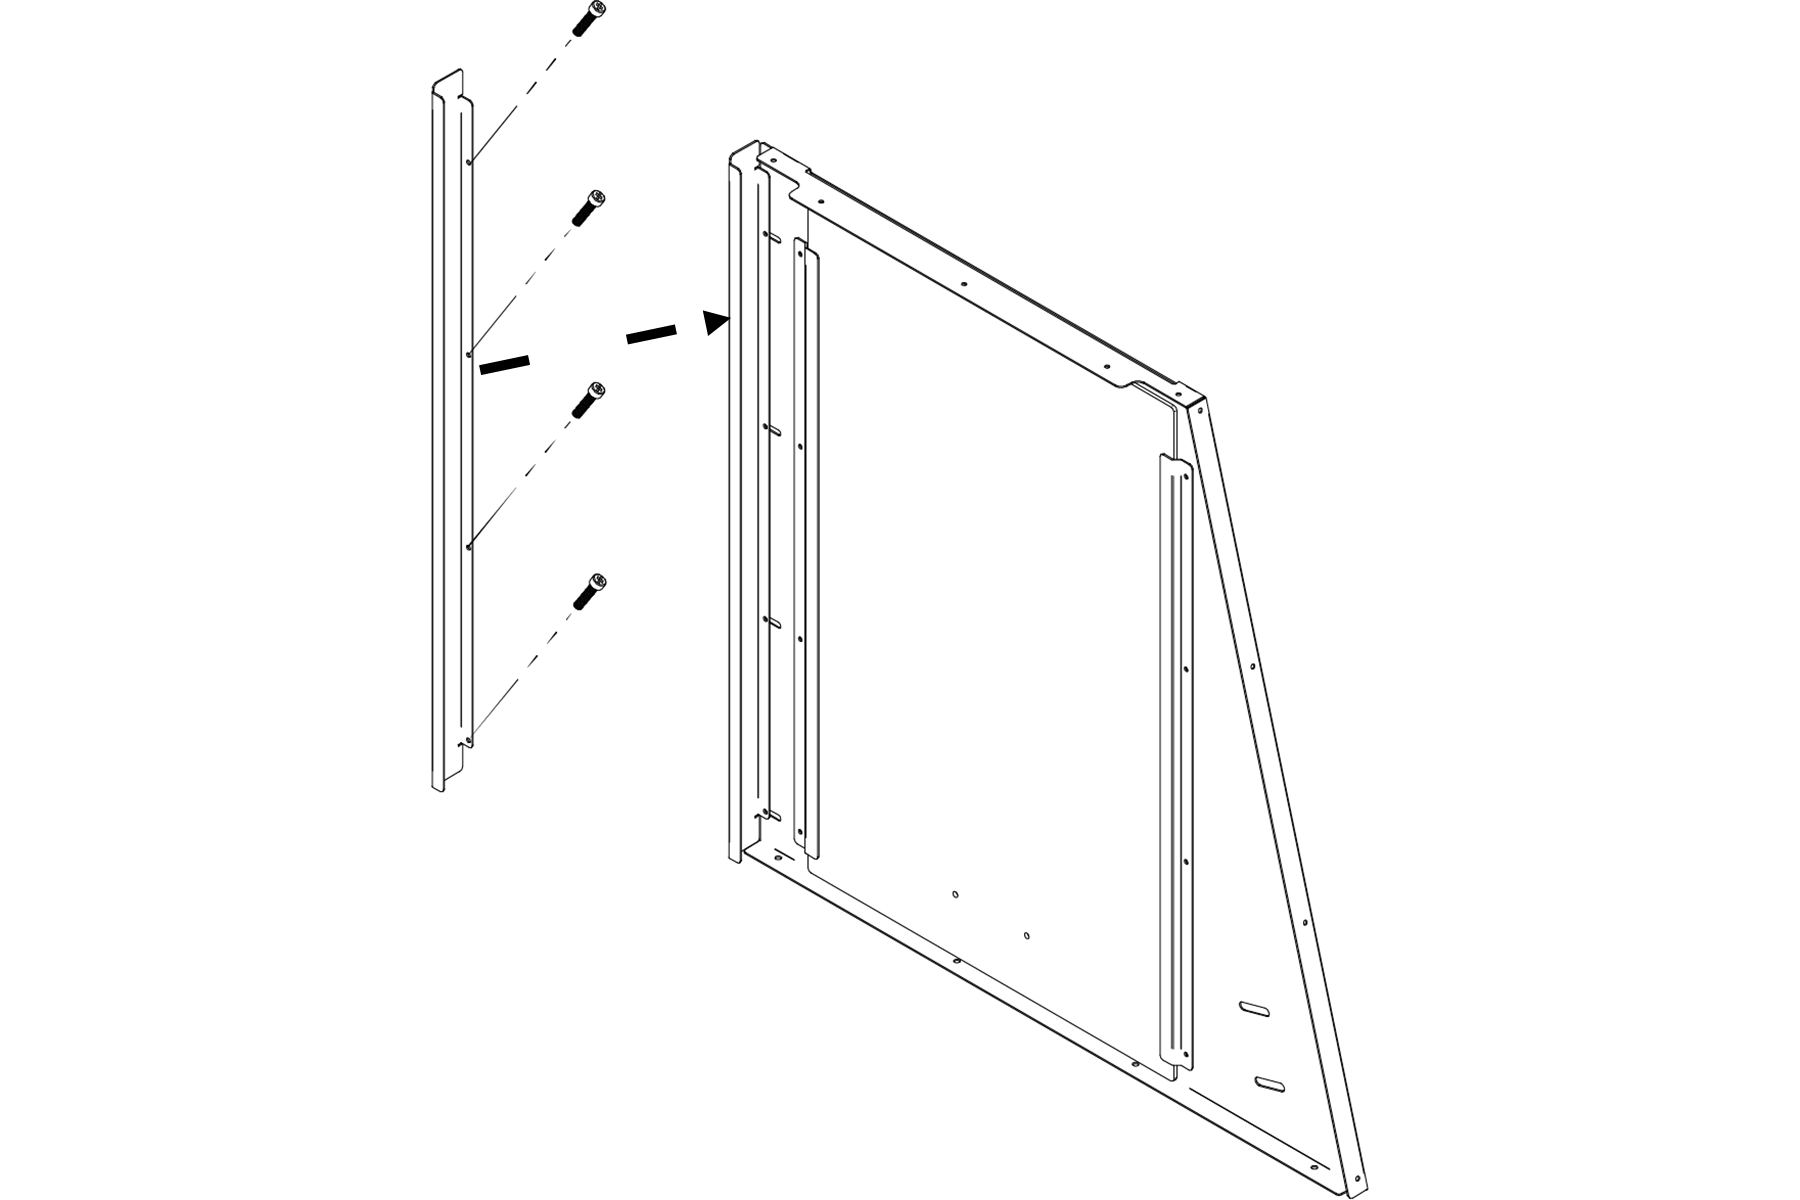
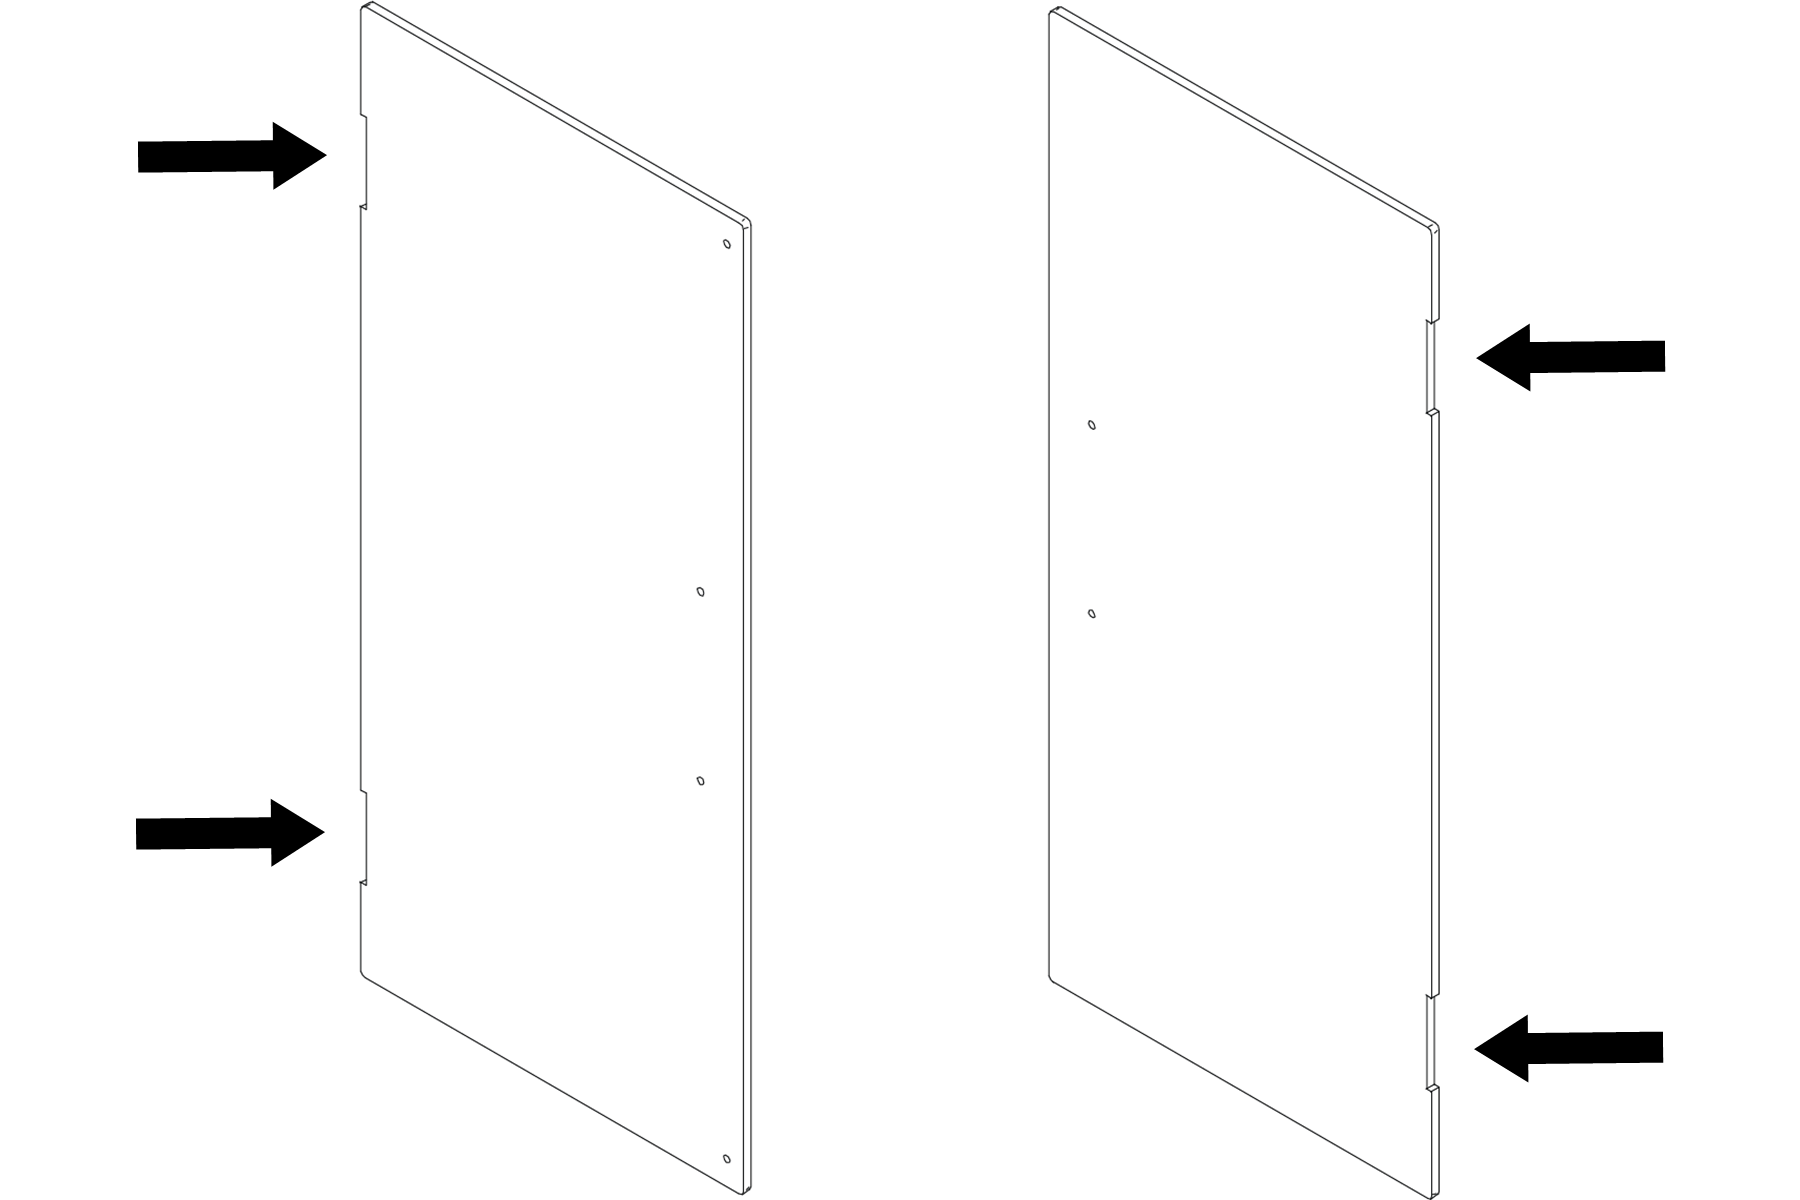
Install the Left Side Panel
-
Attach the left side panel to the left rear panel with

Left side panel attached to the left rear panel.
-
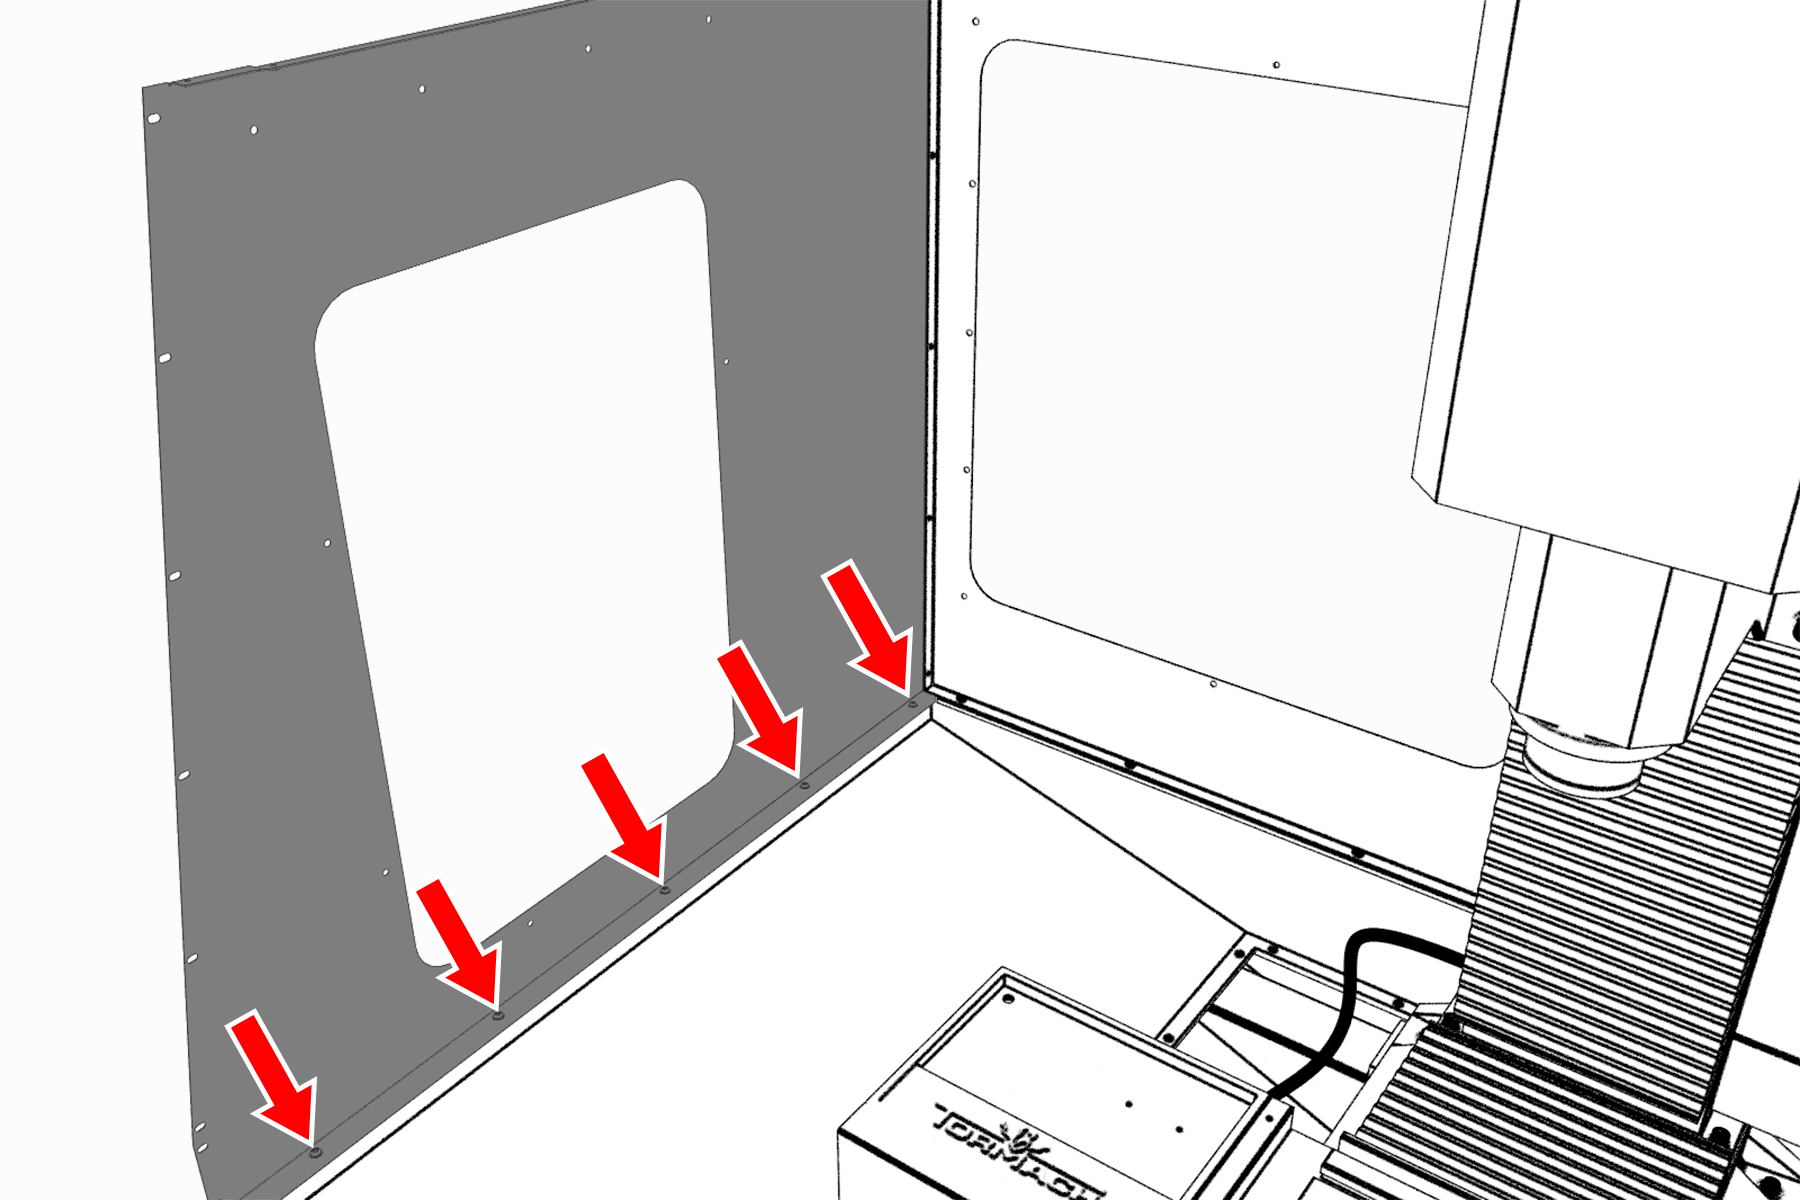
Attach the left side panel to the left chip pan with

Left side panel attached to the left chip pan.
-
Attach the left side panel to the left rear panel with

Left side panel attached to the left rear panel.
-
Attach the left side panel to the left chip pan with

Left side panel attached to the left chip pan.
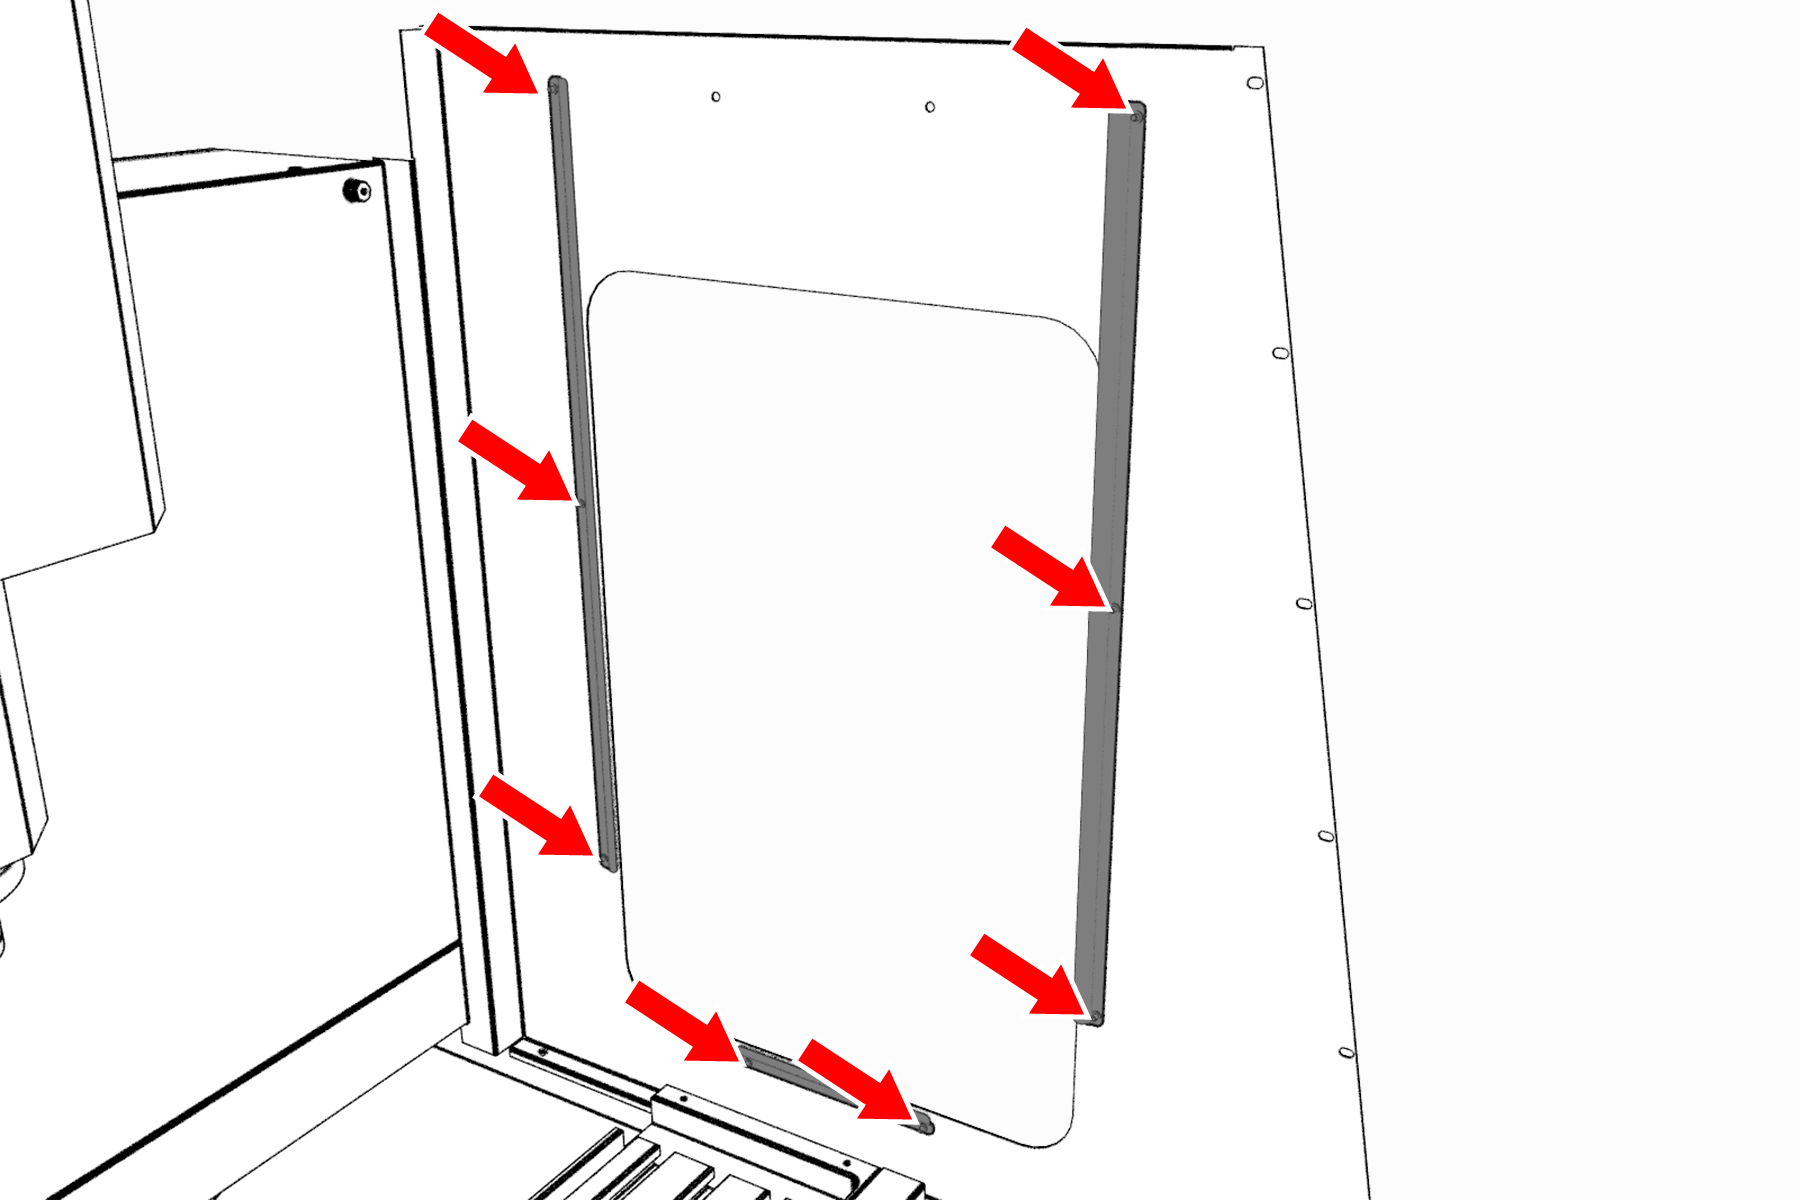
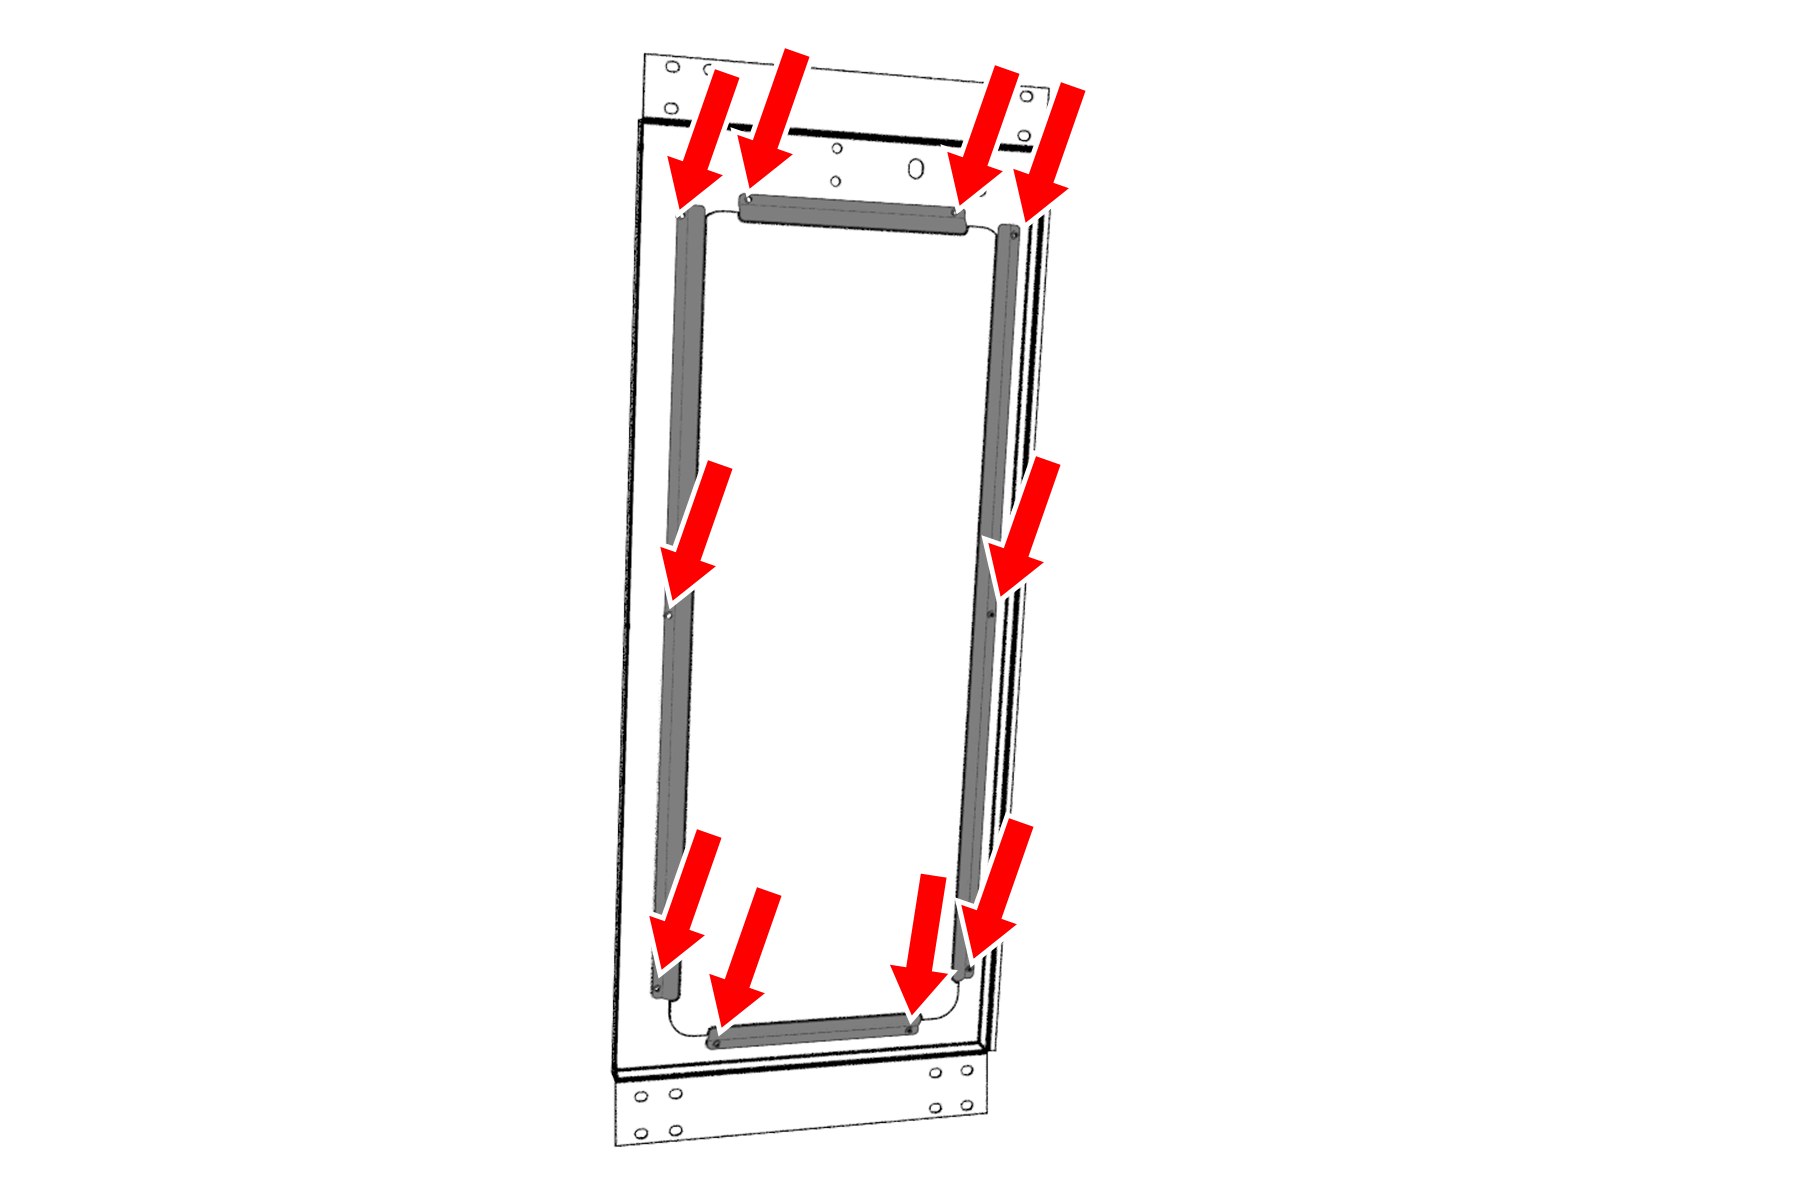
Install the Left Side Window Retainers
To make it easier to install all components, don't install the side windows yet. Wait until later in the procedure.
- Push a strip of rubber window trim on to the edges of:
- Two light gray vertical window retainers
One light gray horizontal window retainer
When finished, use shears or a knife to cut the excess trim.
-
Loosely install two vertical window retainers
Don't fully tighten the screws. Leaving the window retainers loose makes it easier to install the side windows.
-
Loosely attach one horizontal window retainer (light gray) to the bottom of the left side panel's window opening with two M5 × 0.8 - 10 screws.

Side window retainers attached to the left side panel.

To make it easier to install all components, don't install the side windows yet. Wait until later in the procedure.
-
Loosely install two vertical window retainers on both sides of the left side panel's window opening with two sets of
Don't fully tighten the screws. Leaving the window retainers loose makes it easier to install the side windows.

Left side window retainers attached to the left side panel.
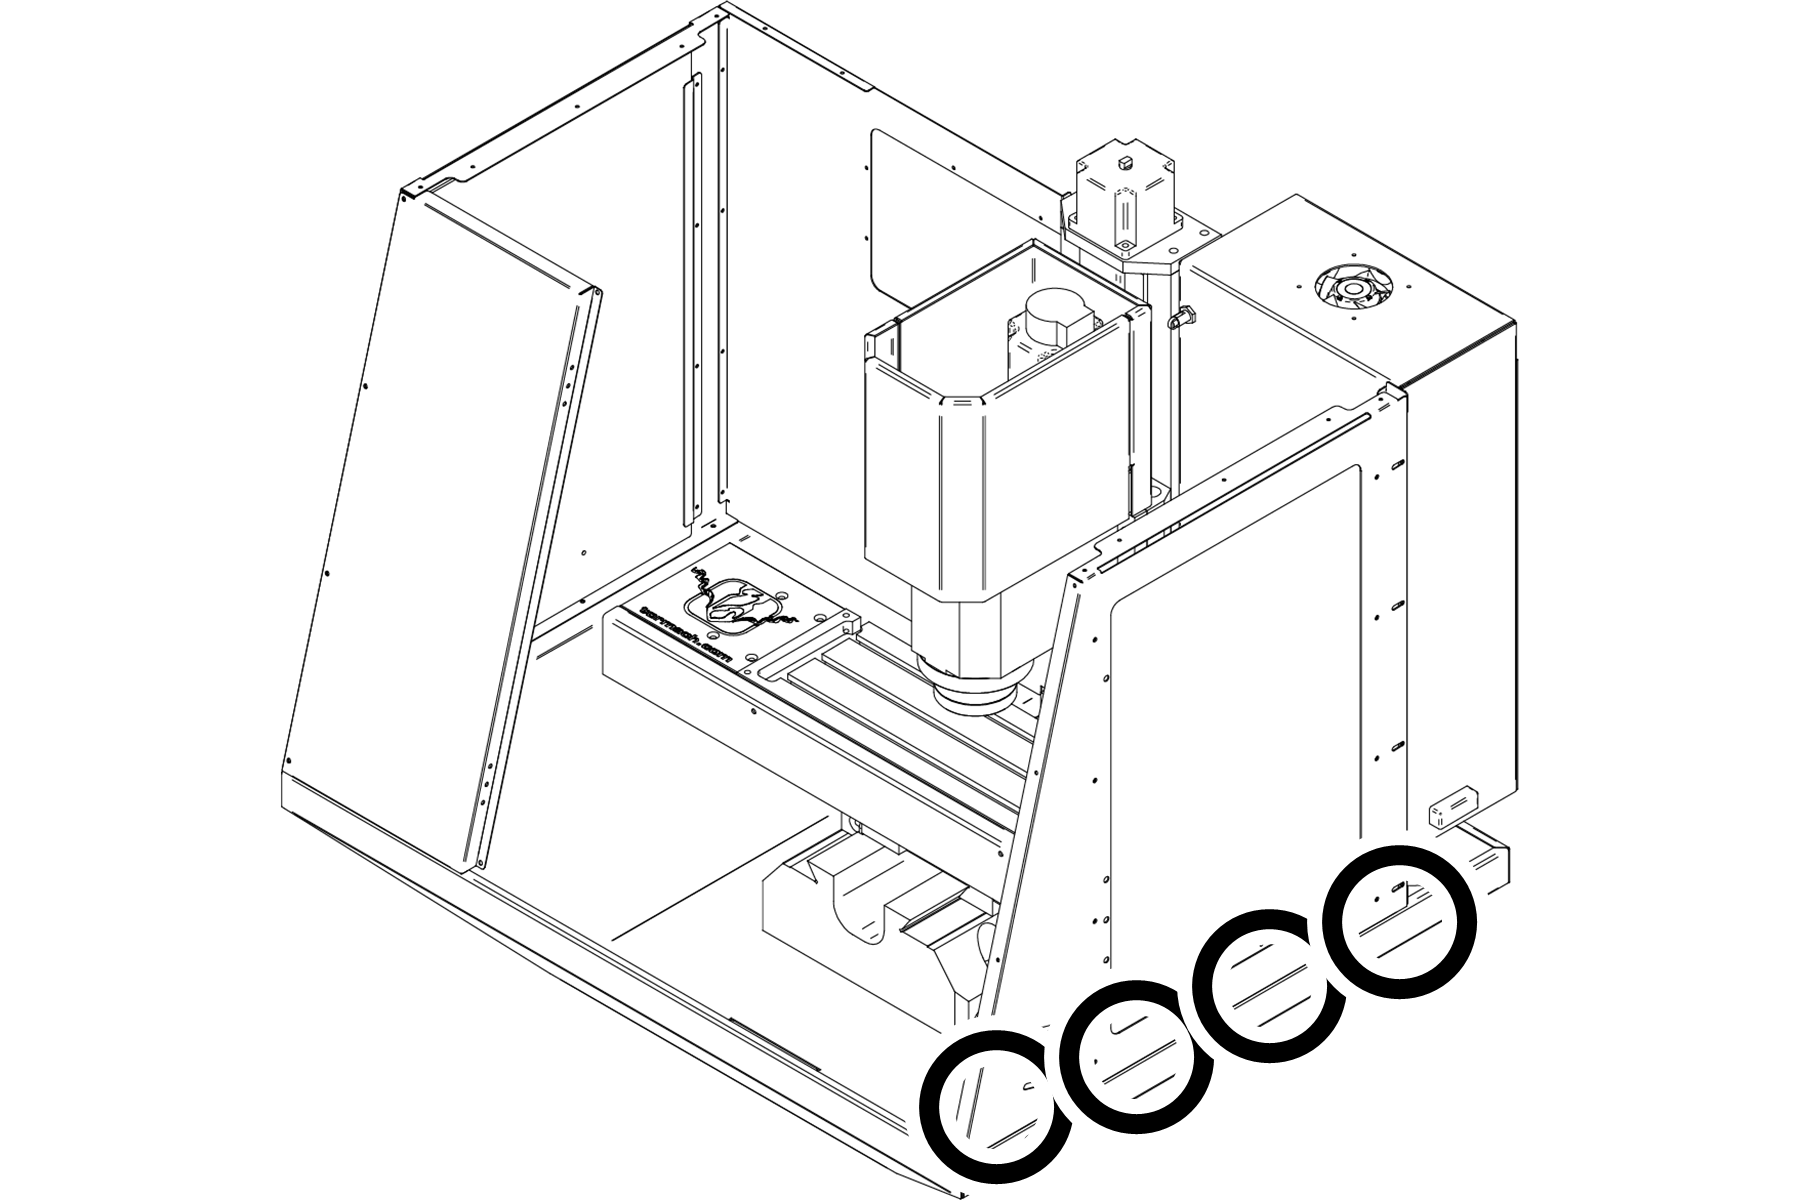
Install the Left Front Panel
-
Attach the left front panel to the left chip pan with

-
Attach the left front panel to the left side panel with

-
Attach the left front panel to the left chip pan with
-
Attach the left front panel to the left side panel with
- Loosely attach two 10-32 × 3/8-inch Phillips screws to the chip pan.
-
Slide the left front panel over the two screws that you installed in Step 1.

-
Attach the left front panel to the left side panel with

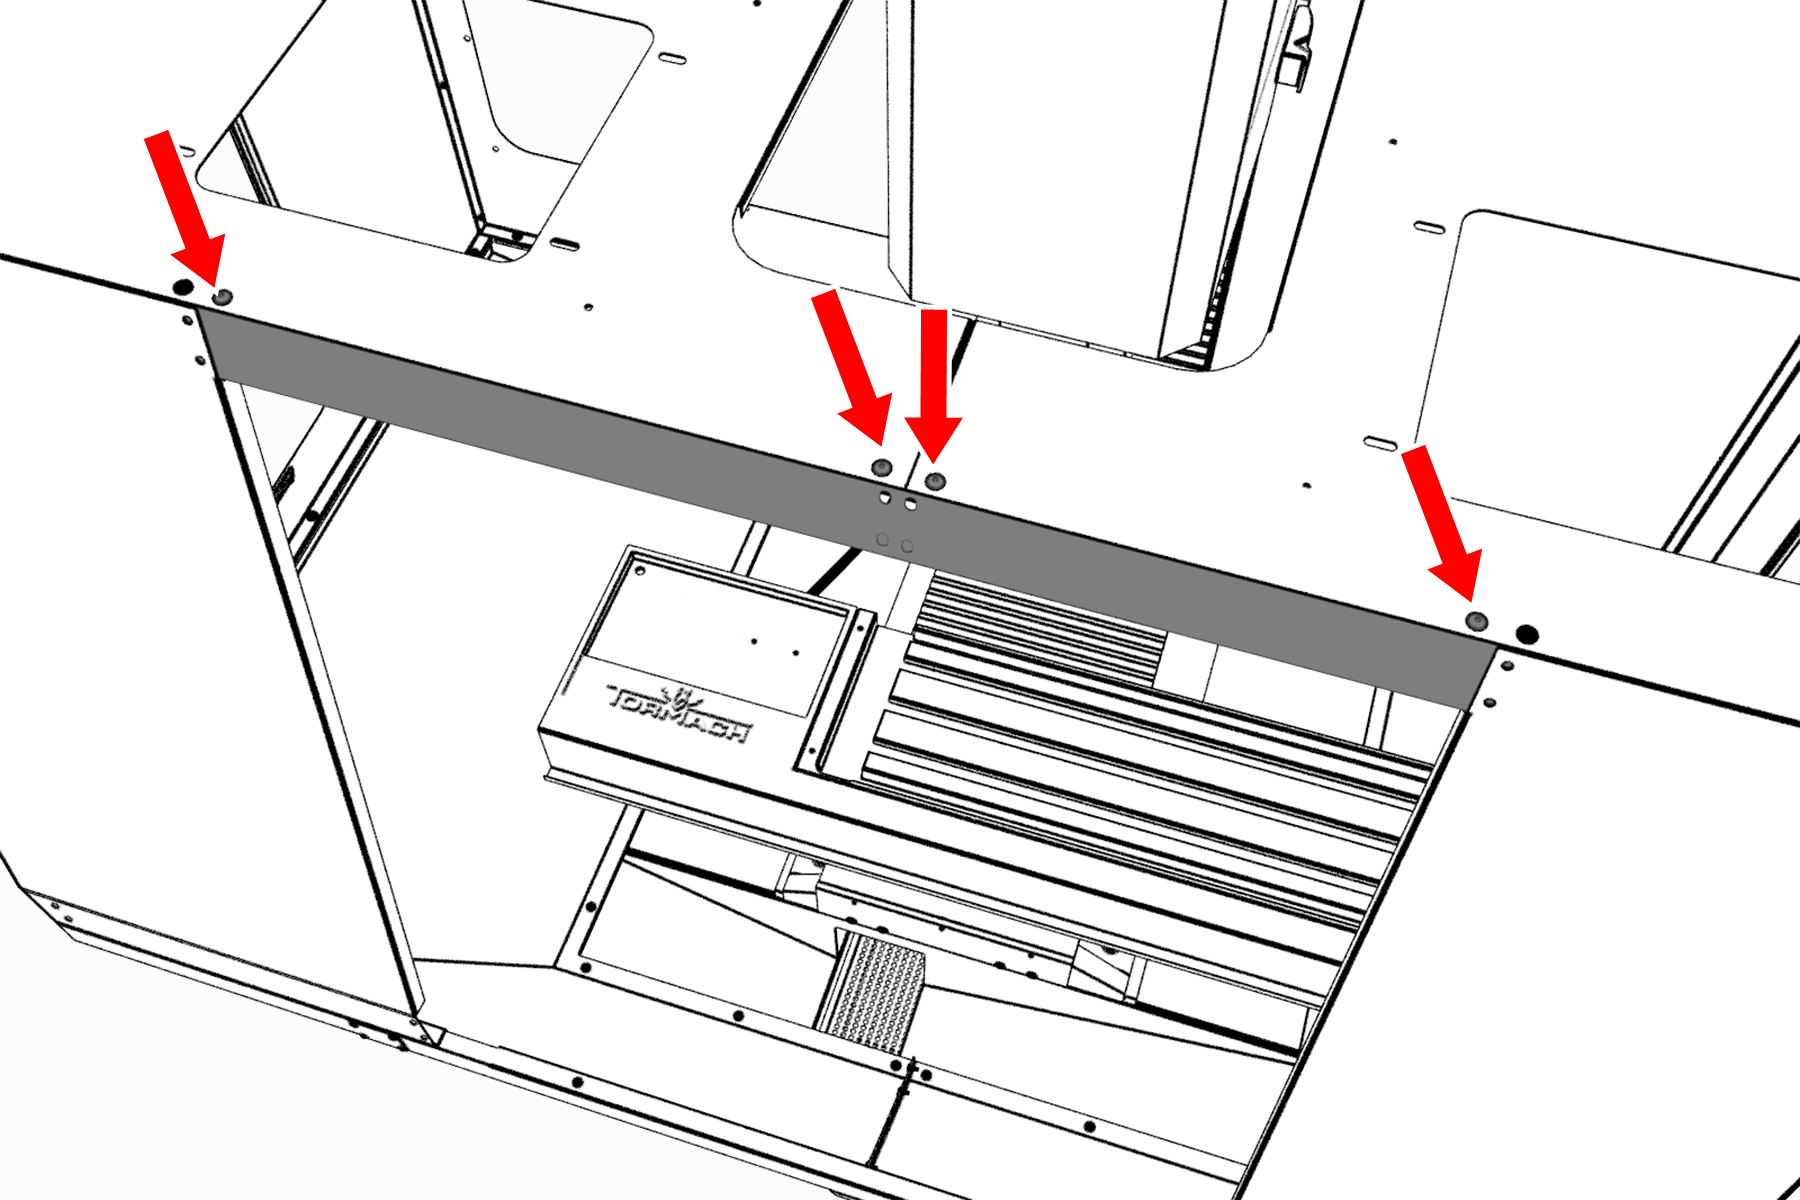
Install the Enclosure Splice Plate (1100M/MX, 770M/MX Only)
- Find the three installed M5 × 0.8 - 10 screws on the right side of the electrical cabinet.
- Remove and set aside the three M5 × 0.8 - 10 screws.
- Attach the right rear side panel to the electrical cabinet with the three M5 × 0.8 - 10 screws that you set aside in Step 2.
Install the Right Rear Panel (1100M/MX, 770M/MX Only)
- Find the three installed M5 × 0.8 - 10 screws along the top of the electrical cabinet.
- Remove and set aside the three M5 × 0.8 - 10 screws.
- Attach the right rear top panel to the electrical cabinet with the three M5 × 0.8 - 10 screws that you set aside in Step 2.
Install the Right Side Panel
- Attach the right side panel to the enclosure splice plate with four M5 × 0.8 - 10 screws.
-
Attach the right side panel to the right chip pan with four M6 × 1.0 - 12 screws.
-
Loosely install two vertical window retainers on both sides of the right side panel's window opening with two sets of four 10-32 × 3/8-inch Phillips screws.

-
Attach the right side support to the right side panel with four 10-32 × 3/8-inch Phillips screws.

-
Attach the right side panel to the right chip pan with four 10-32 × 3/8-inch

Right side panel attached to the chip pan.
- (Optional) If required, pull the chip pan forward while pushing the machine backward until you can secure the screws in place.

Install the Right Side Window Retainers (1100M/MX, 770M/MX Only)
To make it easier to install all components, don't install the side windows yet. Wait until later in the procedure.
- Push a strip of rubber window trim on to the edges of:
- Two light gray vertical window retainers
One light gray horizontal window retainer
When finished, use shears or a knife to cut the excess trim.
-
Loosely install two vertical window retainers
Don't fully tighten the screws. Leaving the window retainers loose makes it easier to install the side windows.
-
Loosely attach one horizontal window retainer (light gray) to the bottom of the right side panel's window opening with two M5 × 0.8 - 10 screws.

Side window retainers attached to the right side panel.
Install the Right Front Panel
-
Attach the right front panel to the right chip pan with two M6 × 1.0 - 12 screws.

-
Attach the right front panel to the right side panel with

-
Attach the right front panel to the right chip pan with two M6 × 1.0 - 12 screws.
-
Attach the right front panel to the right side panel with
- Loosely attach two 10-32 × 3/8-inch Phillips screws to the chip pan.
-
Slide the right front panel over the screw that you installed in Step 1.

-
Attach the right front panel to the right side panel with

Install the Left Top Panel (1100M/MX, 770M/MX Only)
-
Attach the left top panel to the panels on the left side of the enclosure with 12 M5 × 0.8 - 10 screws.

Left top panel attached to the left side of the enclosure.
-
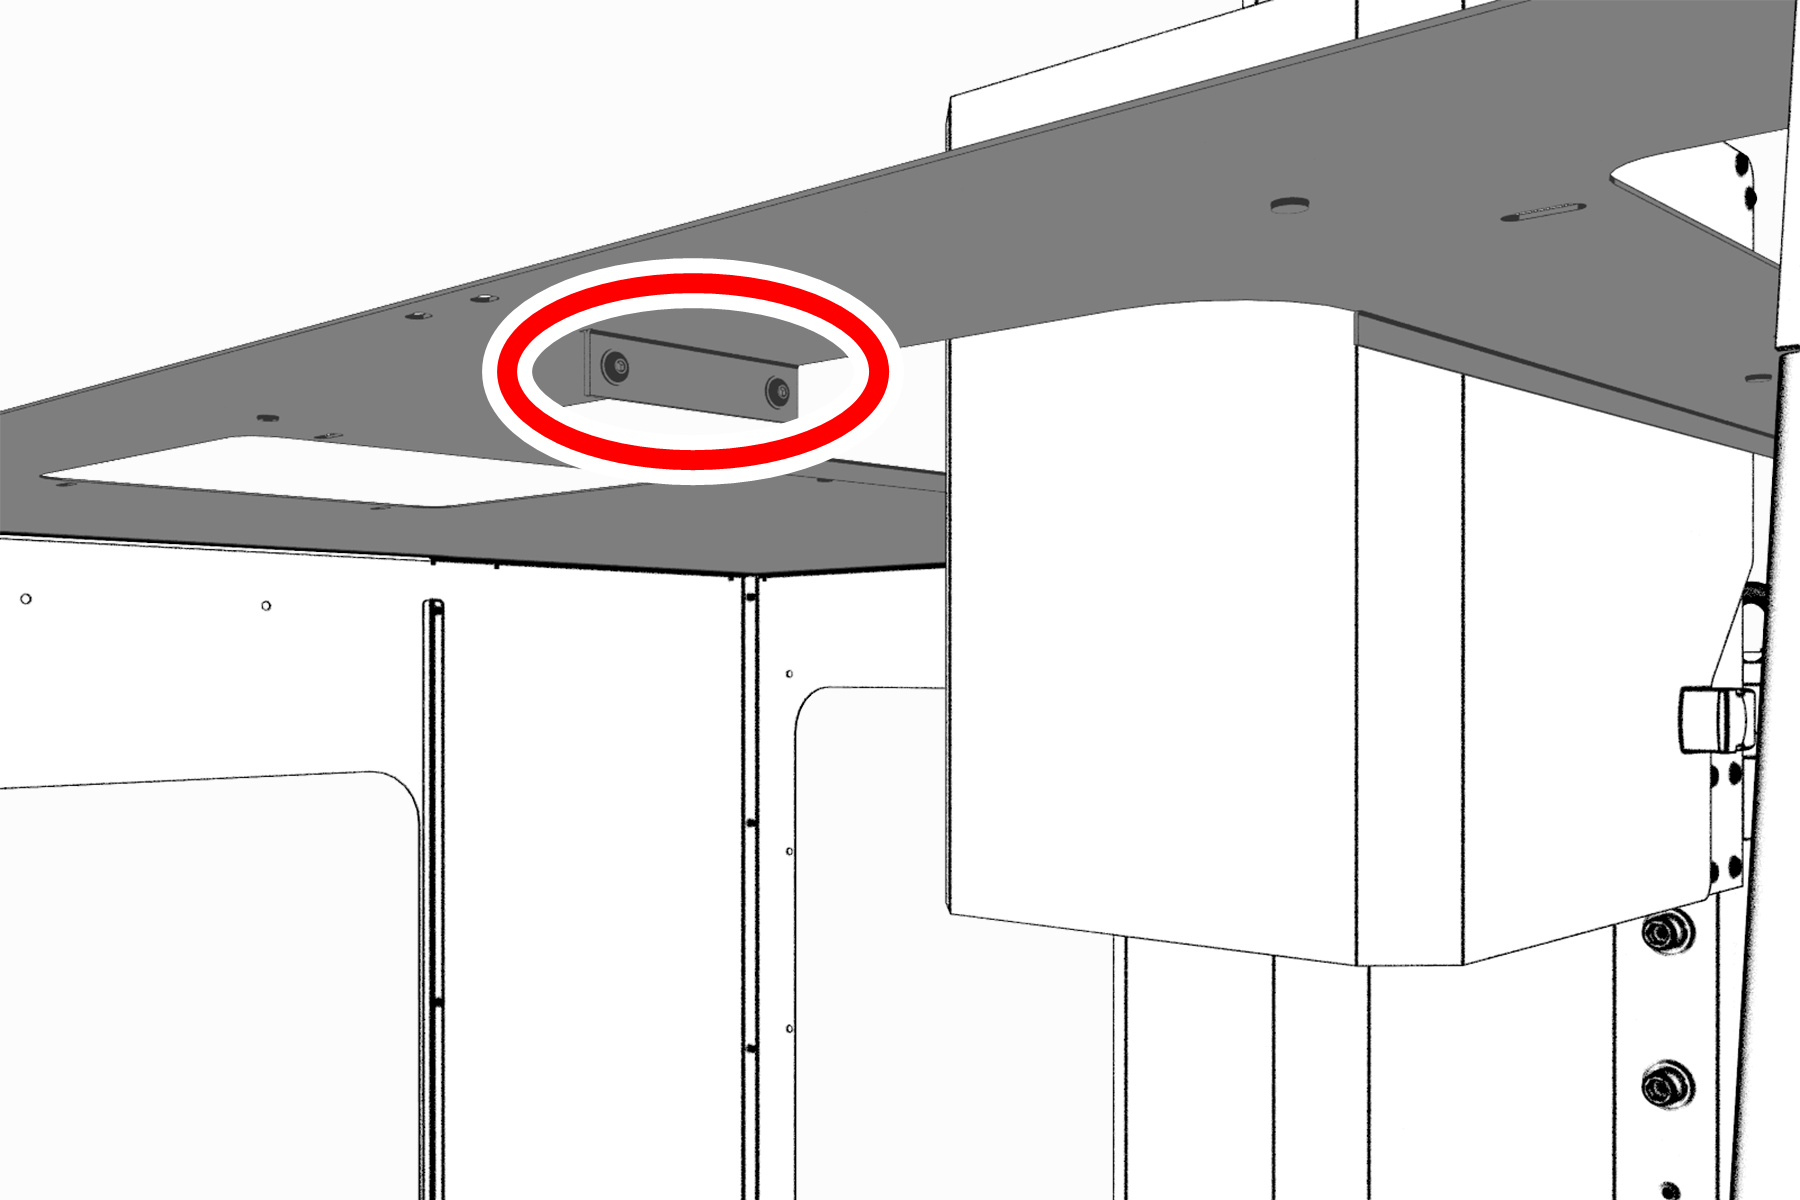
Attach two cable tie anchors to the left top panel with two M5 × 0.8 - 10 screws.

Location to attach two cable tie anchors.
Install the Right Top Panel (1100M/MX, 770M/MX Only)
-
Attach the right top panel to the panels on the right side of the enclosure with nine M5 × 0.8 - 10 screws.

-
Connect the left and right top panels with

-
Attach three cable tie anchors to the right top panel with three M5 × 0.8 - 10 screws.

-
Attach the right top panel to the panels on the right side of the enclosure with nine M5 × 0.8 - 10 screws.
-
Connect the left and right top panels with
-
Attach three cable tie anchors to the right top panel with three M5 × 0.8 - 10 screws.
Install the Top Panel (PCNC 440 Only)
- Loosely attach two short, vertical window retainers to both sides of the top panel with three sets of 10-32 × 3/8-inch Phillips screws.
-
Loosely attach the long, vertical window retainer to the top panel with three 10-32 × 3/8-inch Phillips screws.

Window retainers attached to the top panel.
- Remove and discard the protective plastic film from the window.
- Slide the window into the three installed window retainers. Take care not to scratch the window.
-
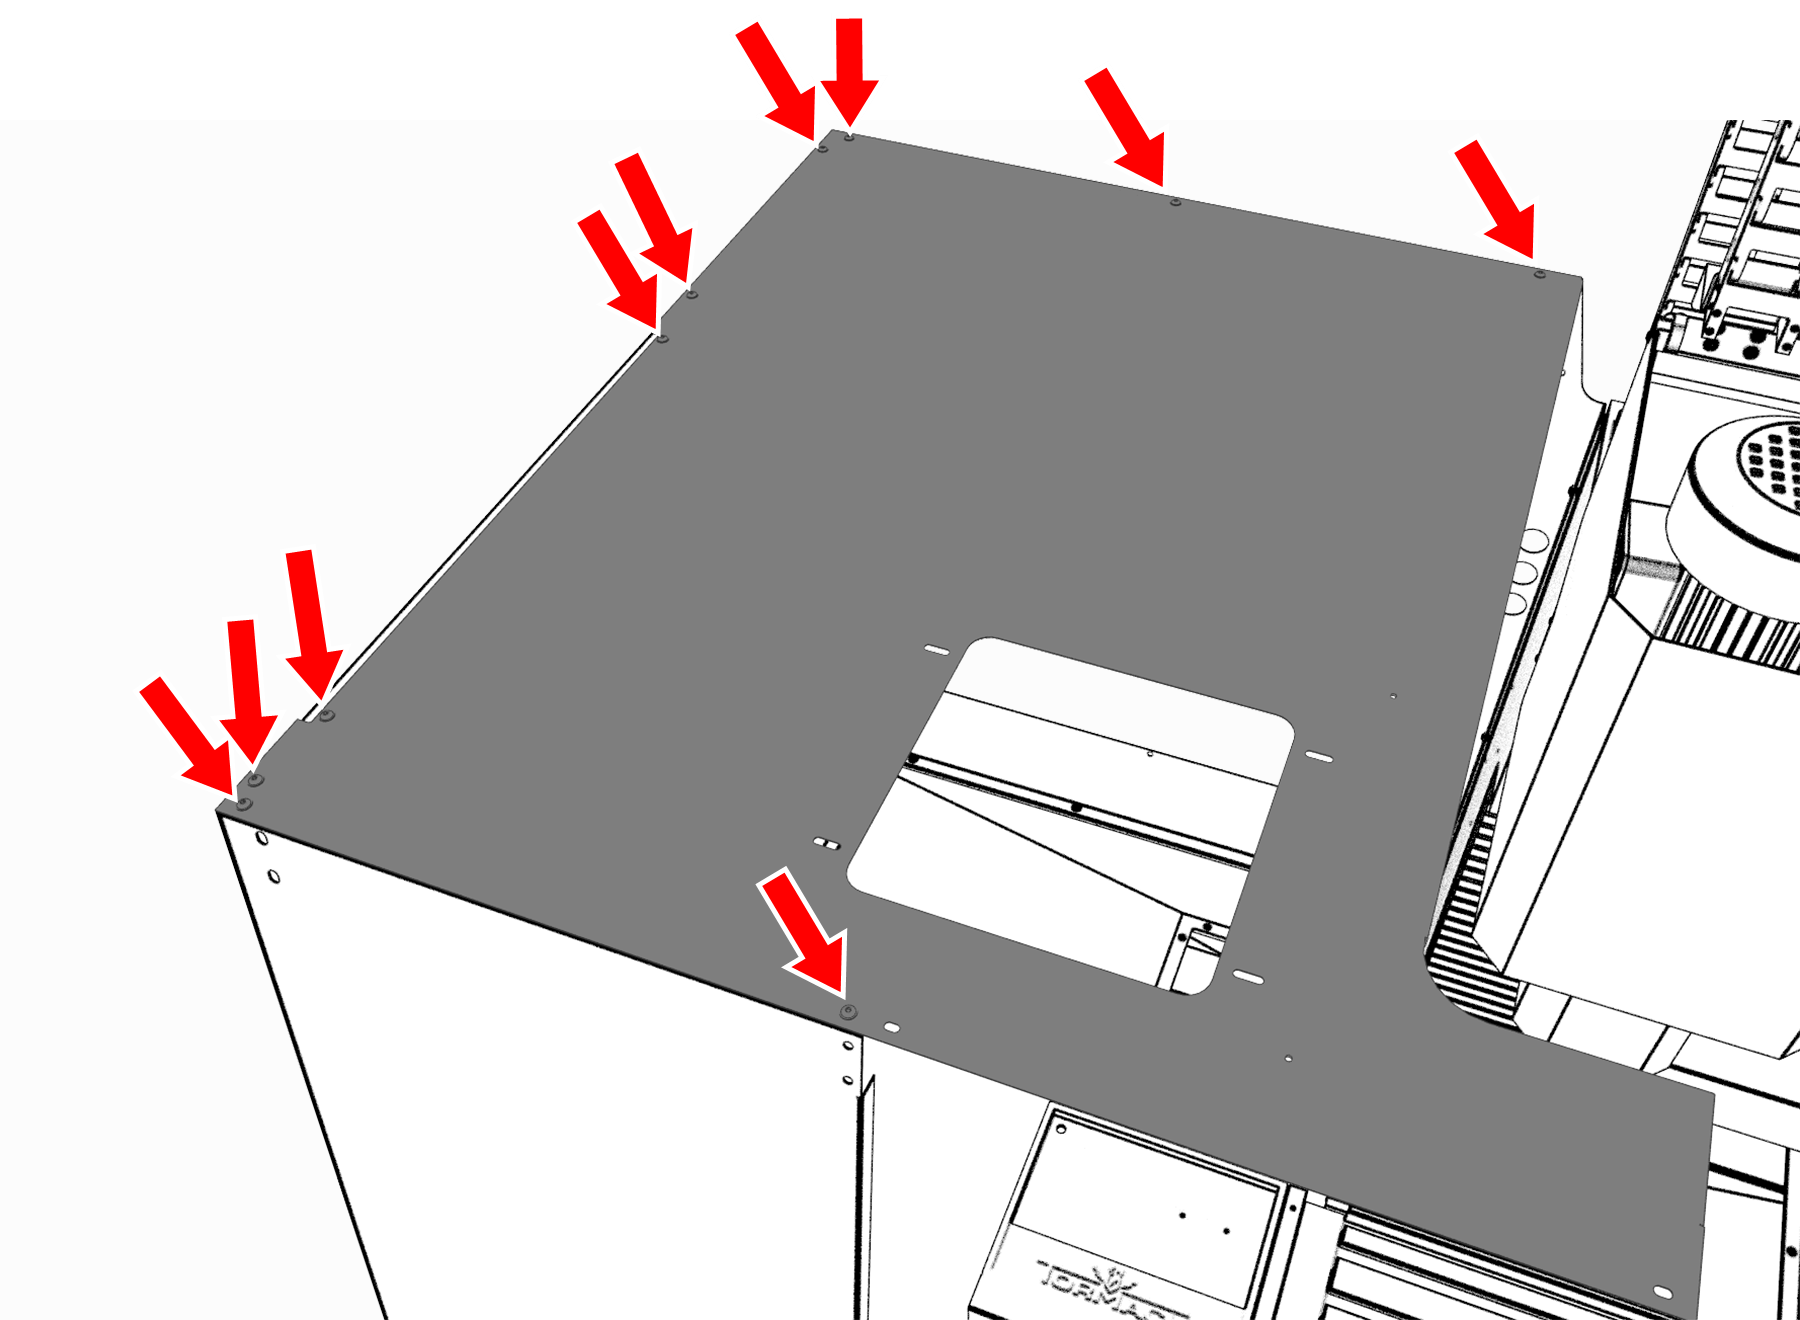
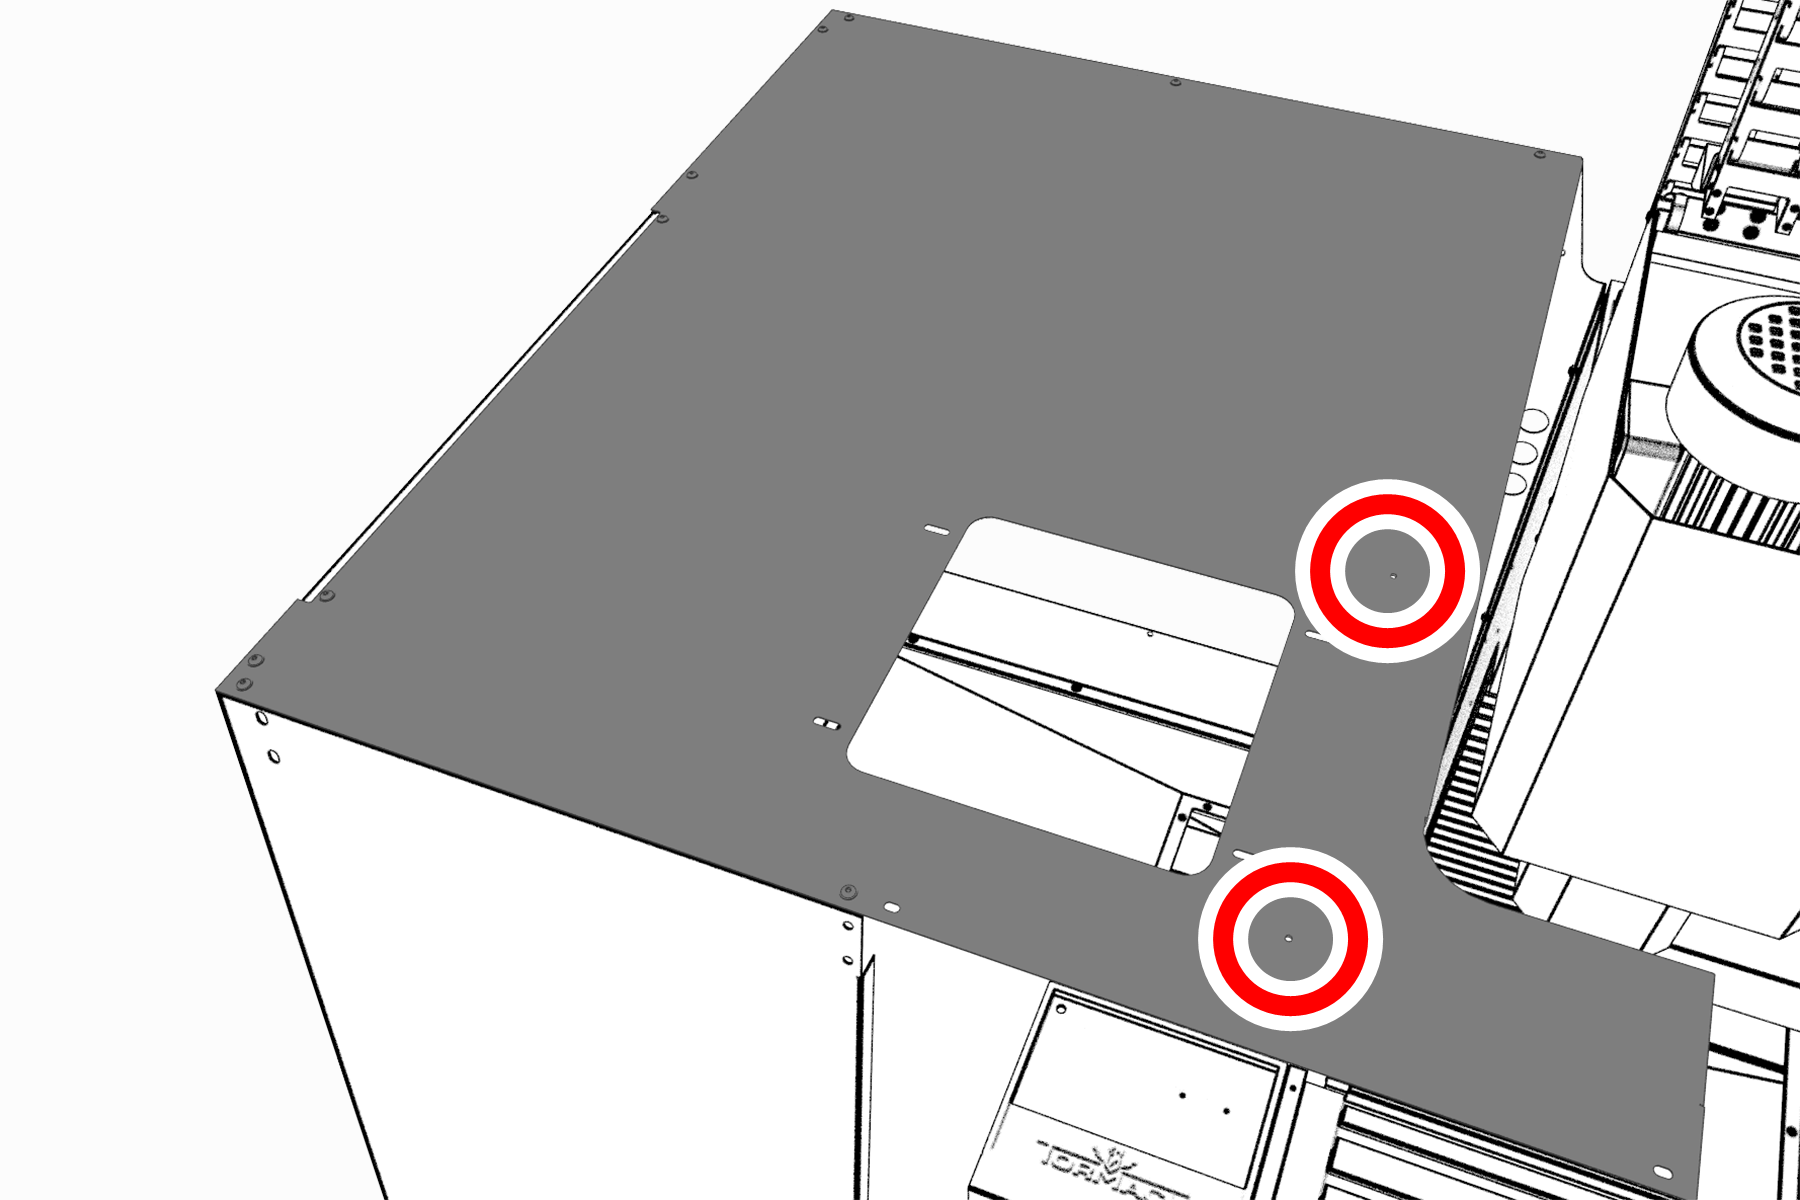
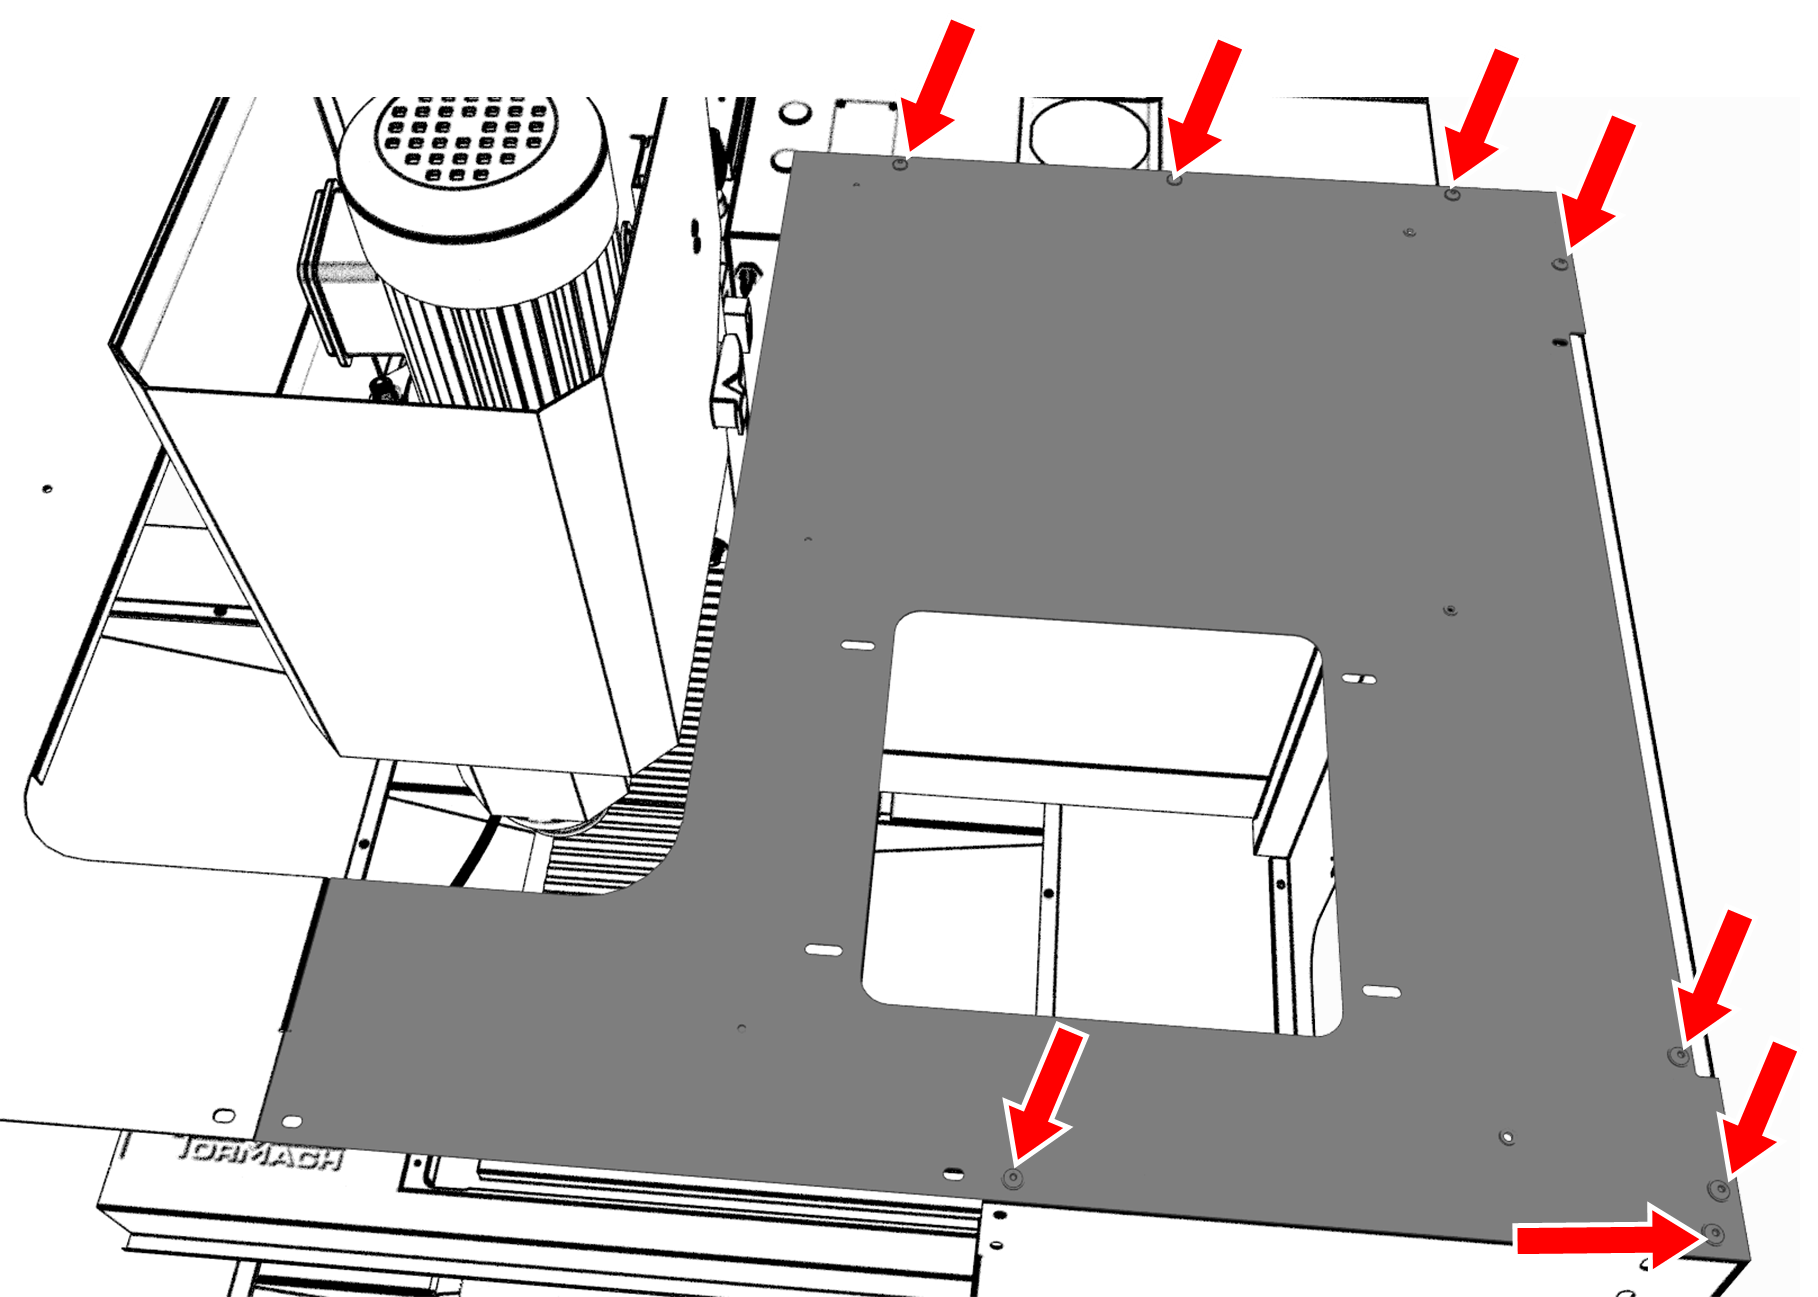
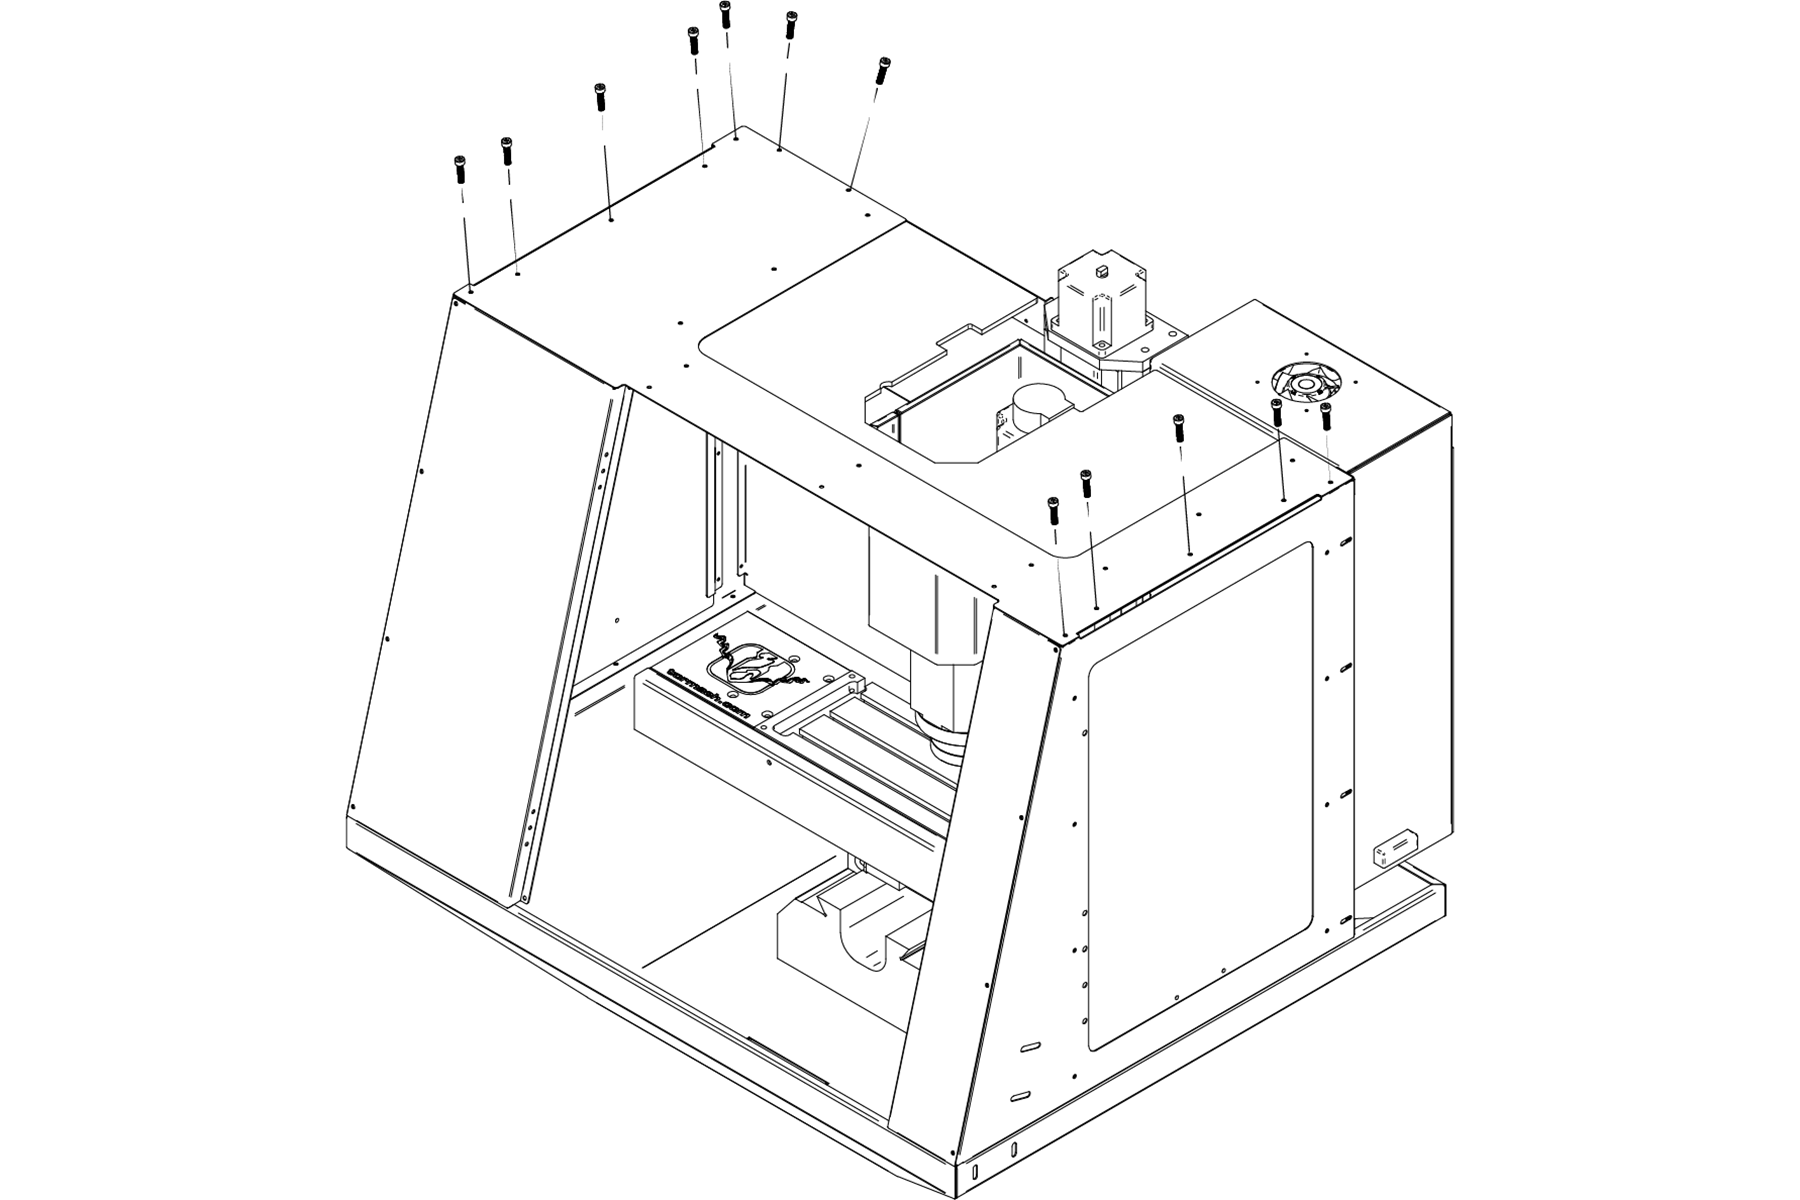
Attach the top panel assembly to the enclosure with 12 10-32 × 3/8-inch Phillips screws, as shown in the following image.

Top panel attached to the enclosure.
Install the Upper Front Panel
-
Attach the front upper panel (with the threaded holes facing up) to the right and left front panels with

Front upper panel attached to the right and left front panels.
-
Attach the front upper panel to the

Front upper panel attached to the right and left top panels.

-
Attach the front upper panel (with the threaded holes facing up) to the right and left front panels with

-
Attach the front upper panel to the

Install the Front Lower Panel
-
Attach the front lower panel to the right and left front panels with

Front lower panel attached to the right and left front panels.
-
Attach the front lower panel to the right and left chip pans with four M5 × 0.8 - 10 screws.

Front lower panel attached to the right and left chip pans.
-
Attach the front lower panel to the right and left front panels with

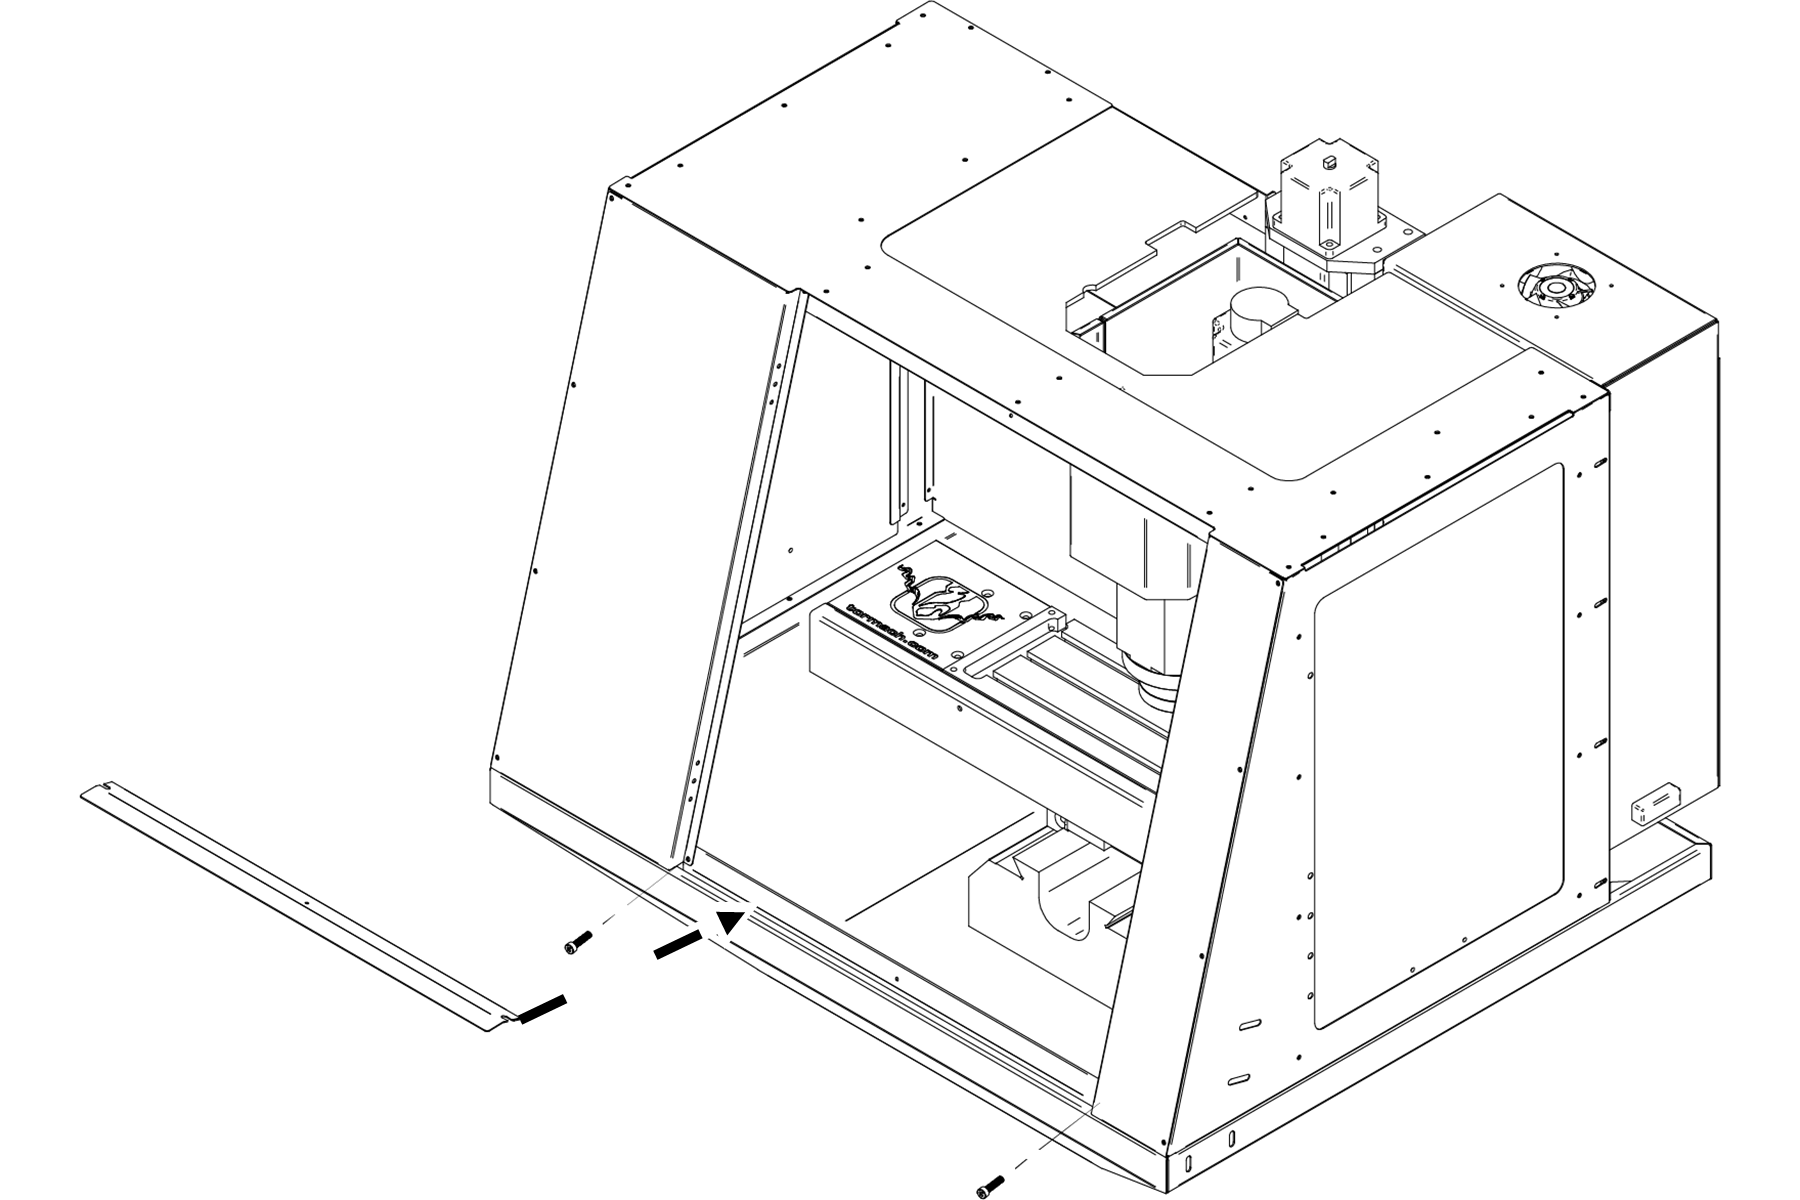
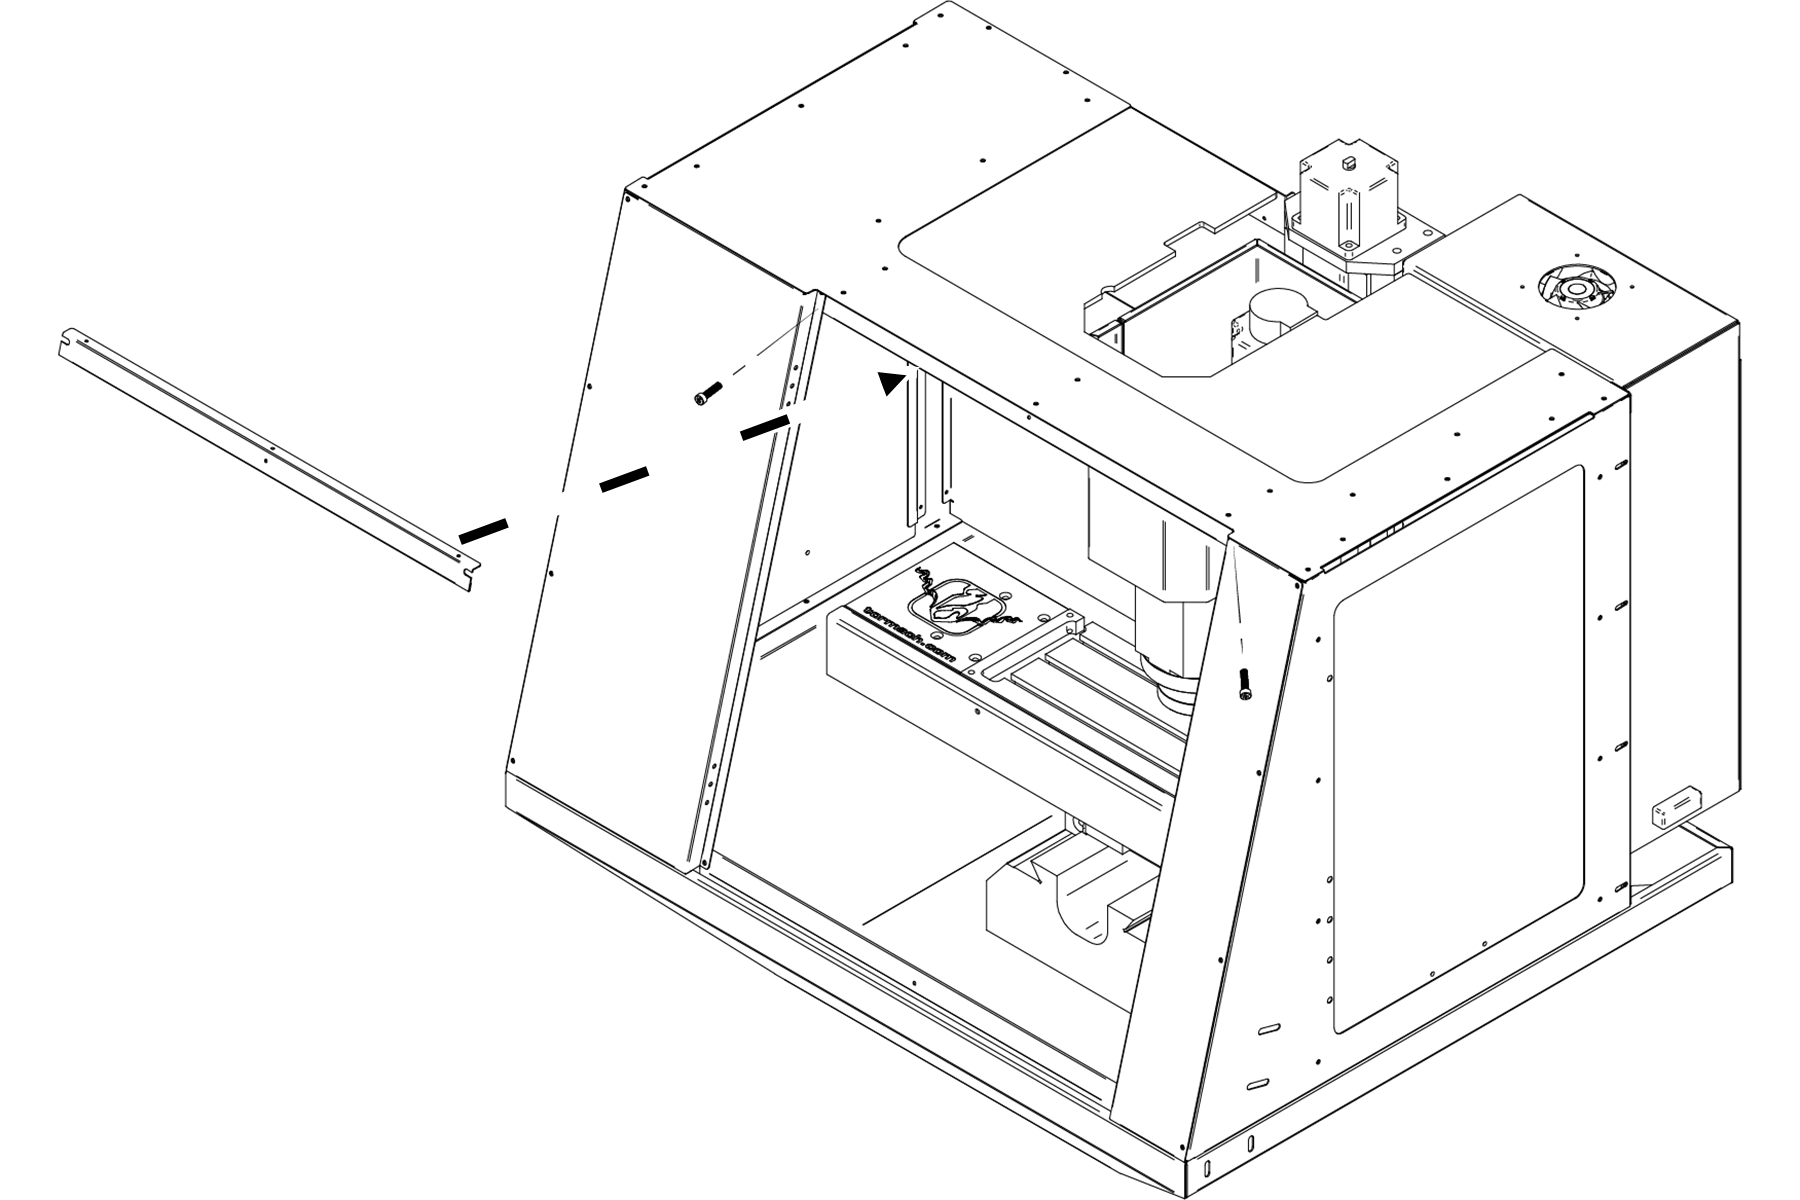
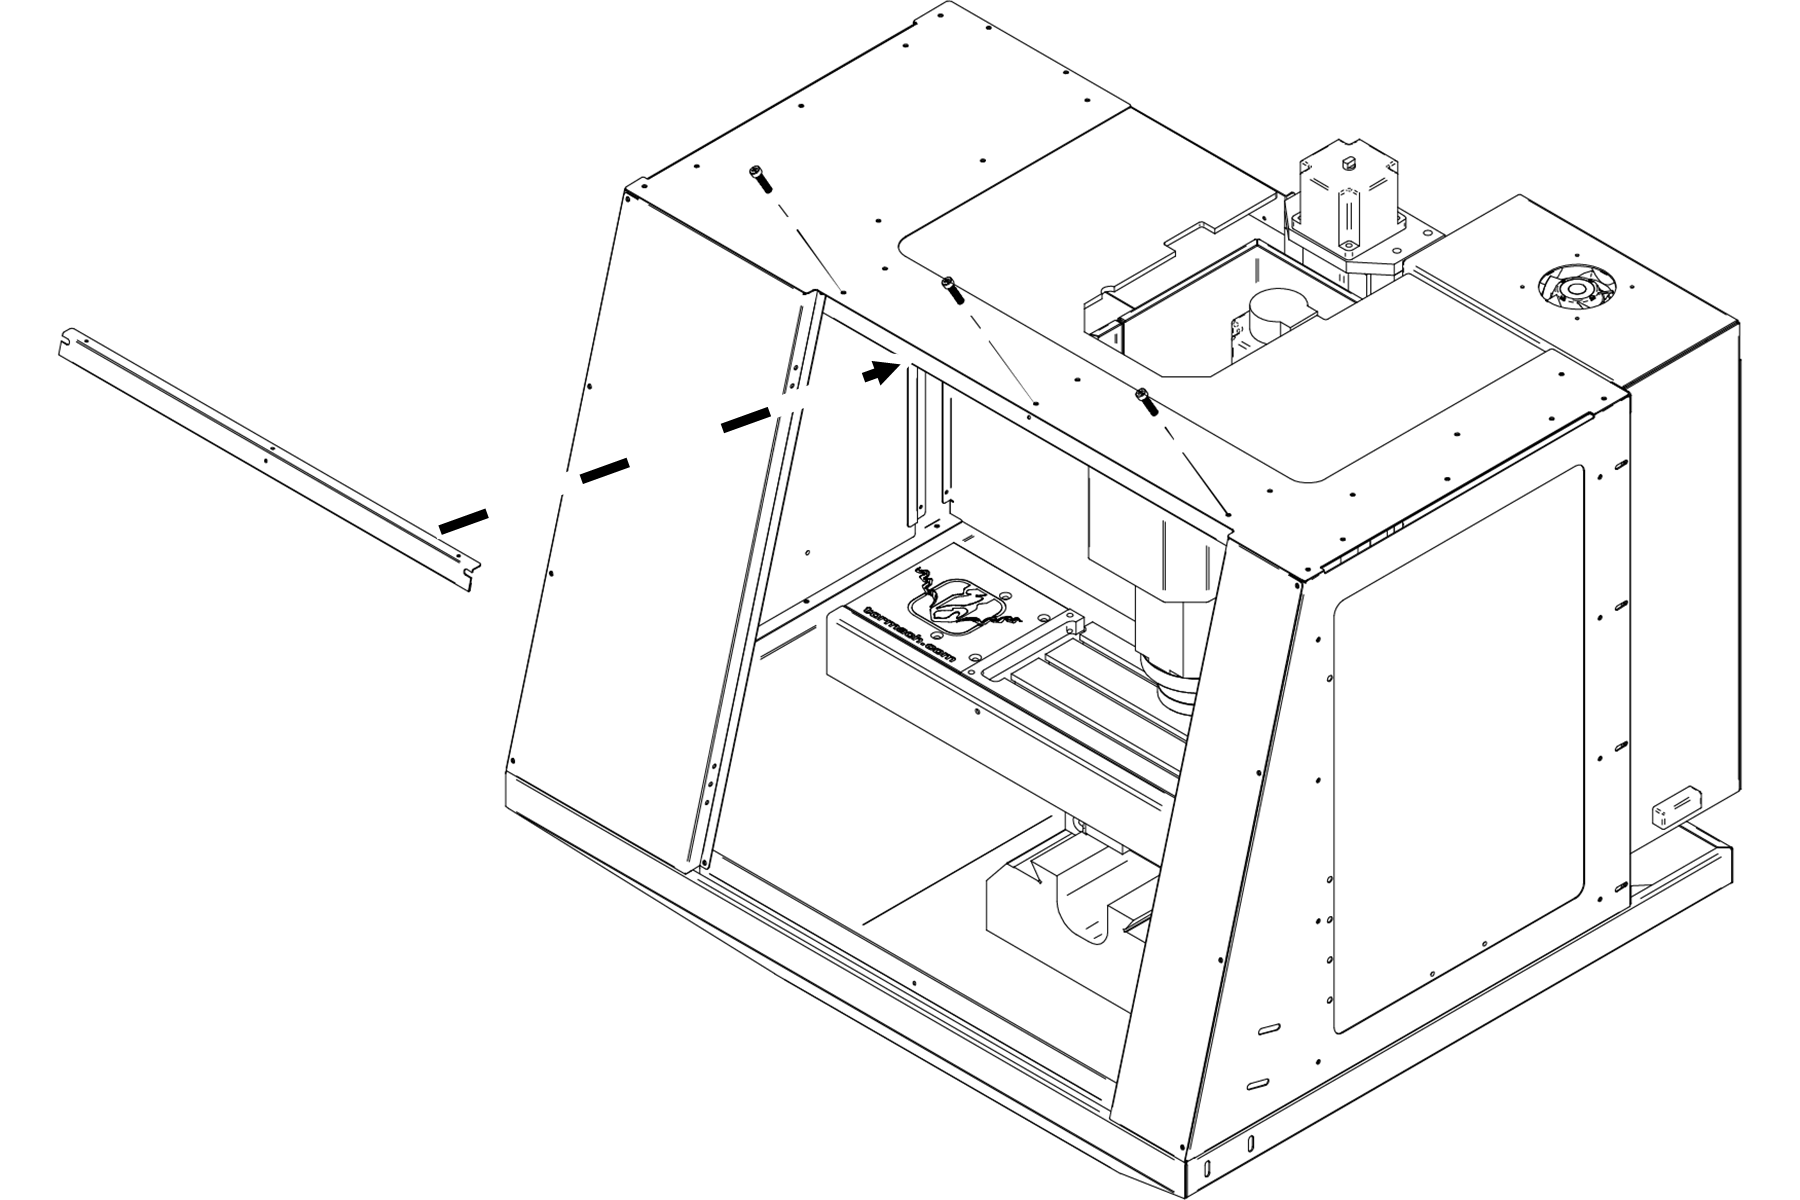
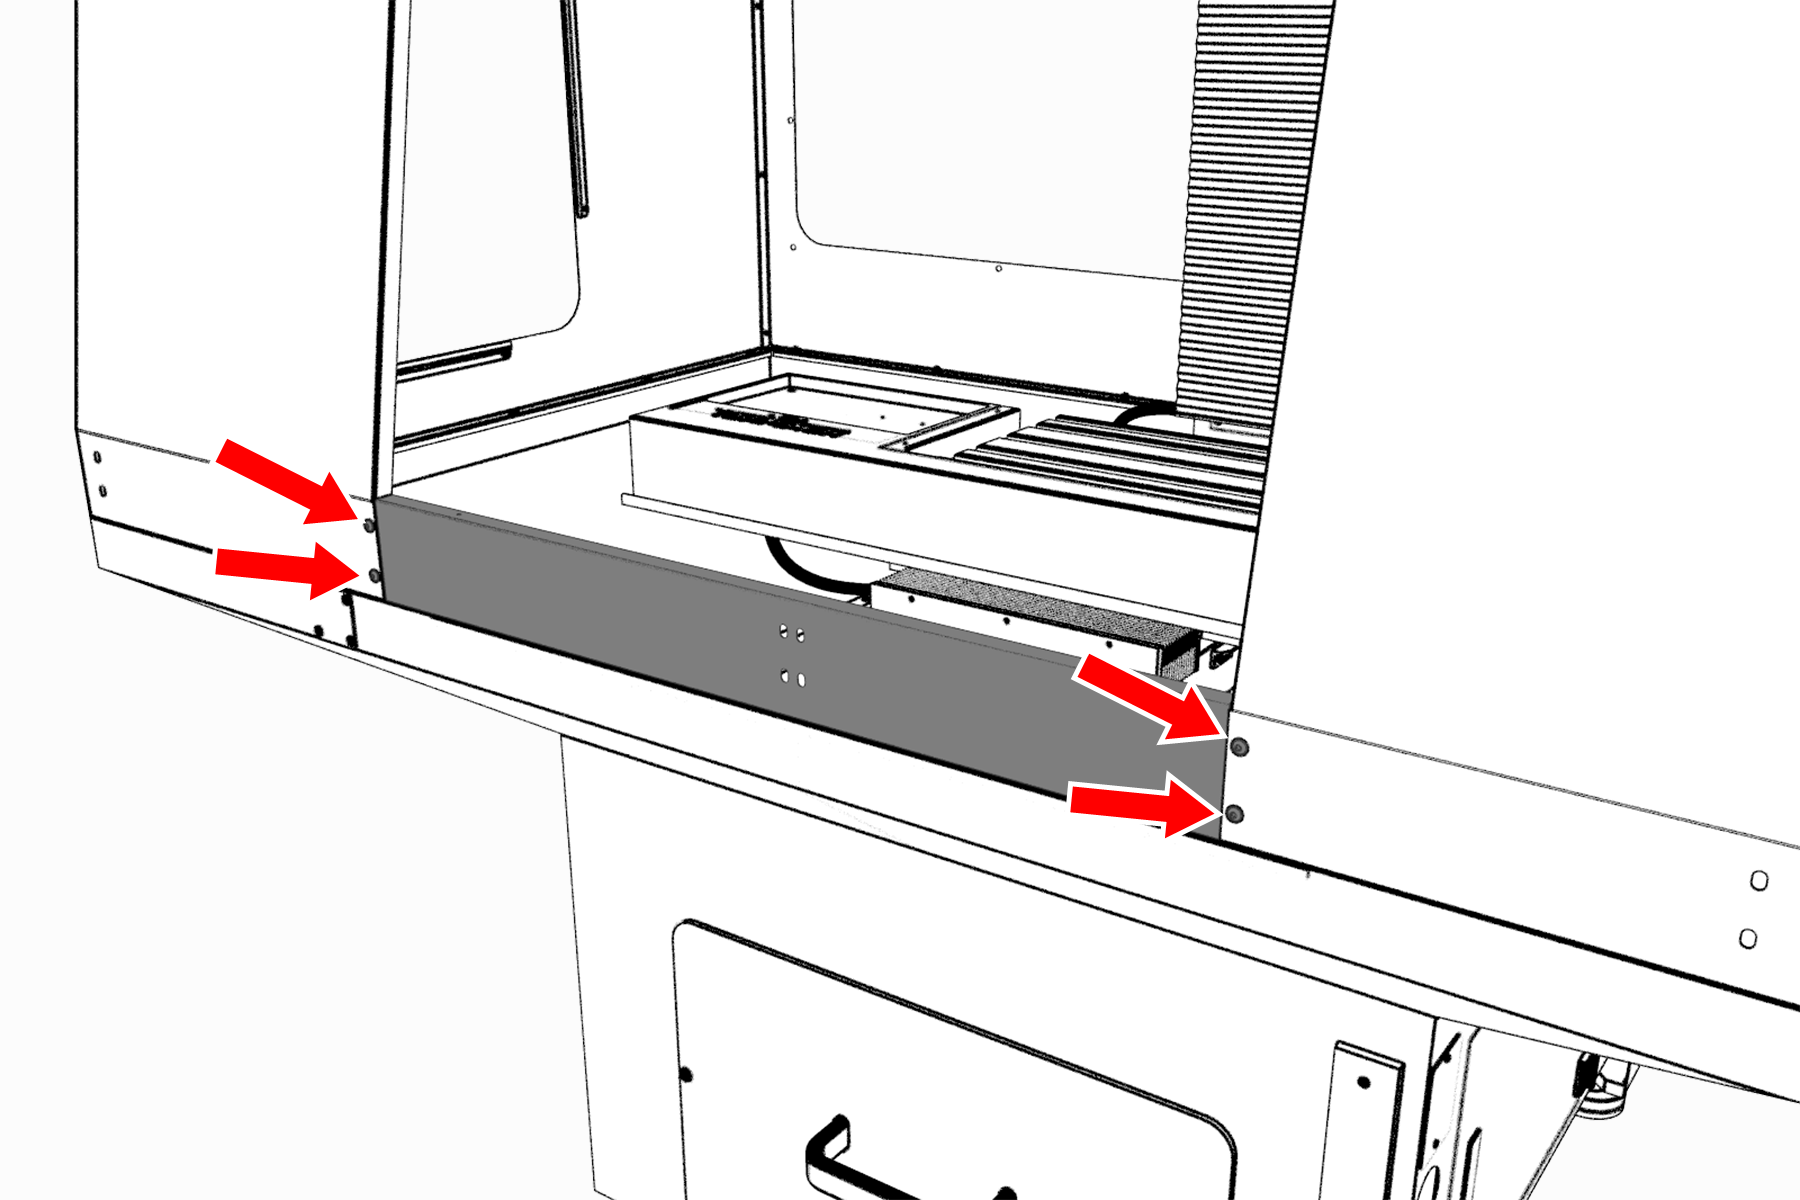
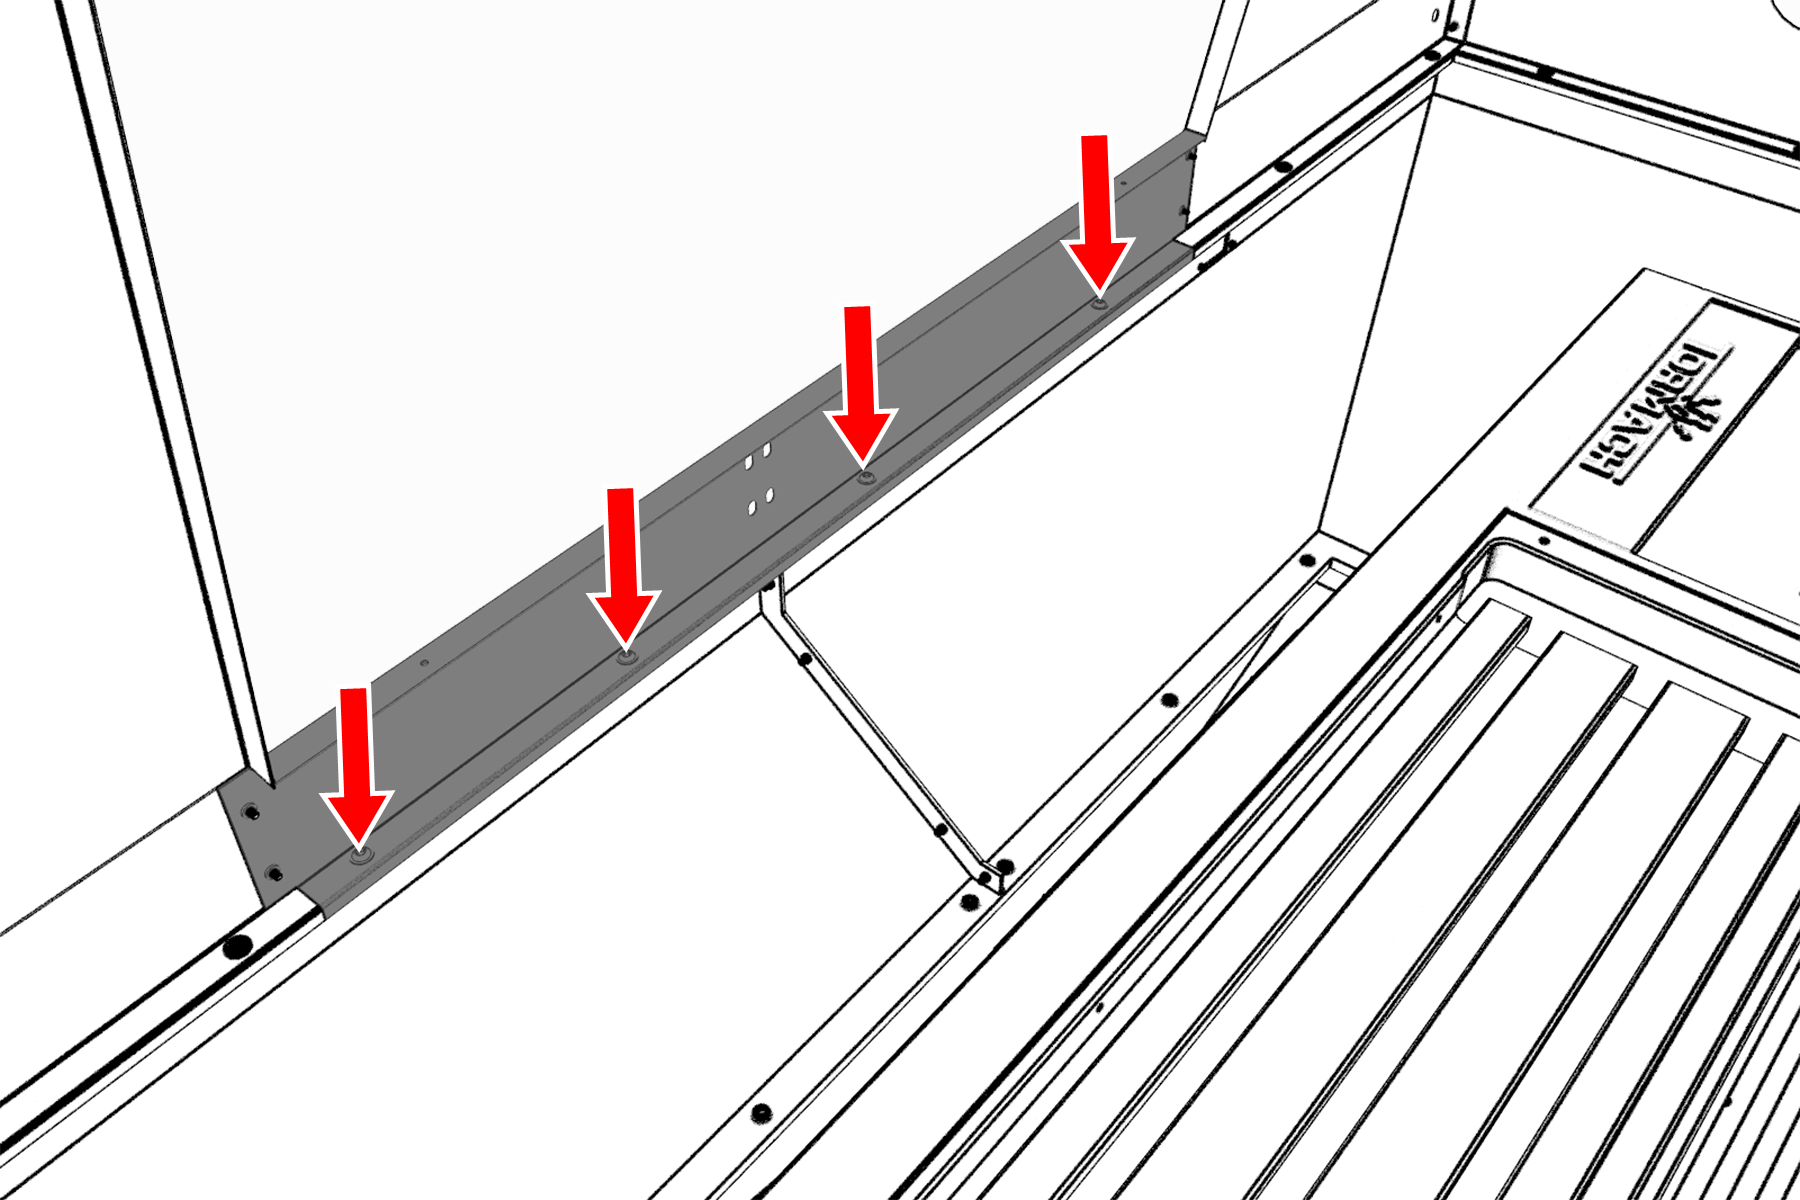
Install the Rear Splash Shield (1100M/MX, 770M/MX Only)
- Attach the rear splash shield to the right chip pan below the electrical cabinet with four M6 × 1.0 - 12 screws.
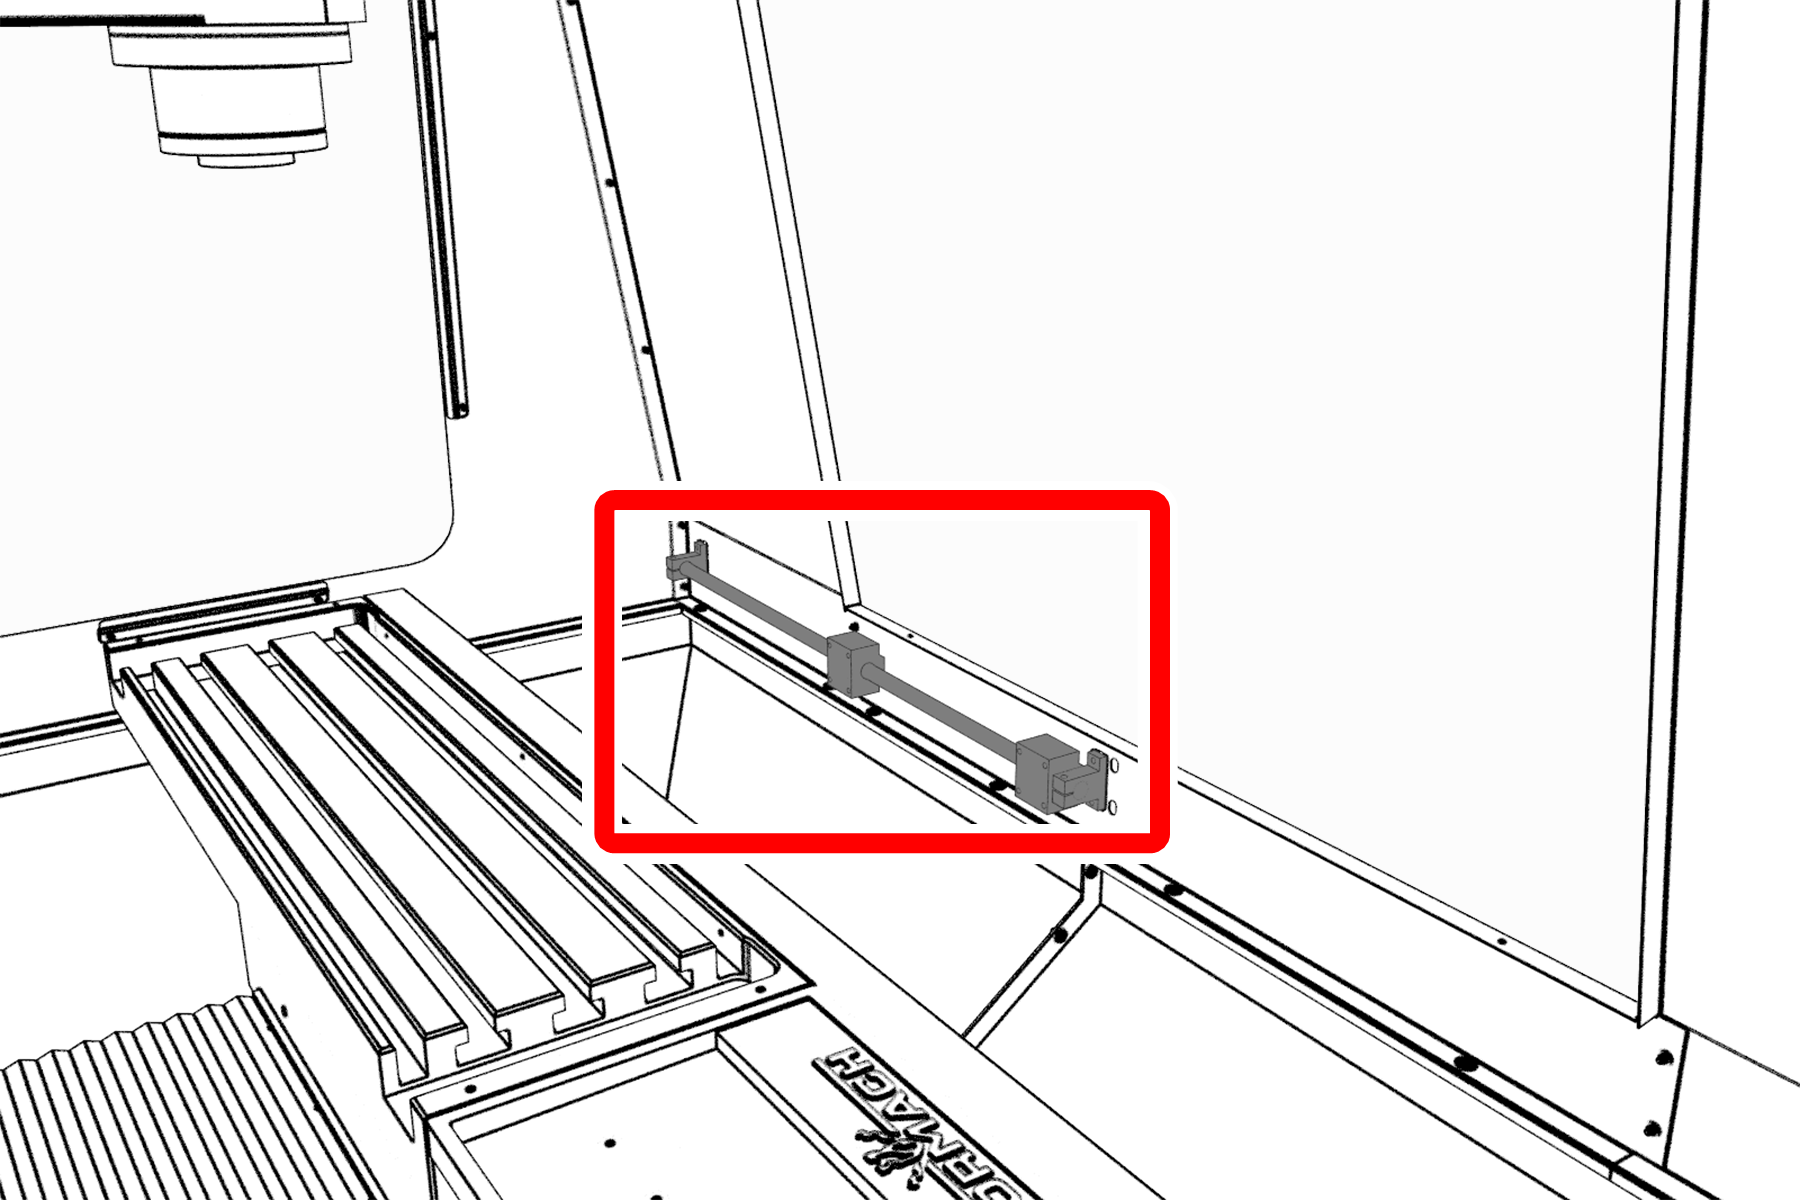
Install the Linear Rails (1100M/MX, 770M/MX Only)
Assemble the Linear Rails
- Find the four linear rails provided: use the two shorter linear rails on the right side of the enclosure. Use the two longer linear rails on the left side of the enclosure.
- Assemble each linear rail in the following order:
Slide one linear rail mount onto one end of the linear rail.
Don't completely tighten the clamping screw on the linear rail mount. It's easier to install and align the linear rails with loose clamping screws.
- Slide one bumper onto the linear rail.
Slide two linear bearings onto the linear rail.
- Slide one bumper onto the opposite end of the linear rail.
Slide one linear rail mount onto the opposite end of the linear rail.
Make sure that the linear rail mount's clamping screw faces the same direction as the linear rail mount that you installed in Step A.

Linear rail assembly.
- Repeat Step 2 for the remaining three linear rails.

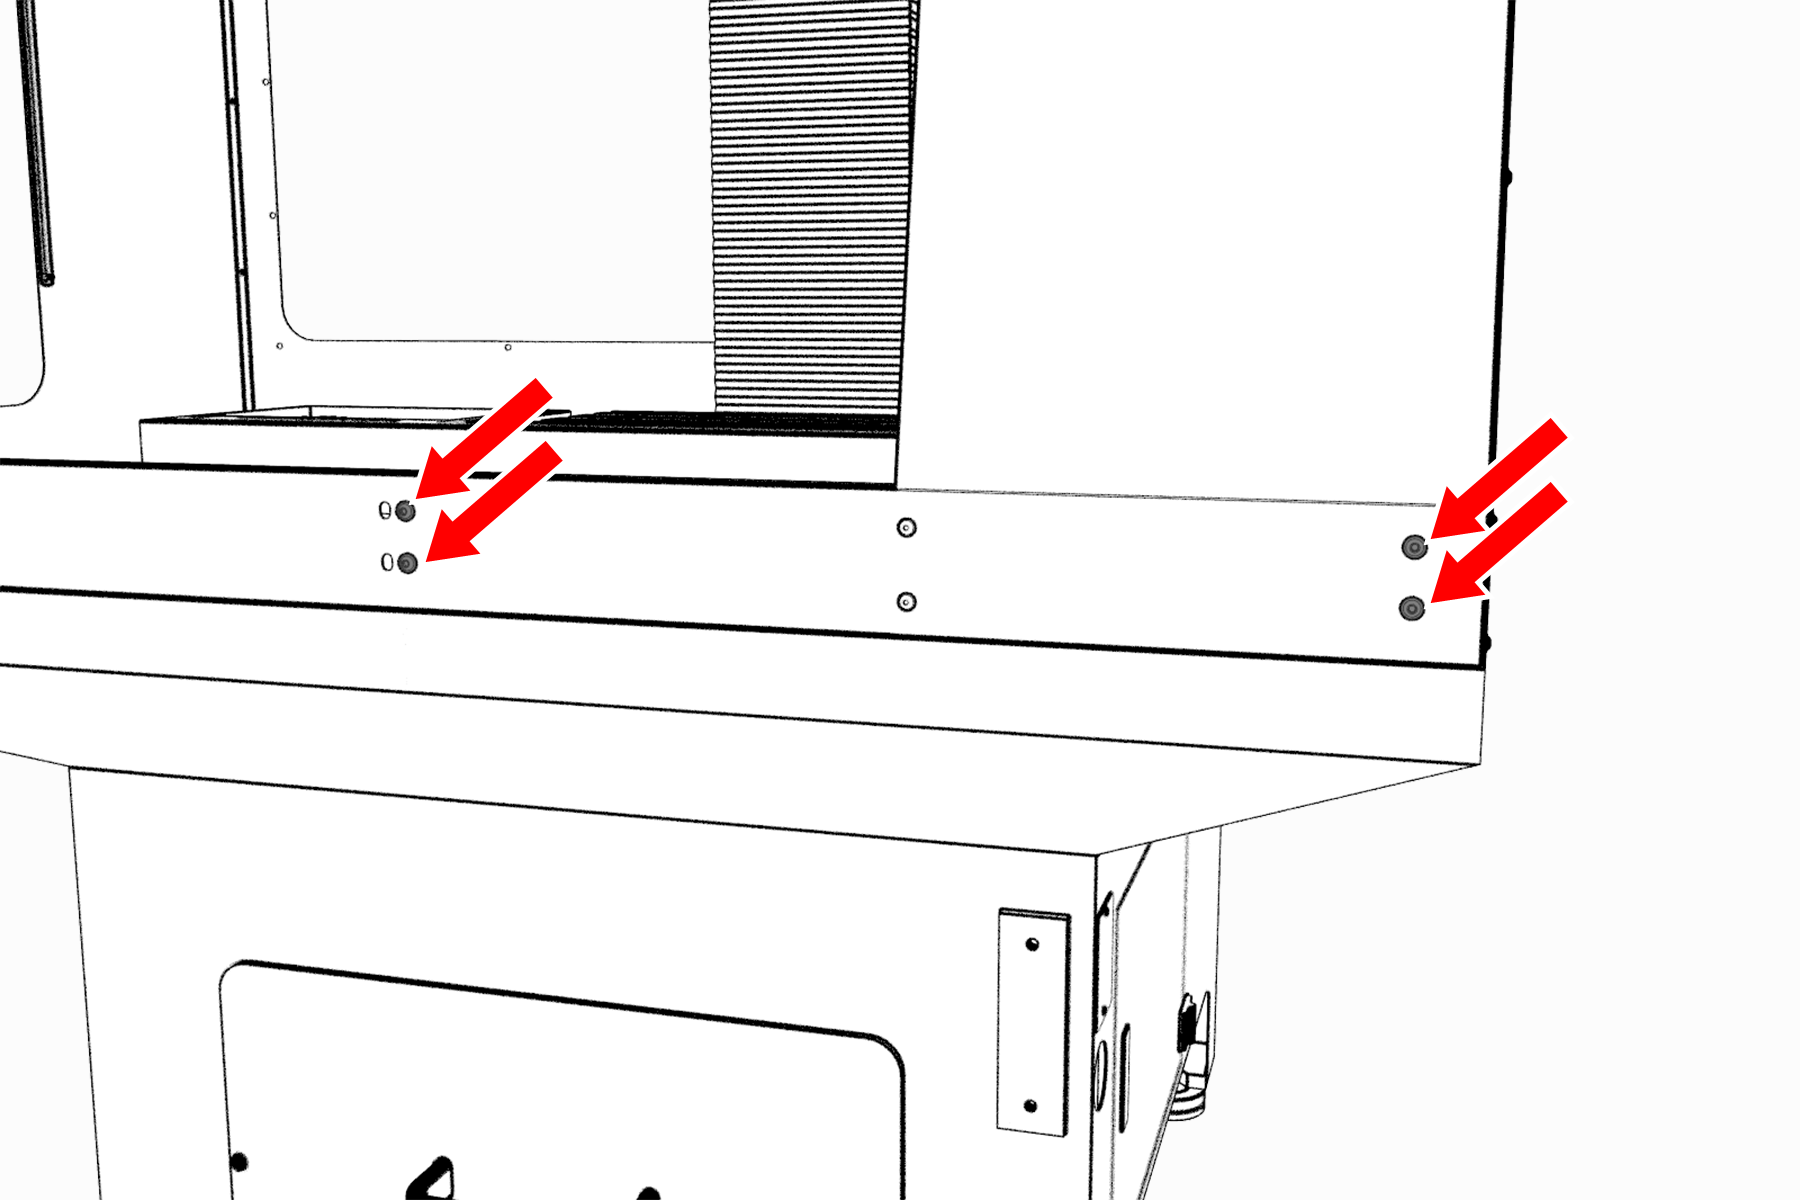
Install the Linear Assemblies
-
Align one short linear rail assembly to the two holes on the inside of both the right front panel and the front lower panel.
The linear rail mount's clamping screws must face up.

Right lower linear assembly attached to the inside of the enclosure's lower right side.
-
Attach the short linear rail assembly to the outside of both the right front panel and the front lower panel with two sets of two M6 × 1.0 - 12 screws.

Right lower linear assembly attached to the outside of the enclosure's lower right side.
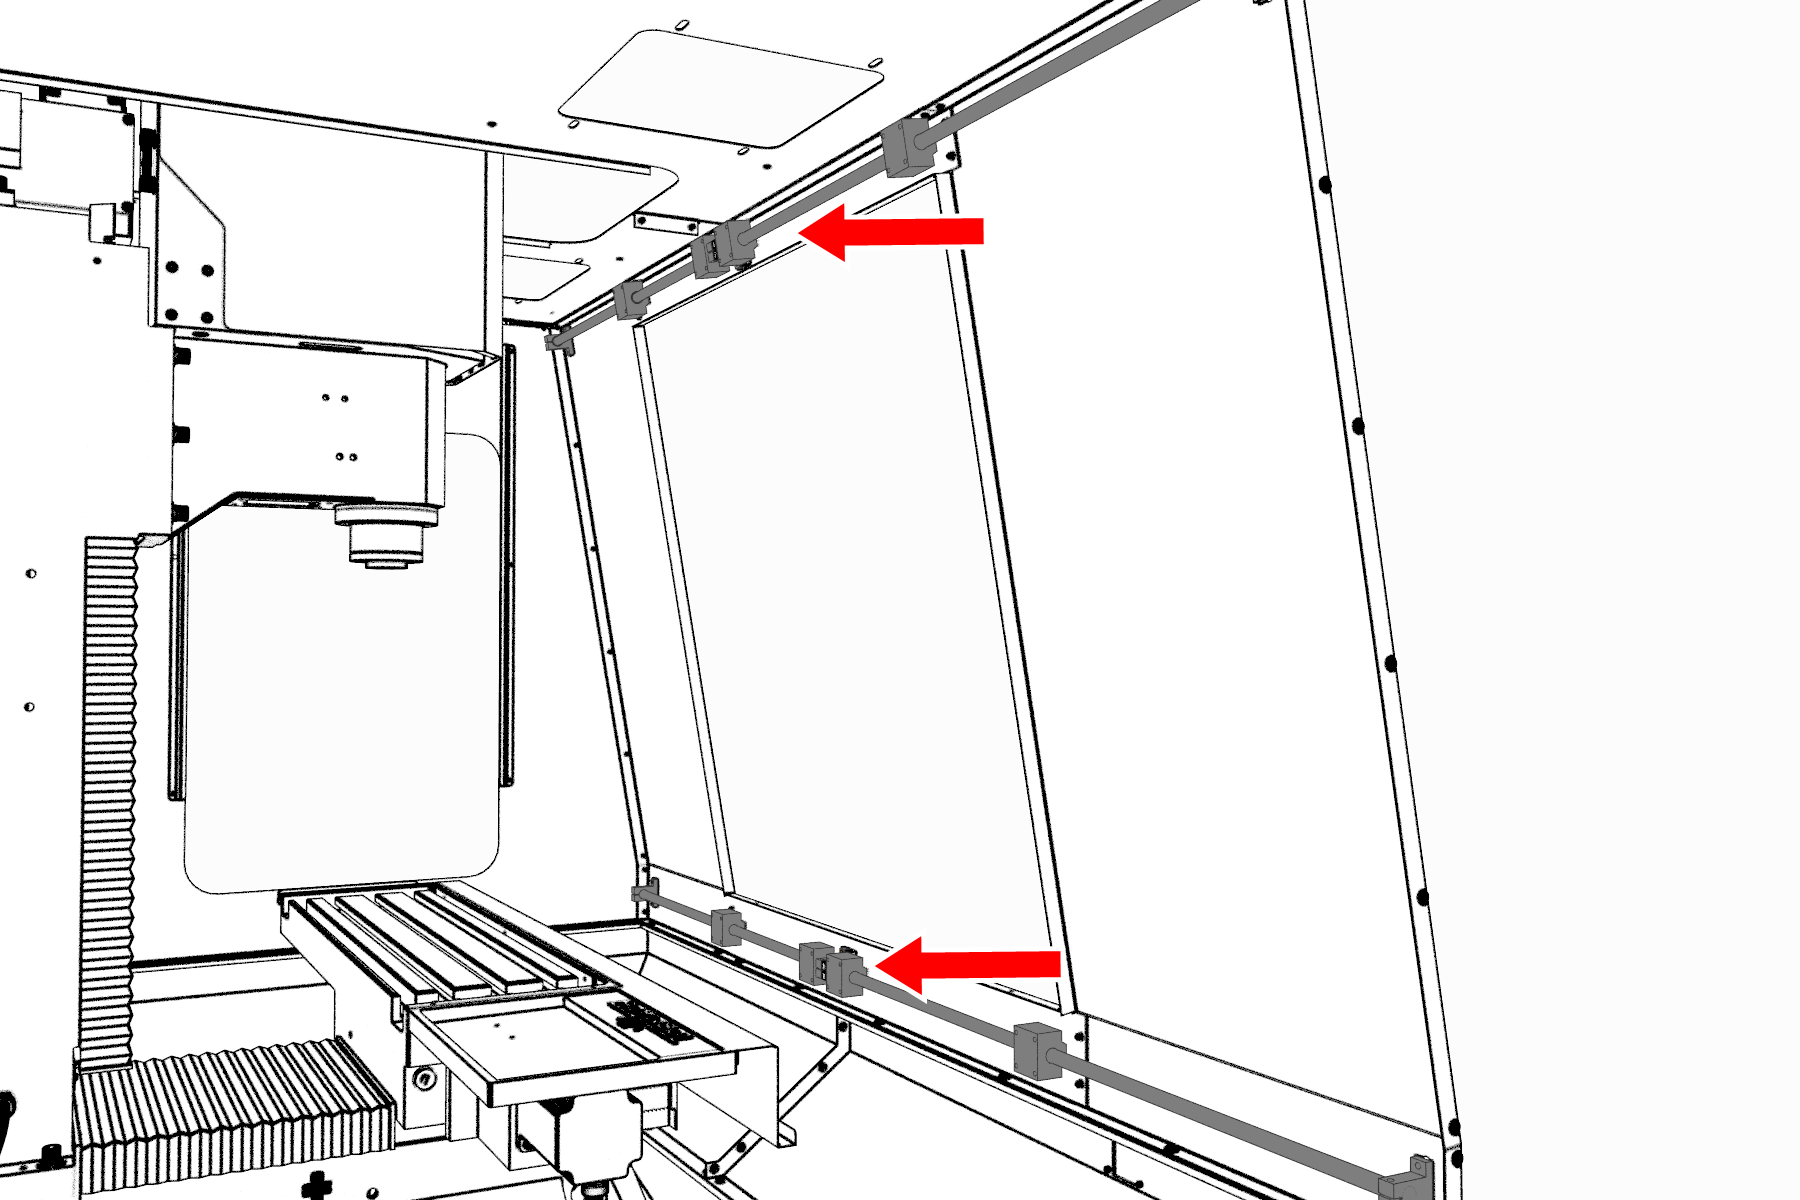
-
Repeat Steps 1 to 2 for the remaining three linear rails, with the linear rail mount's clamping screws face in the following directions:
- Up on the lower linear assemblies
- Down on the upper linear assemblies

Four linear assemblies attached to the enclosure.
Install the Front Doors
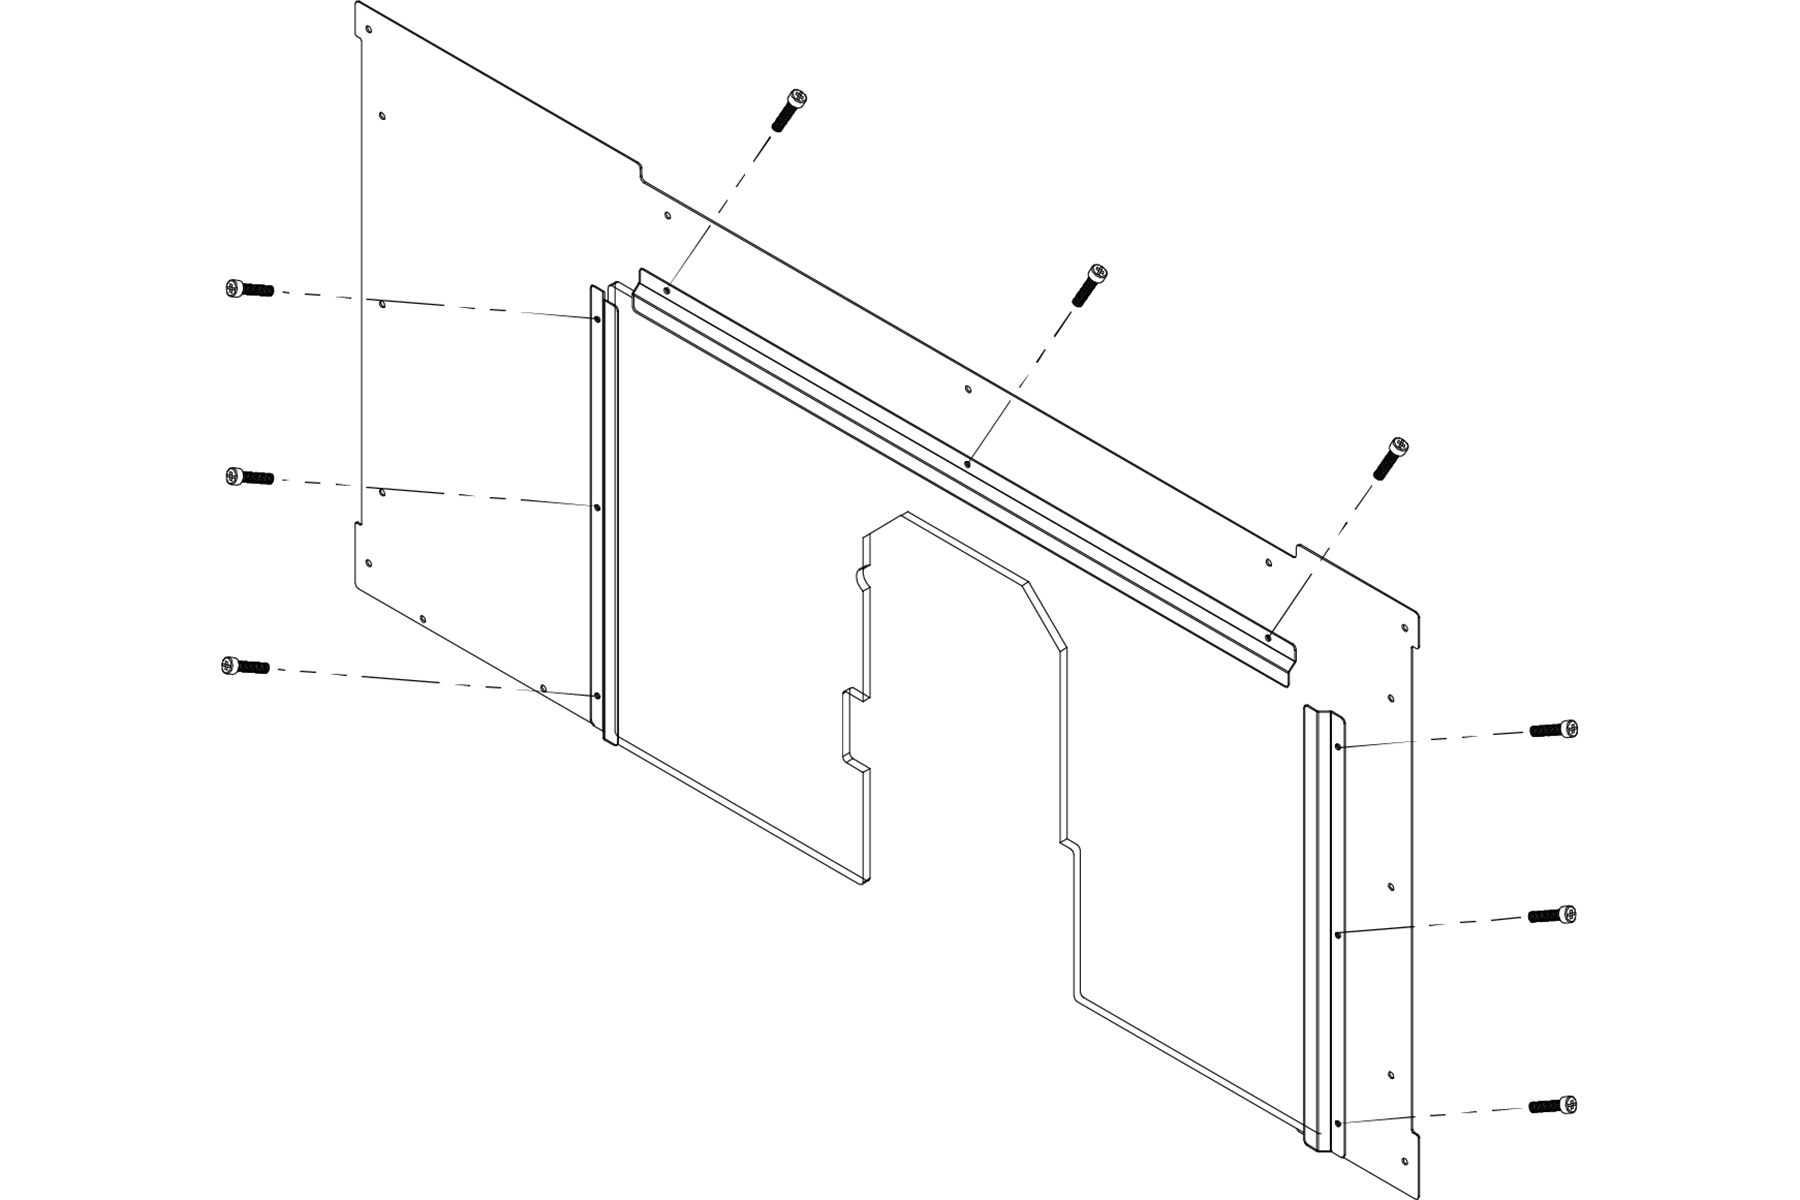
Assemble the Front Doors
Rubber trim, window, and window retainers layered to assemble the front door.
- Push a strip of rubber trim onto the edge of the window opening on each front door. Make sure that the trim starts at one end of the door handle mount, continues around the perimeter of the window, and ends at the opposite side of the door handle mount. When finished, use shears or a knife to cut the excess trim.
- Remove and discard the protective plastic film from each window.
-
On the inside of one front door, put one window on top of the rubber trim.
-
Attach one dark gray, vertical window retainer to both sides of the front door's window opening with two sets of three M5 × 0.8 - 10 screws.
To prevent window damage from over-tightening, use your fingers to tighten the screws.
-
Attach one dark gray, horizontal window retainer to the top and bottom of the front door's window opening with two sets of two M5 × 0.8 - 10 screws.
To prevent window damage from over-tightening, use your fingers to tighten the screws.

Window retainers attached to the front door.
- Repeat Steps 1 through 5 to assemble the remaining front door.
-
Slide four door hinges into the notches on the left door window and right door window.

Notches on the door windows.
-
Tighten the three set screws on each door hinge with a small, flat-blade screwdriver to secure it to the window.
Discard any additional hardware that's included with the separately-packaged door hinges.
- Determine the orientation of the doors: test fit each on the enclosure.
- Set the right door window aside.
-
Attach the door edge to the left door window with two 8-32 × 1/2-inch Phillips screws and two 8-32 nuts.

Door hinge attached to the door window.
-
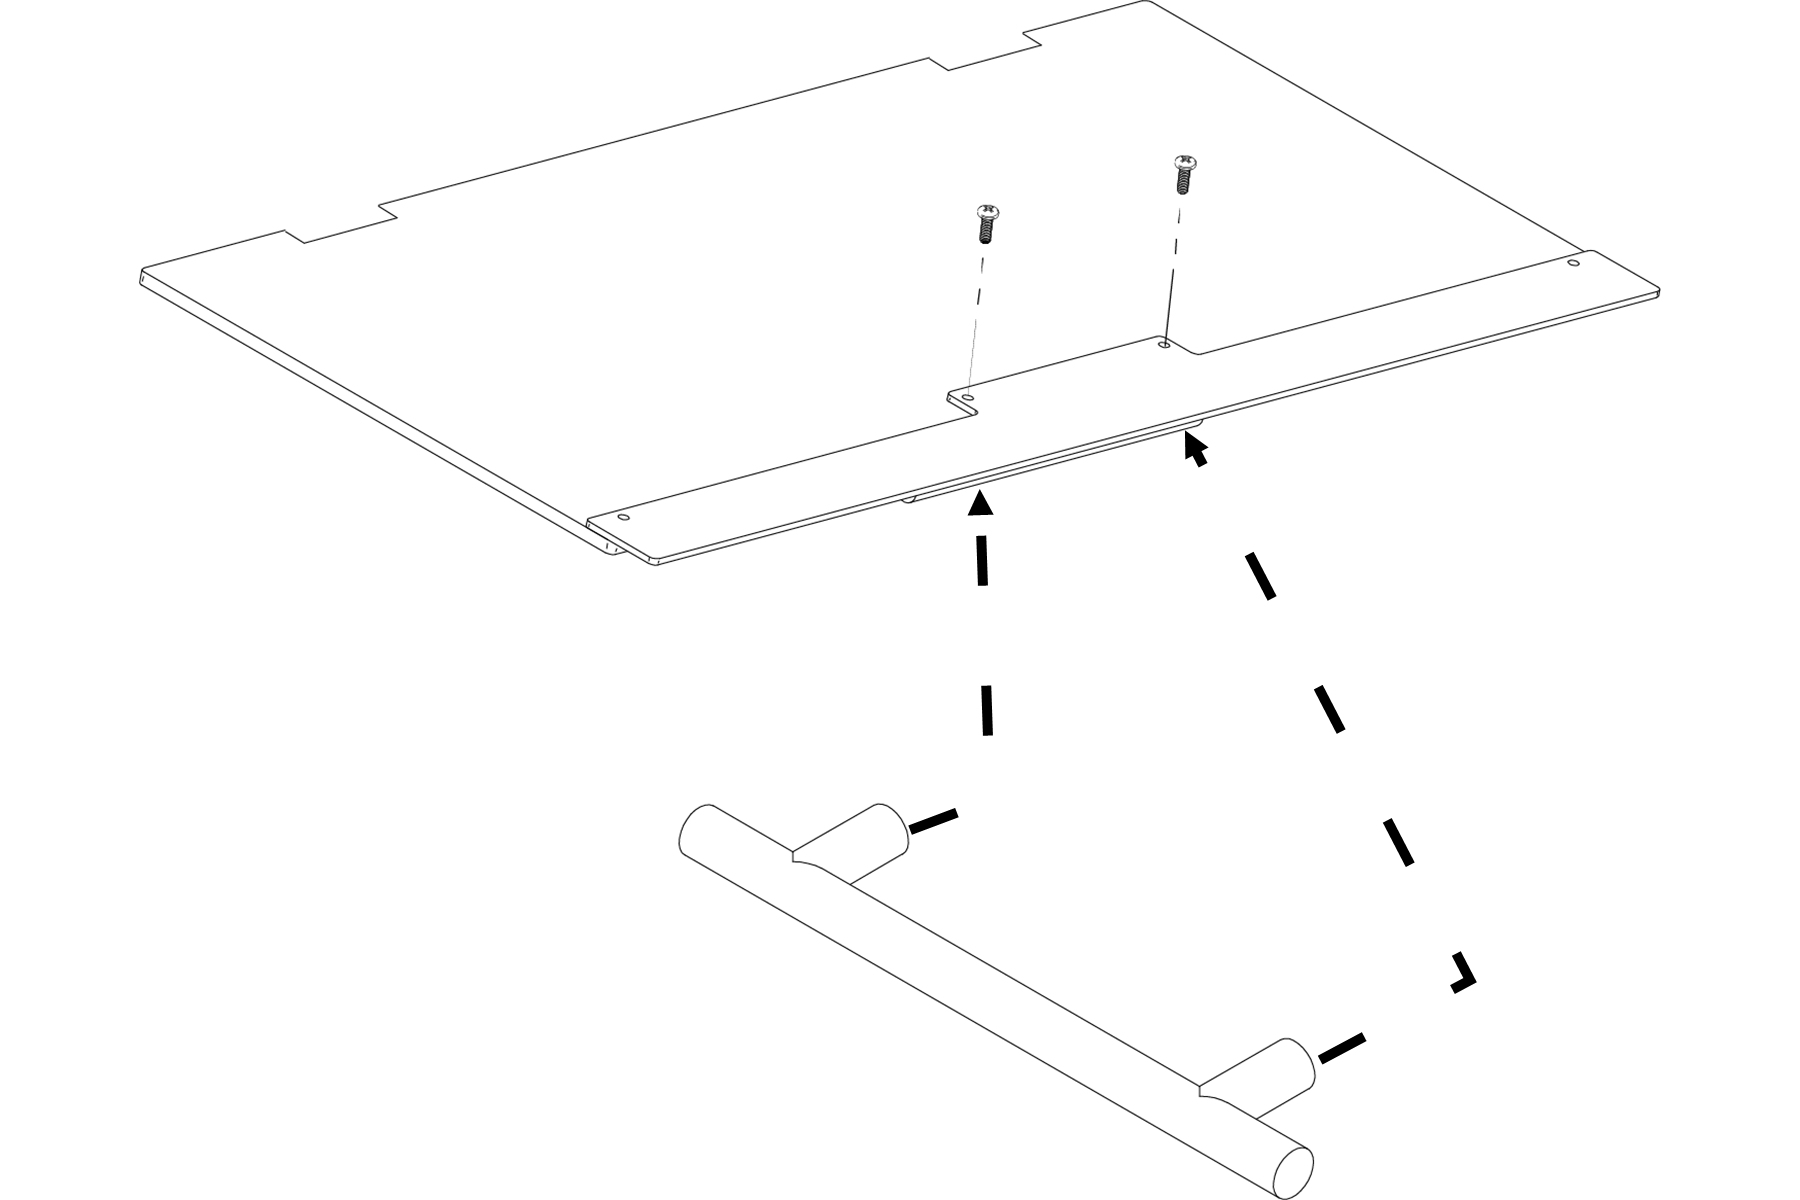
Attach one large handle to the left door window opposite the door edge with two 8-32 × 1/2-inch Phillips screws.

Large door handle location on the door window.
- Tighten the screws on the large handle.
Install the Front Door Assemblies
Each front door is attached to the enclosure by securing it to the linear bearings: the wider door is mounted on the left side of the enclosure, and the narrower door is mounted on the right side of the enclosure.
To install the front doors:
-
Starting with the top linear assembly, attach the narrow door to the two upper linear bearings with two sets of four M5 × 0.8 - 10 screws.

Narrow door attached to the top linear assembly.
- Move the bottom of the narrow door into alignment with the bottom linear assembly. Then, attach the narrow door to the two bottom linear bearings with two sets of four M5 × 0.8 - 10 screws.
-
Repeat Steps 1 to 2 to attach the wide door to the top and bottom linear rail assemblies on the remaining side of the enclosure.

Both front doors attached to the enclosure.
-
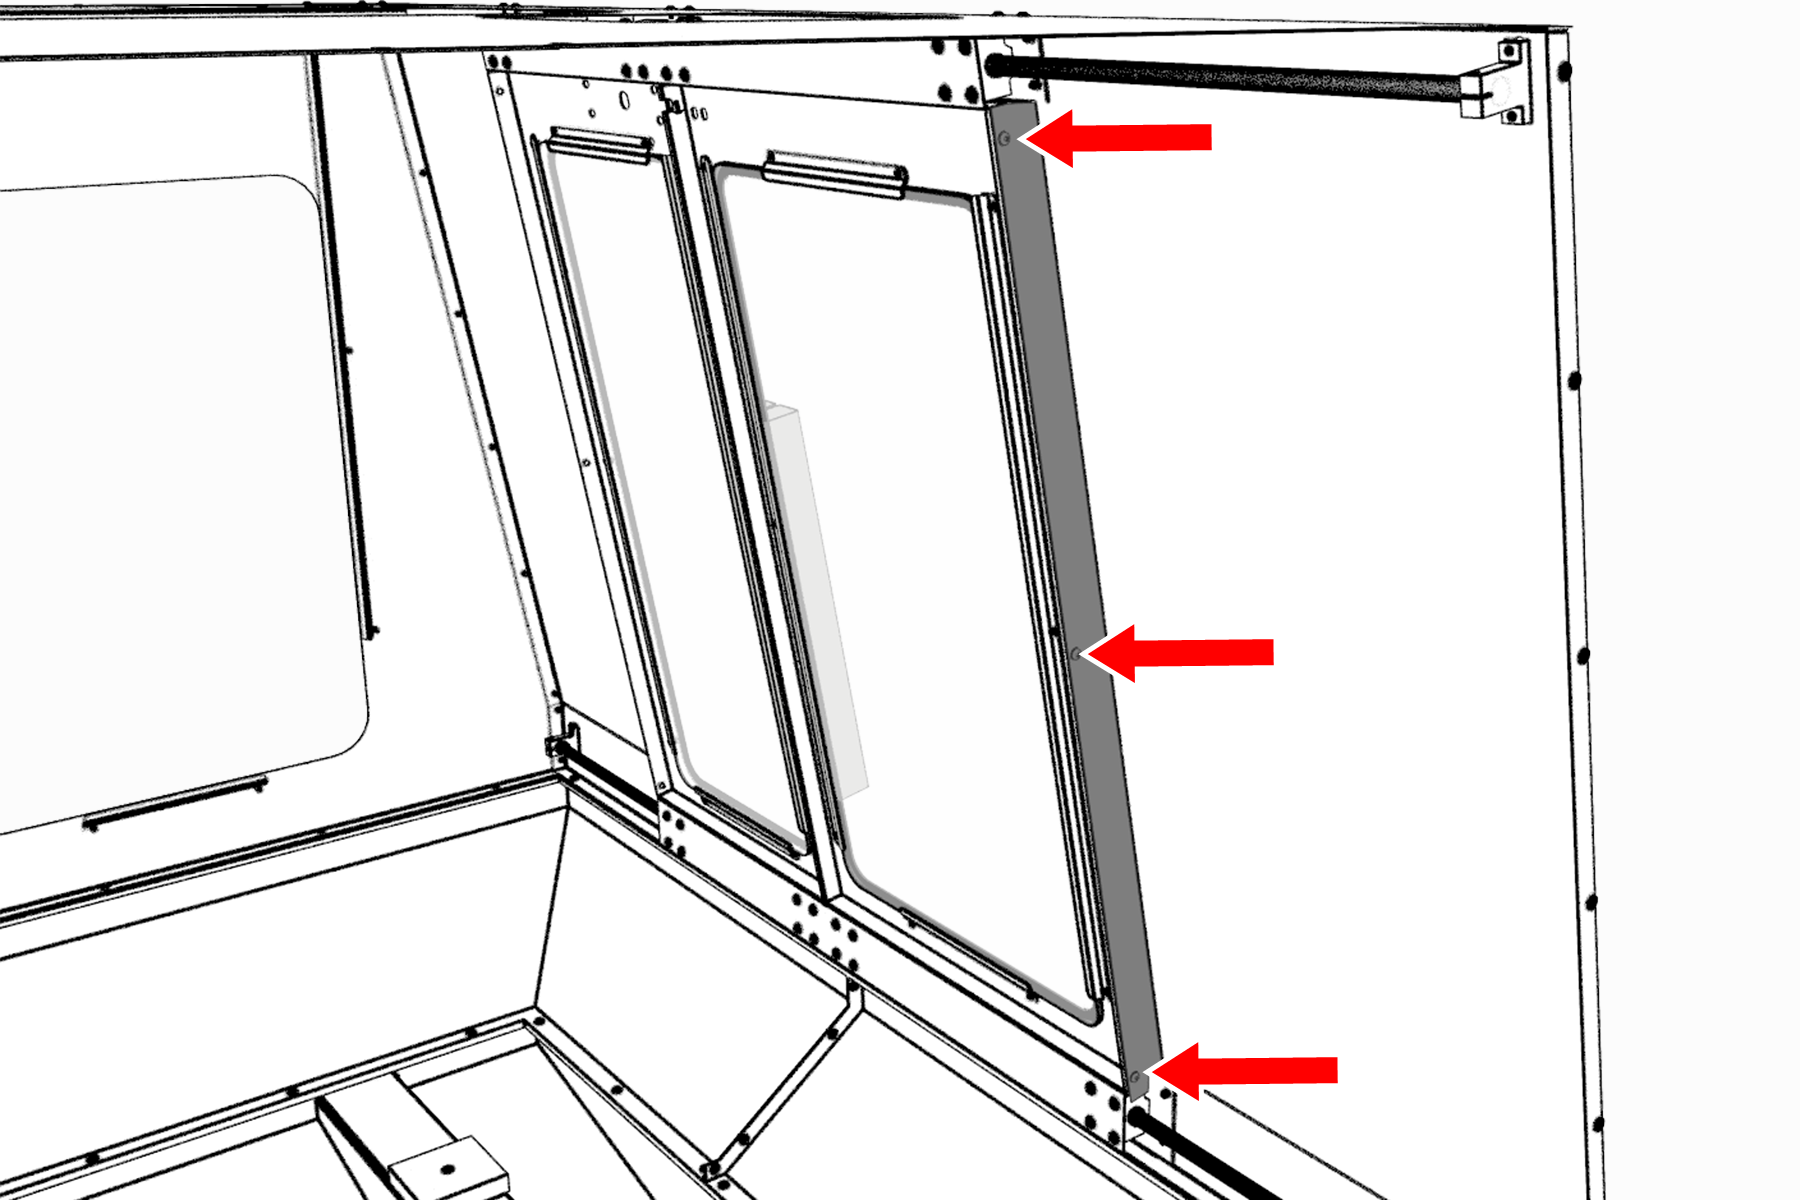
To the edge of the front door that's closest to the left side of the enclosure, attach one door seal with three M5 × 0.8 - 10 screws.

Door seal attached to the edge of the front door.
- Repeat Step 4 for the remaining front door.
-
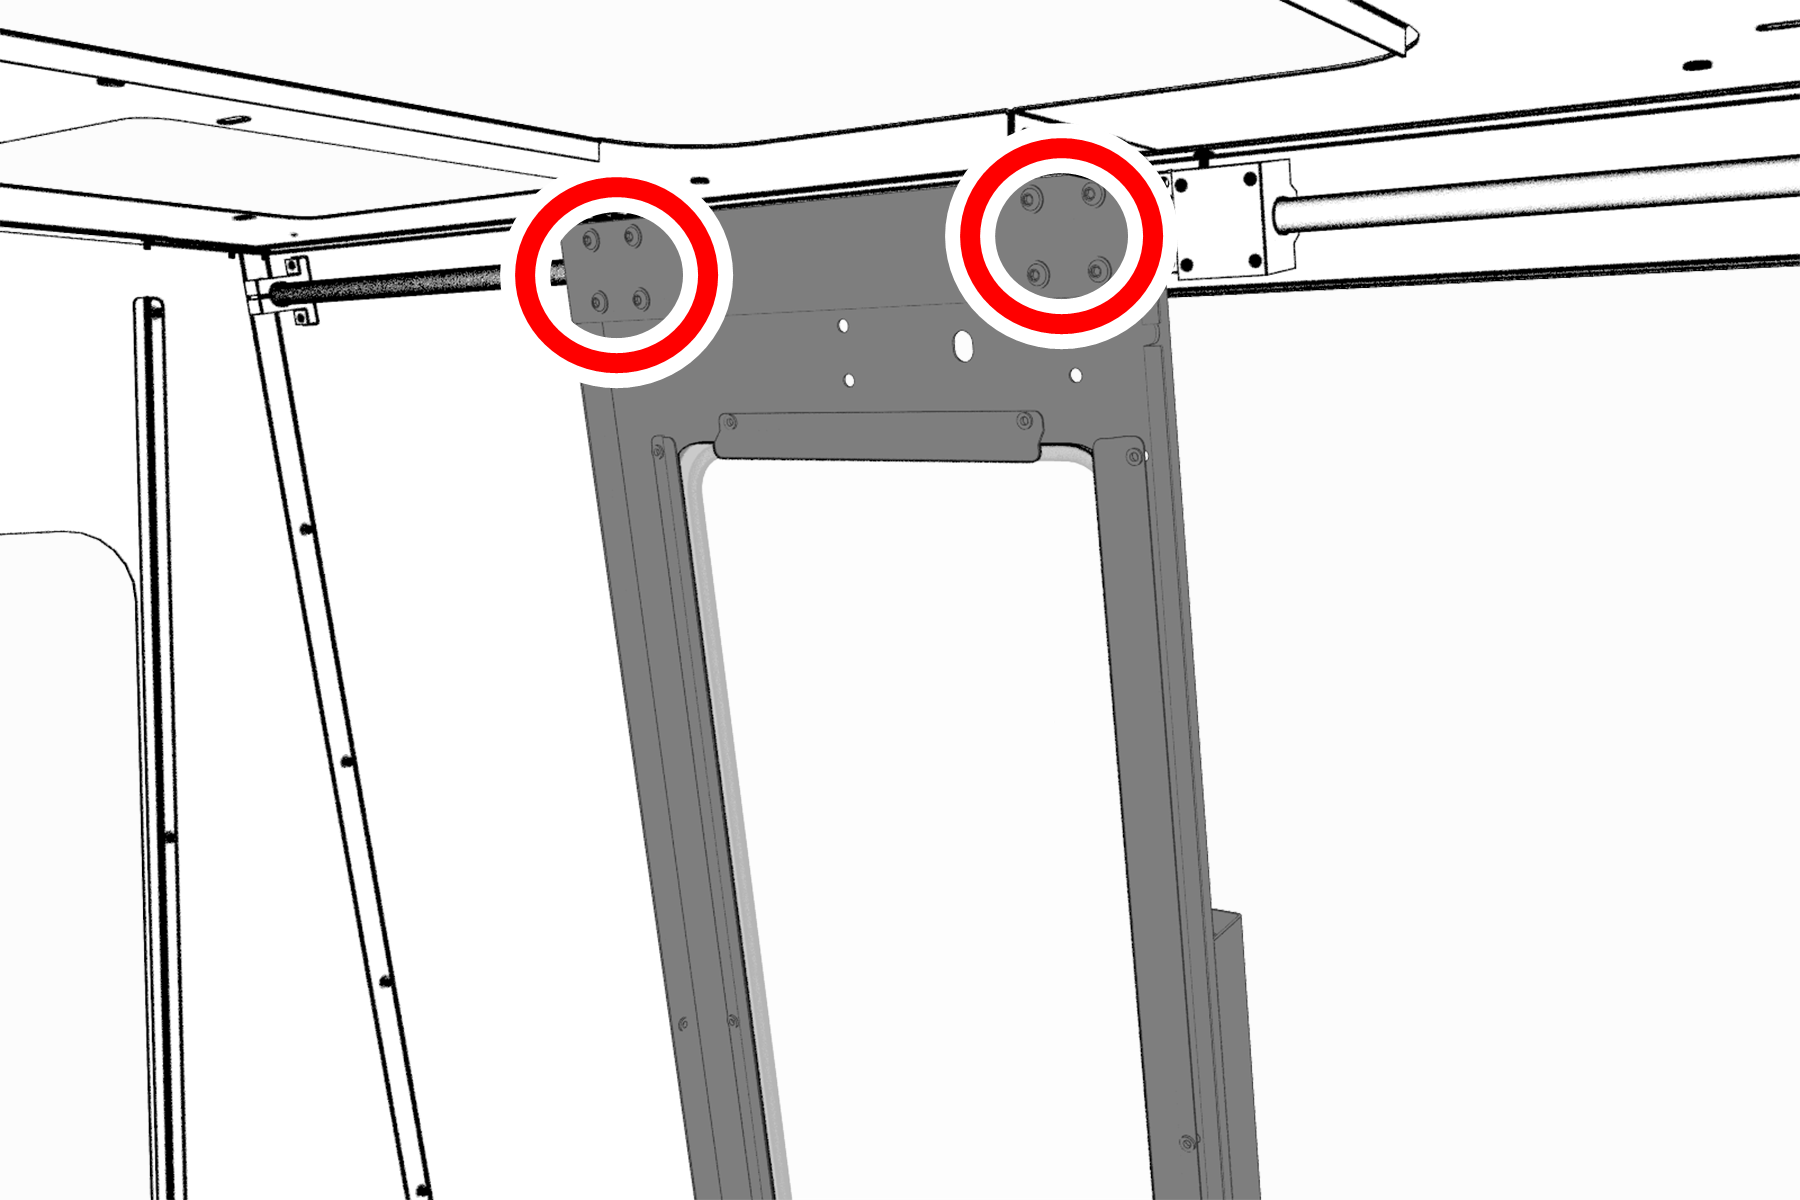
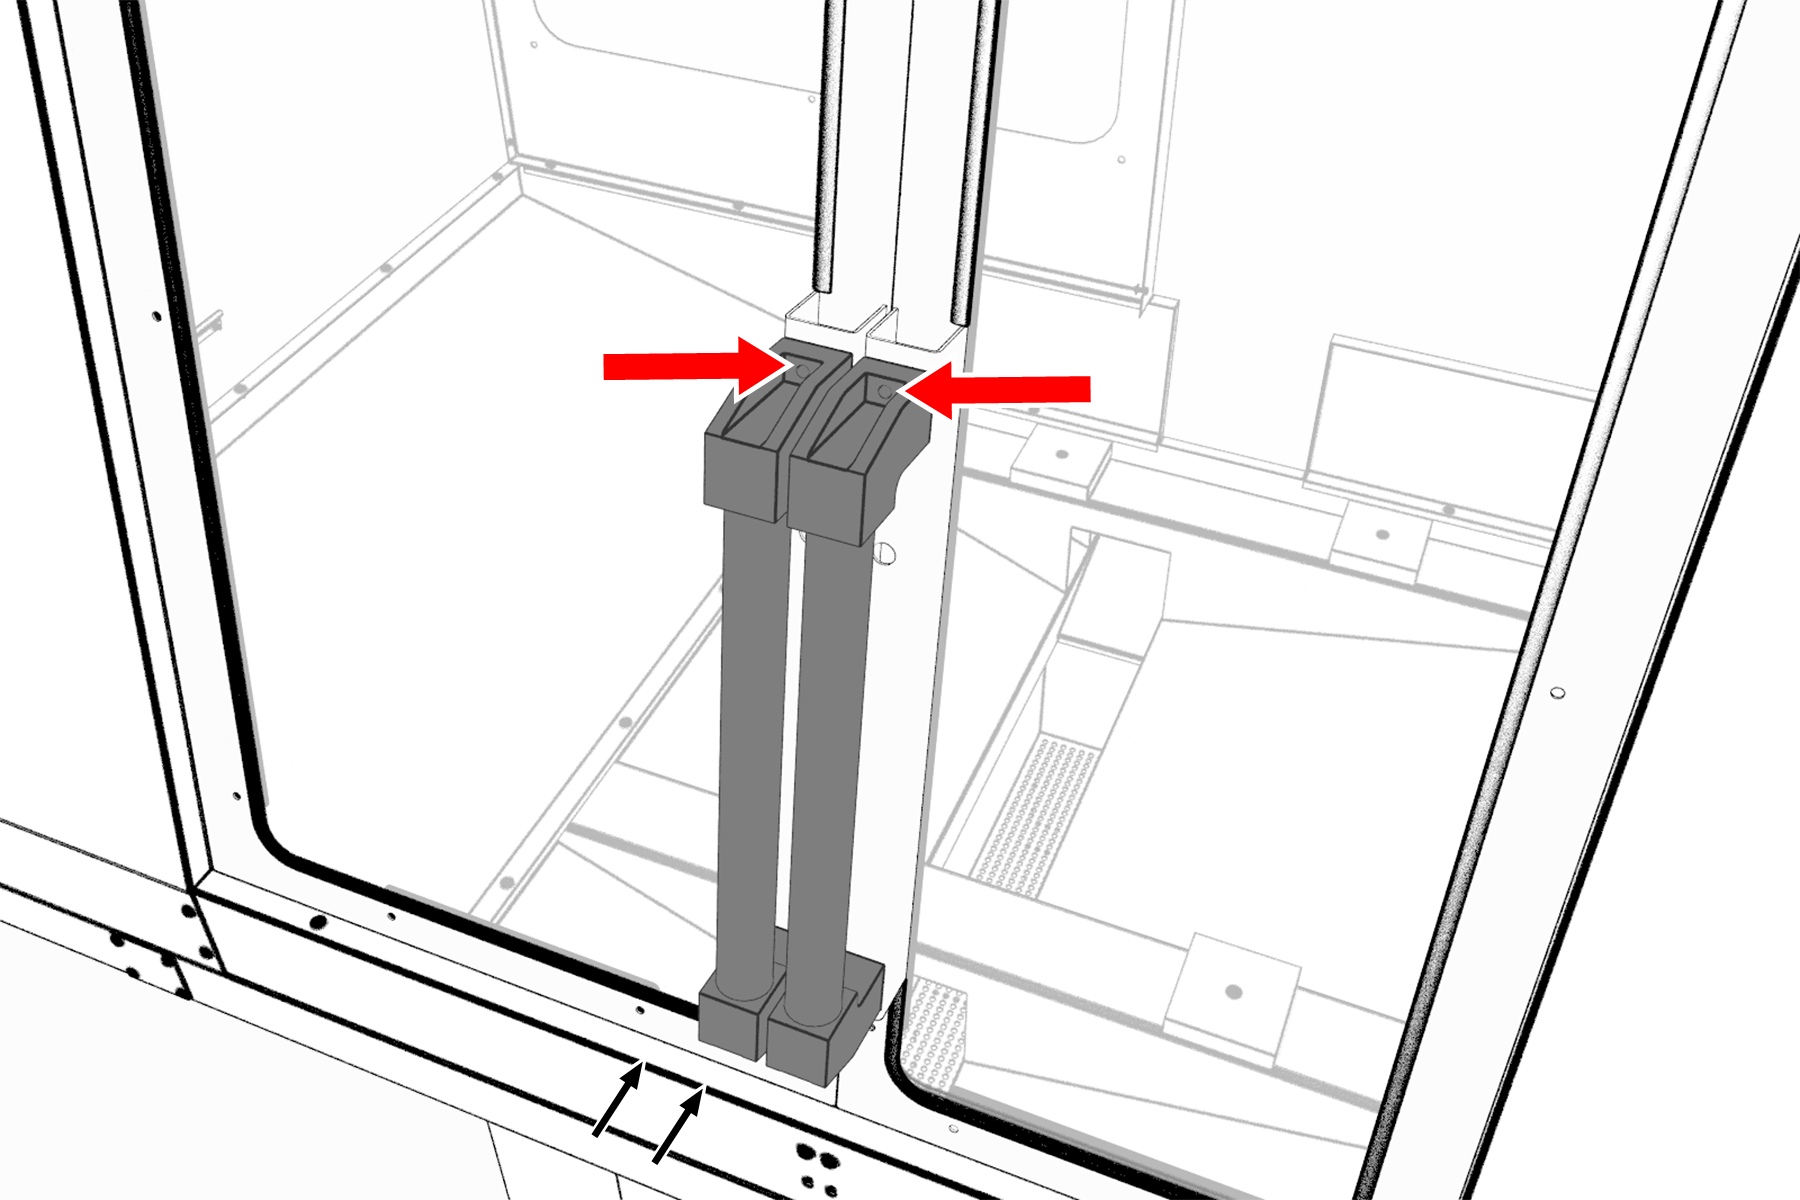
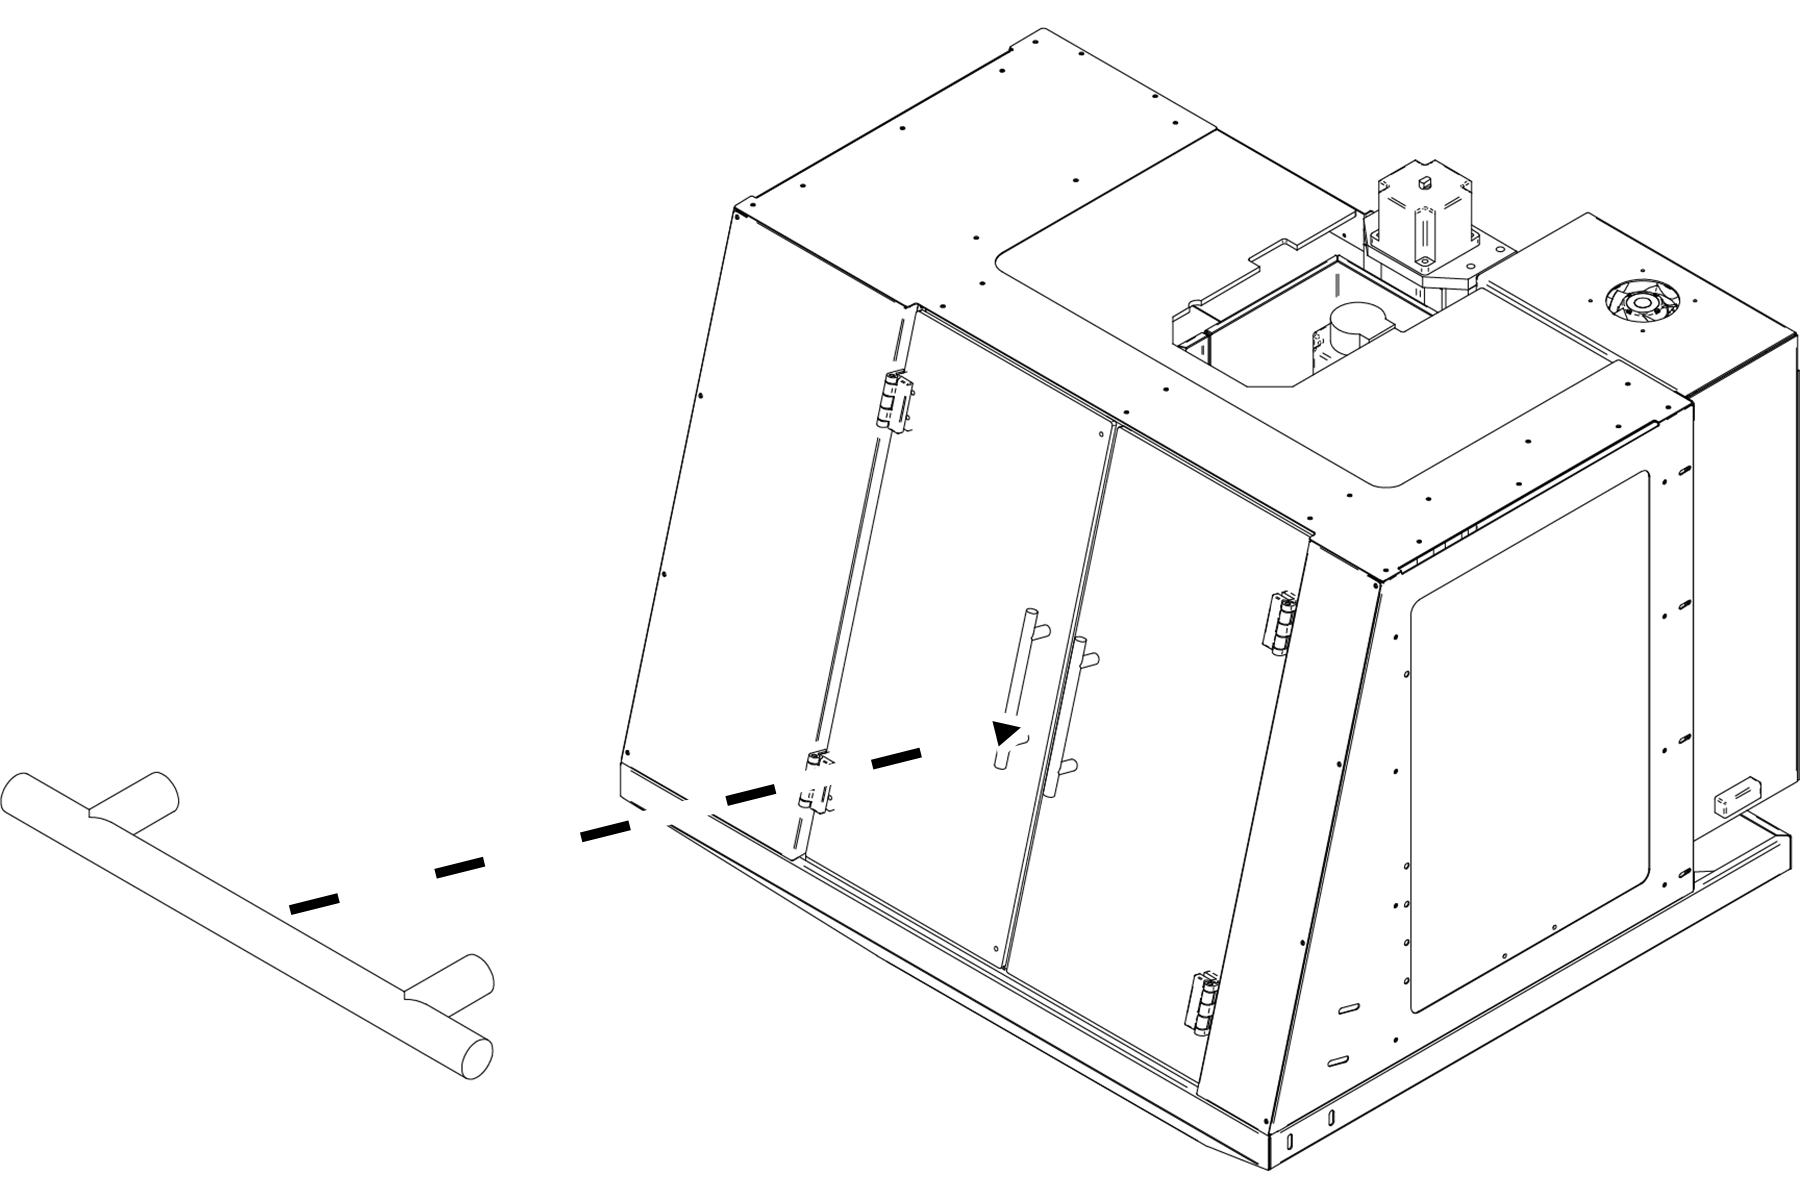
Attach the handles to both front doors with two sets of two M8 x 1.25 - 20 screws and two sets of two M8 flat washers.

Both front door handles attached to the enclosure.

- Attach the door hinges on each door windows to the enclosure in the orientation that you determined in Assemble the Front Doors with 12 10-32 × 3/8-inch flat head Phillips screws and 12 10-32 nuts.
-
Attach one large handle to the right door window with two 8-32 x 1/2-inch Phillips screws.

Large door handle attached to the right door window.
Install the Door Latch (1100M/MX, 770M/MX Only)
- Attach the door latch strike plate on the left front door with a Phillips screwdriver and two M3 screws.
- Attach the door latch in the pocket on the right door with two M3 screws.
Install the Floodlights (1100M/MX, 770M/MX Only)
- Use a multimeter to verify the ground connection of both floodlights:
- Measure the resistance between the floodlight's power connector ground pin (the middle pin on the three-prong connector) and the floodlight's bracket screw.
- Read the OHMS value that displays. The value should be less than 5 OHMS. If the value is greater than 5 OHMS, don't install the floodlight.
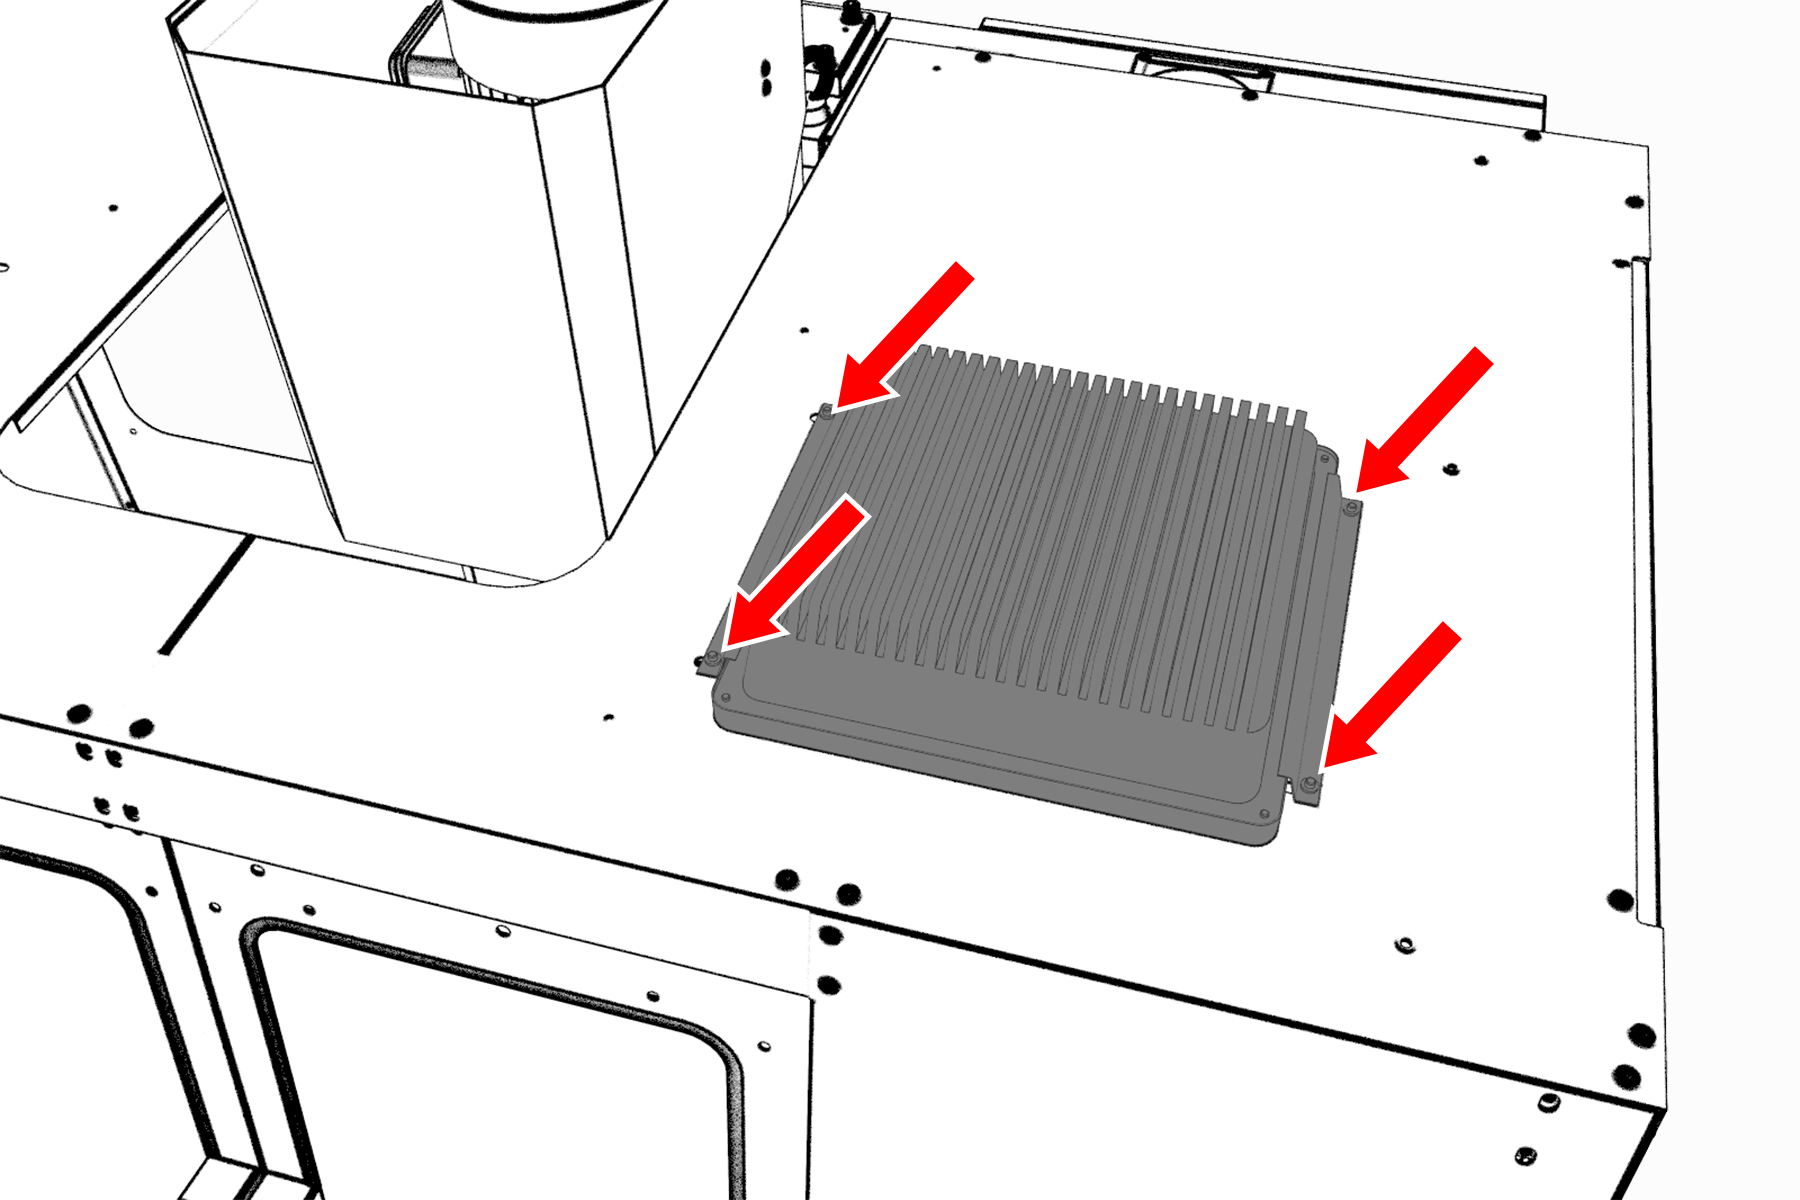
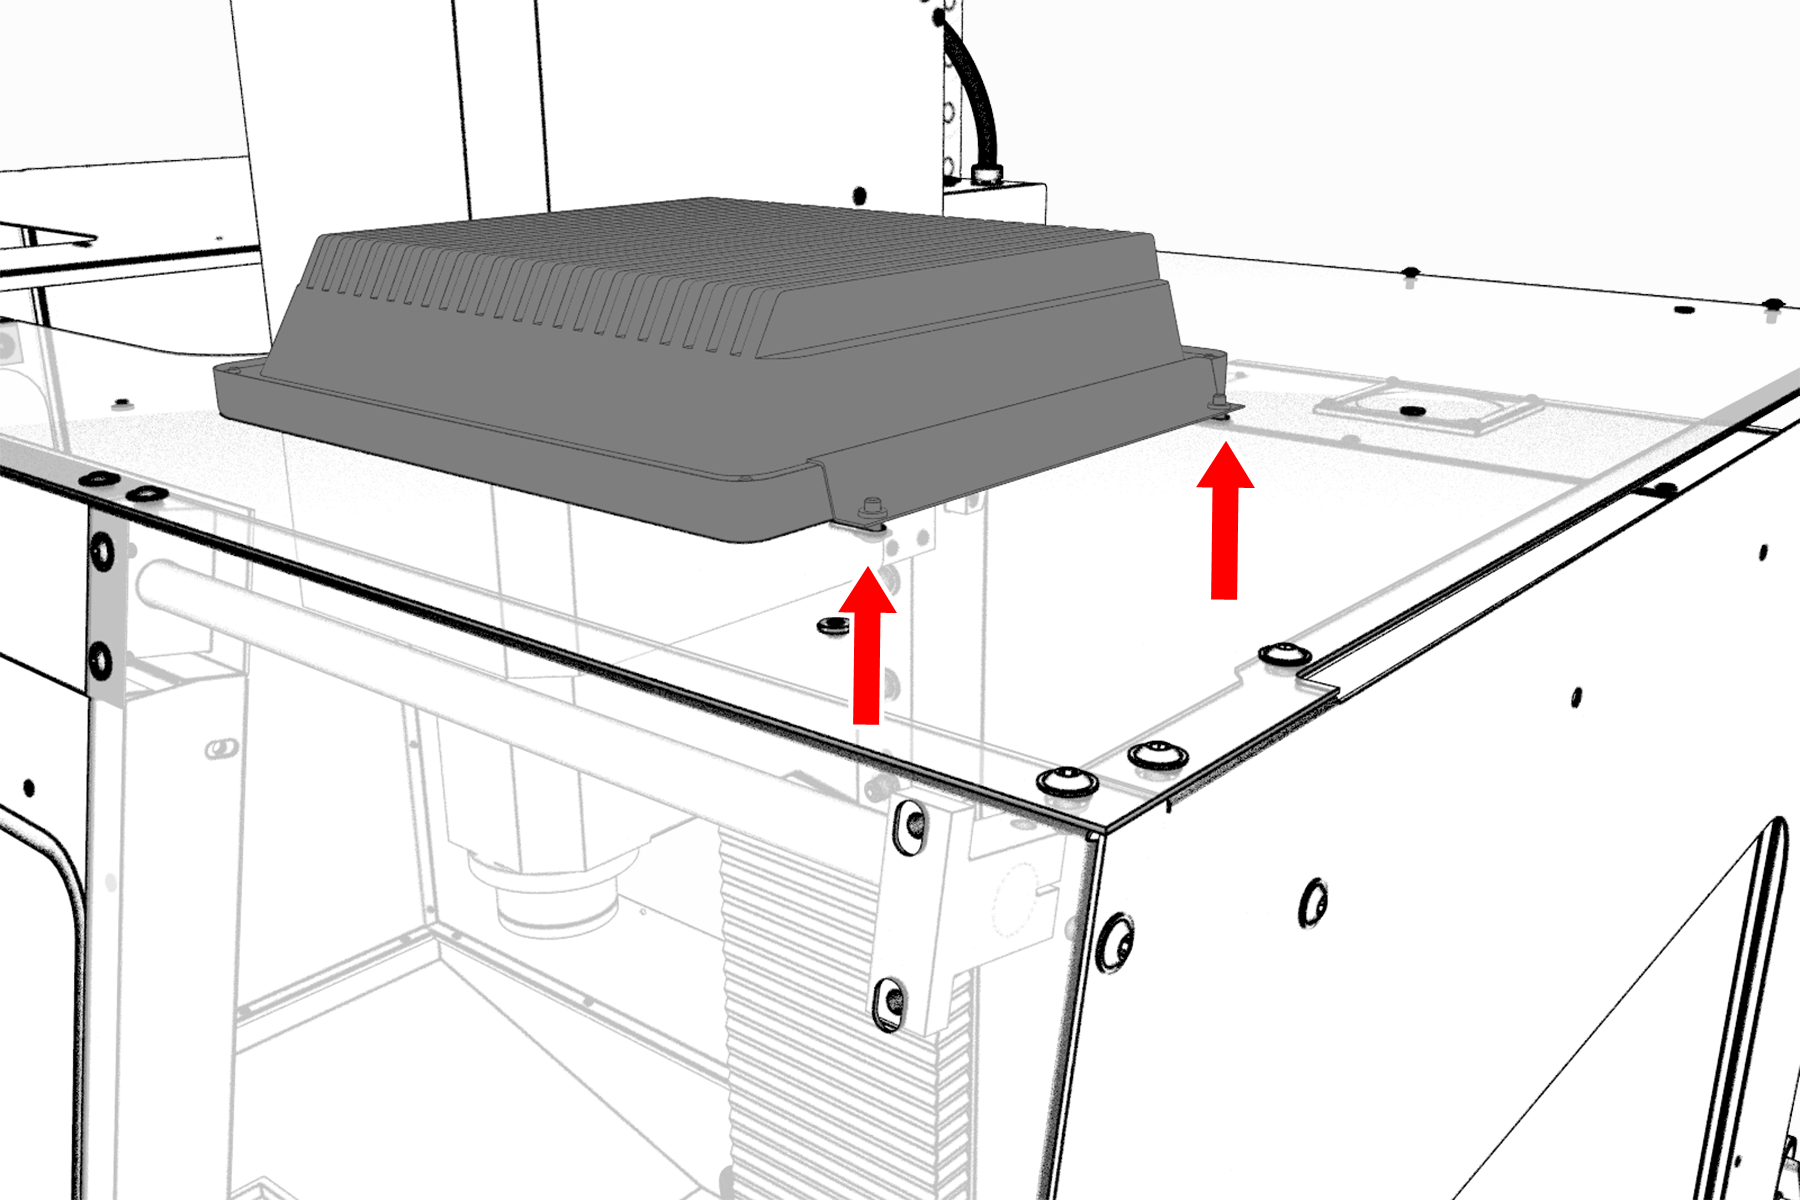
- Position one floodlight over the opening on the right top panel. Take care not to drop the light through the opening into the enclosure.
-
Attach one floodlight retainer to either side of the lights with two sets of two M5 × 0.8 - 10 screws.
Verify that the floodlight is centered over the opening before hand-tightening the floodlight retainers.

Floodlight attached to the top panel.

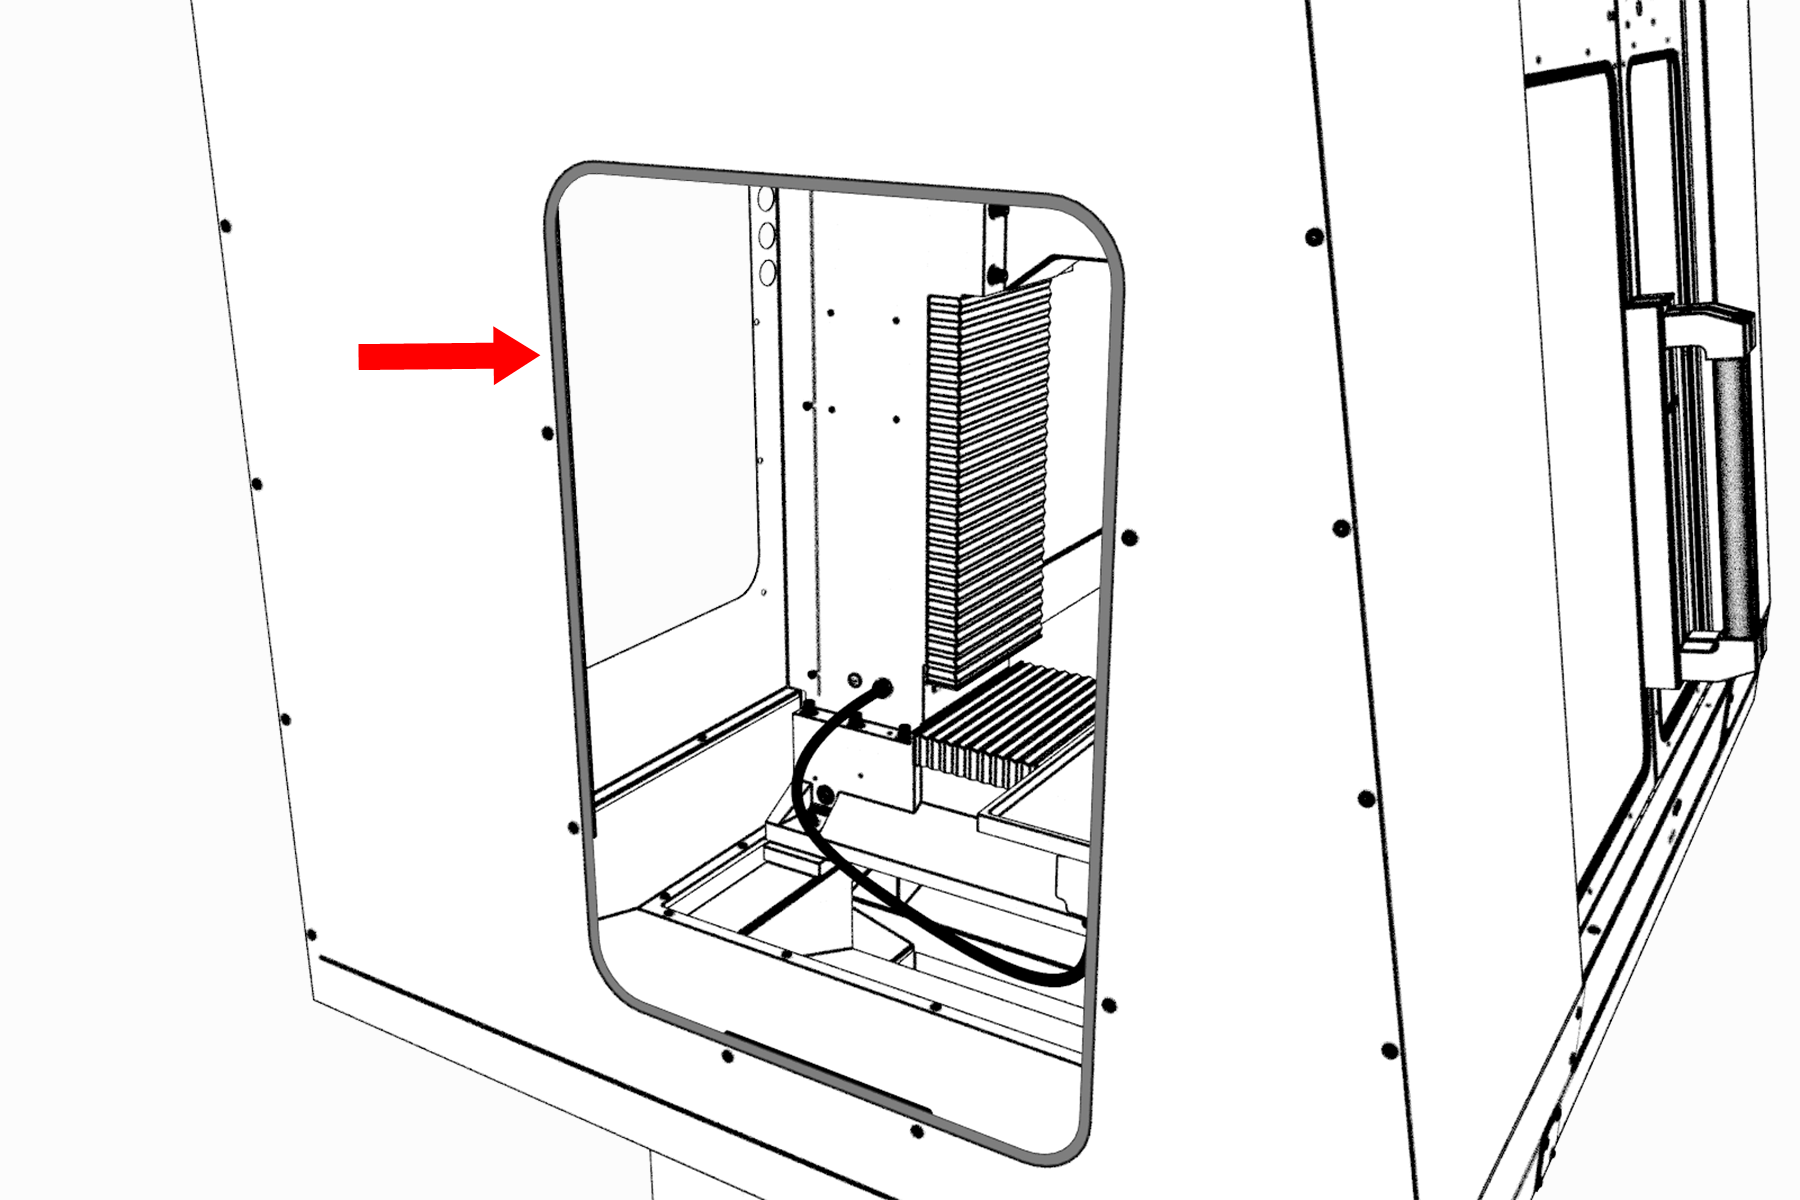
Attached floodlight from the inside of the enclosure.
- Repeat Steps 1 to 3 to install the floodlight on the left side.
- Connect the short power cable from the Enclosure Cable Kit to the plug on the right floodlight.
- Connect the long power cable from the Enclosure Cable Kit to the plug on the left floodlight.
- Route the power cables from the floodlights to the electrical cabinet.
- Plug the floodlights into the Enclosure Lights outlet on the back of the electrical cabinet.
- Attach the floodlights' power cables to the five wire tie anchors on the left and right top panels with five wire ties.
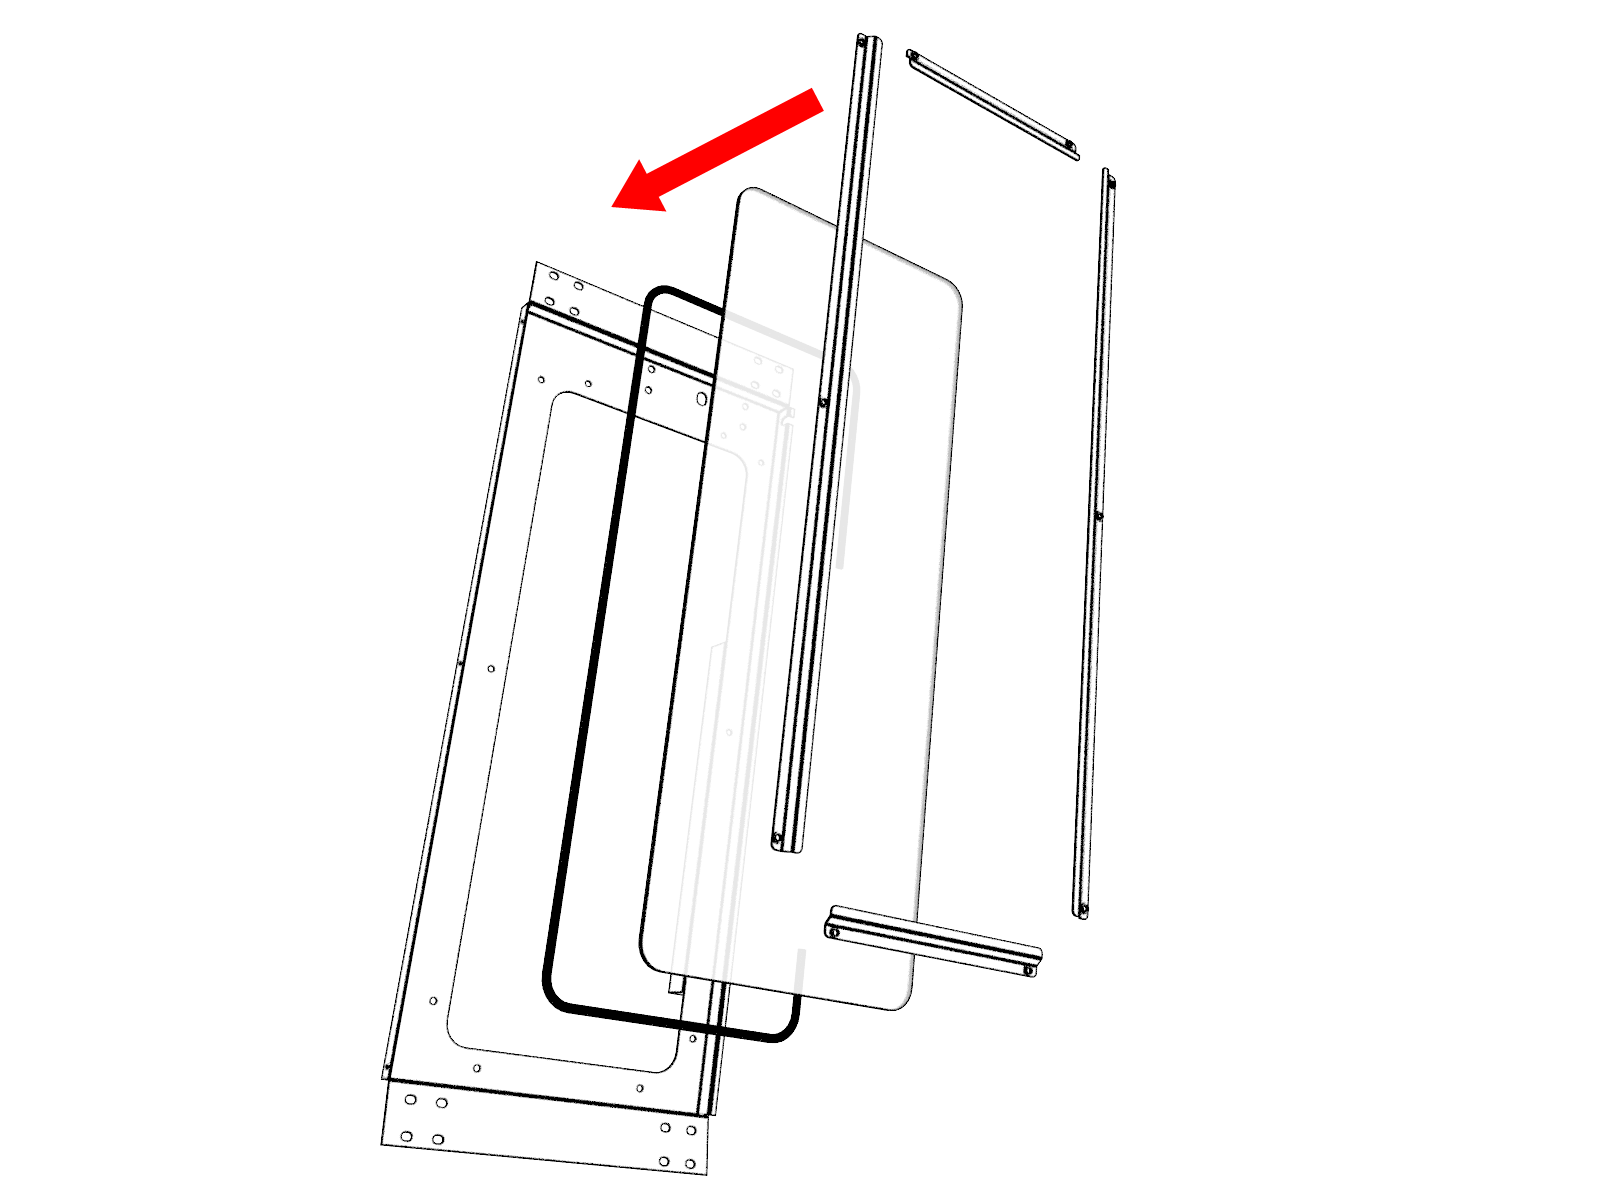
Install the Side Windows
-
Rubber trim is required to prevent leaks around the window openings: push a strip of rubber trim to the edge of the window opening on each side panel. Verify that the trim covers the entire perimeter of the window. When finished, use shears or a knife to cut the excess trim.

Rubber trim pushed onto the window opening.
- Remove and discard the protective plastic film from the windows.
-
Slowly slide one window through the left top panel's window opening and into the two installed vertical window retainers. Take care to not scratch the window. When finished, verify that the window rests on the bottom horizontal window retainer.

Window sliding into the window opening.
- Push a strip of rubber trim onto the edge of one horizontal window retainer. When finished, use shears or a knife to cut the excess trim.
-
Attach one horizontal window retainer above the window on the left side panel with two M5 × 0.8 - 10 screws.

Horizontal window retainer attached above the window.
-
Tighten all screws on the window retainers to secure the window.
To prevent window damage from over-tightening, use your fingers to tighten the screws.
- Repeat Steps 1 through 6 for the window on the right side panel.
- Remove and discard the protective plastic film from the windows.
- Slowly slide one window through the left side panel's window opening and into the two installed vertical window retainers. Take care to not to scratch the window.
- Attach one small handle to the left side window with two 8-32 × 1/2 in. Phillips screws.
-
Repeat Steps 2 to 3 for the right side window.

Small handles attached to the side windows.
- Securely tighten the four bolts securing the machine to the chip pan.
-
To more easily install the enclosure components, you didn't fully tighten various screws in previous installation steps. At this point, securely tighten all screws used in the procedure.
You have completed assembling and installing the 1100M Enclosure.
Install the Access Panel (1100M/MX, 770M/MX Only)
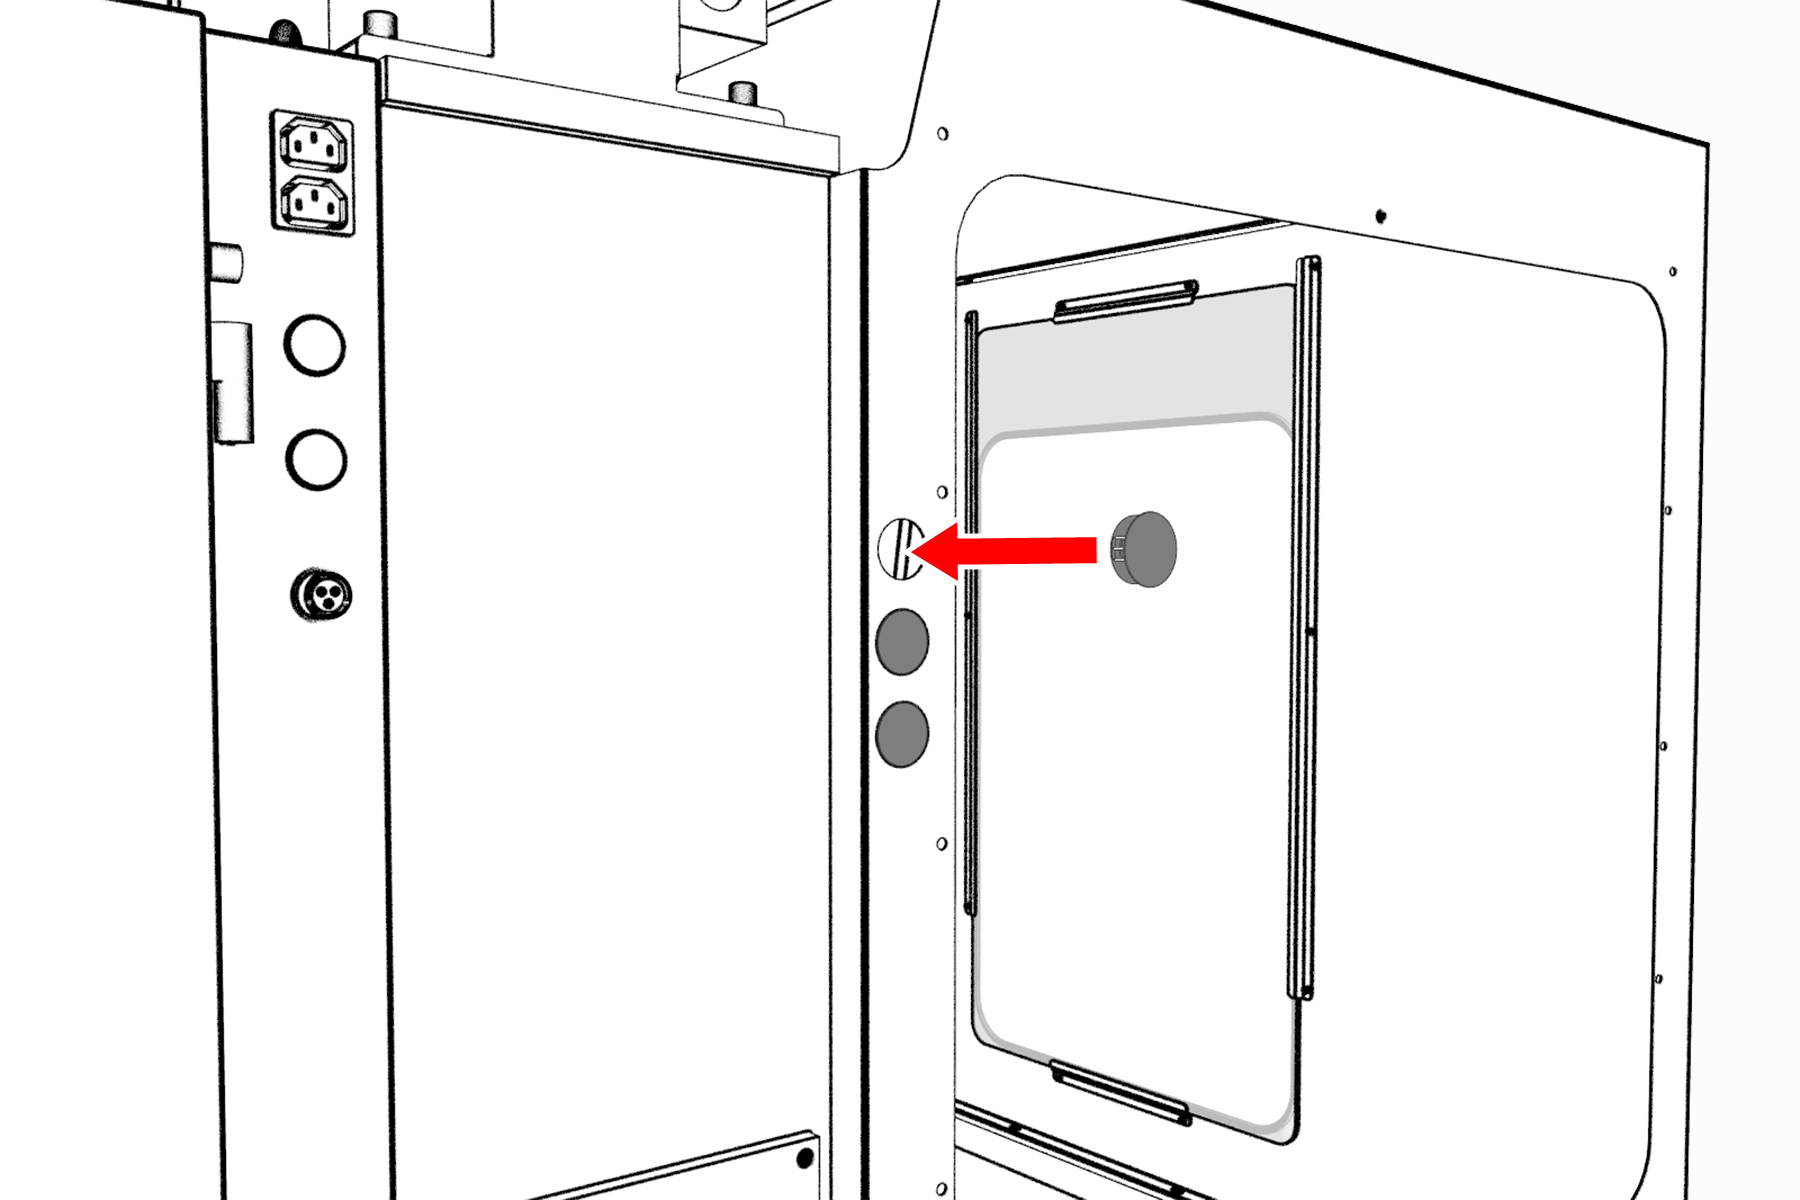
-
Push three round hole plugs into the three holes on the left rear panel.

Round hole plugs pushed into the left rear panel.
- Push a strip of rubber trim to the edge of the access panel opening on the left rear panel. Verify that the trim covers the entire perimeter of the opening. When finished, use shears or a knife to cut the excess trim.
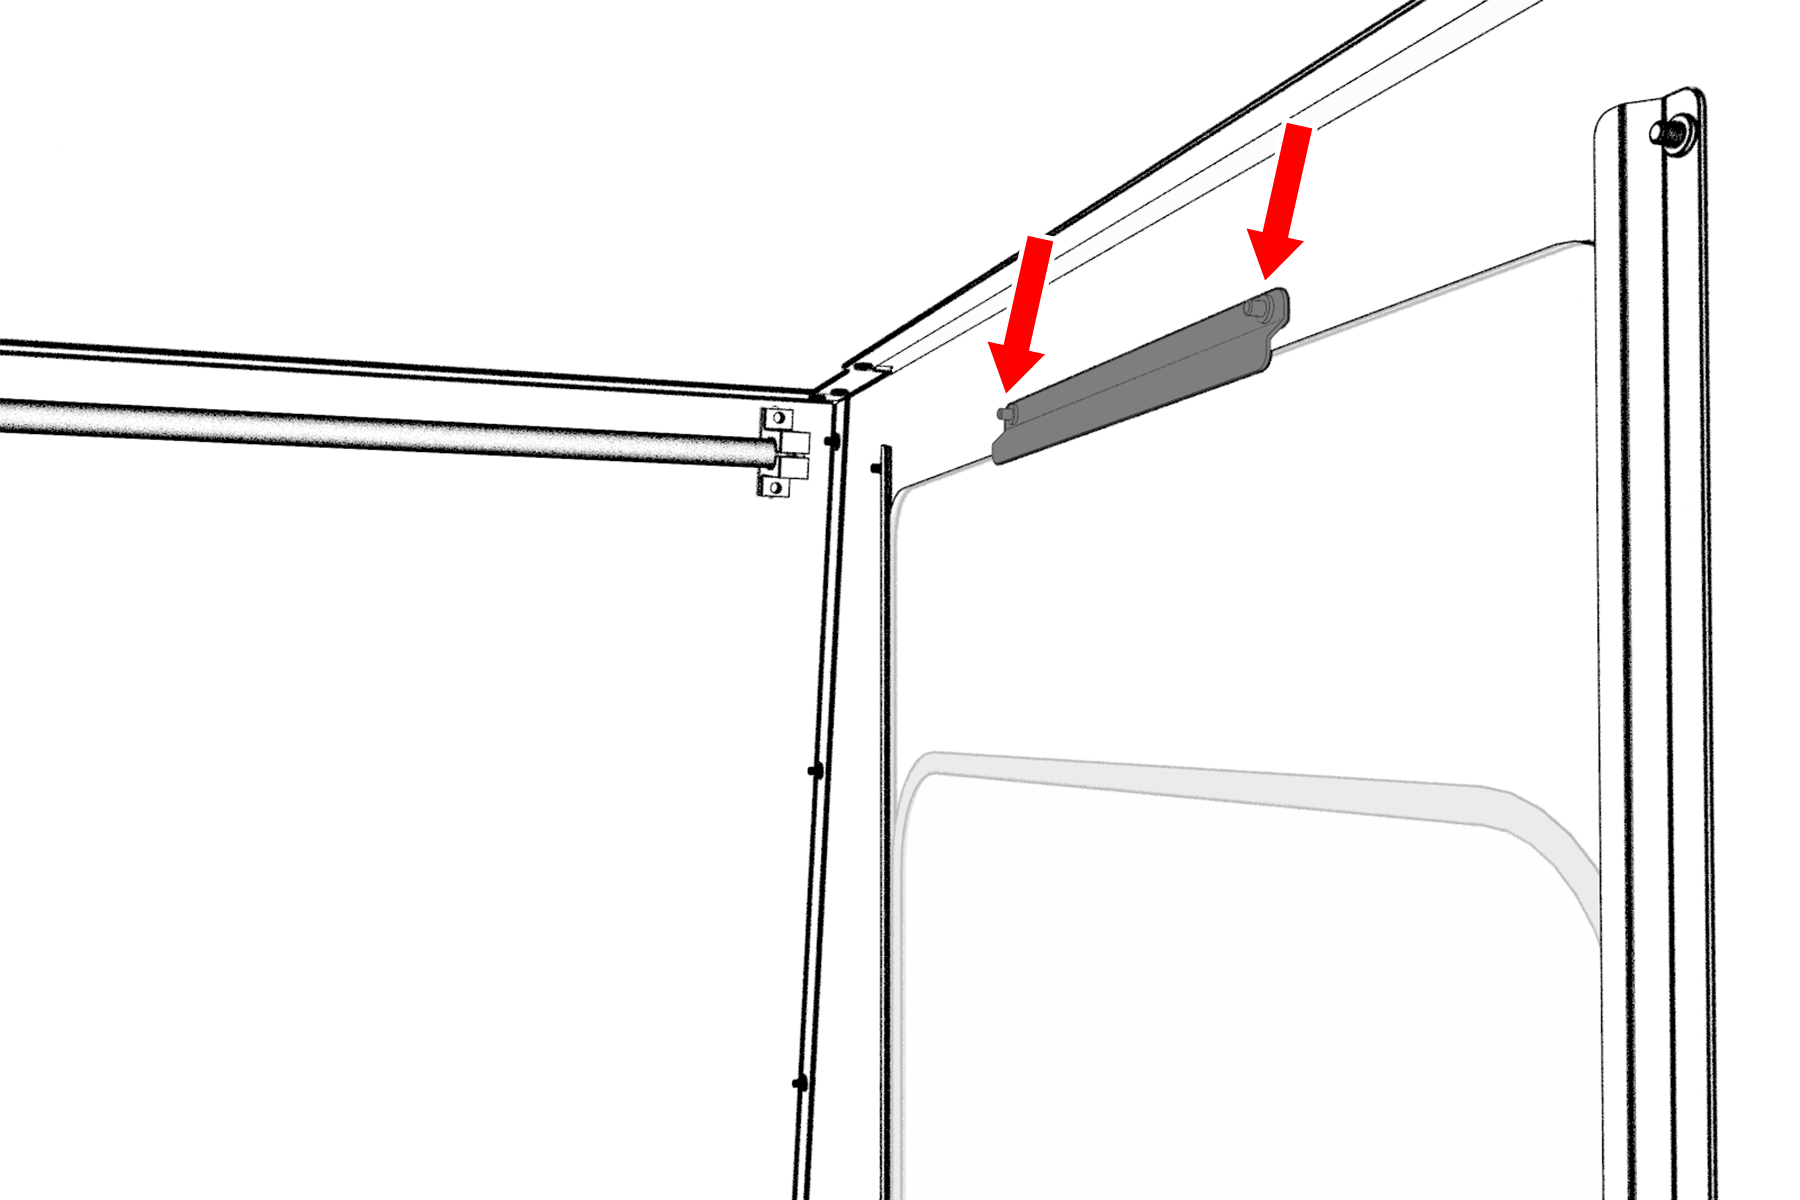
-
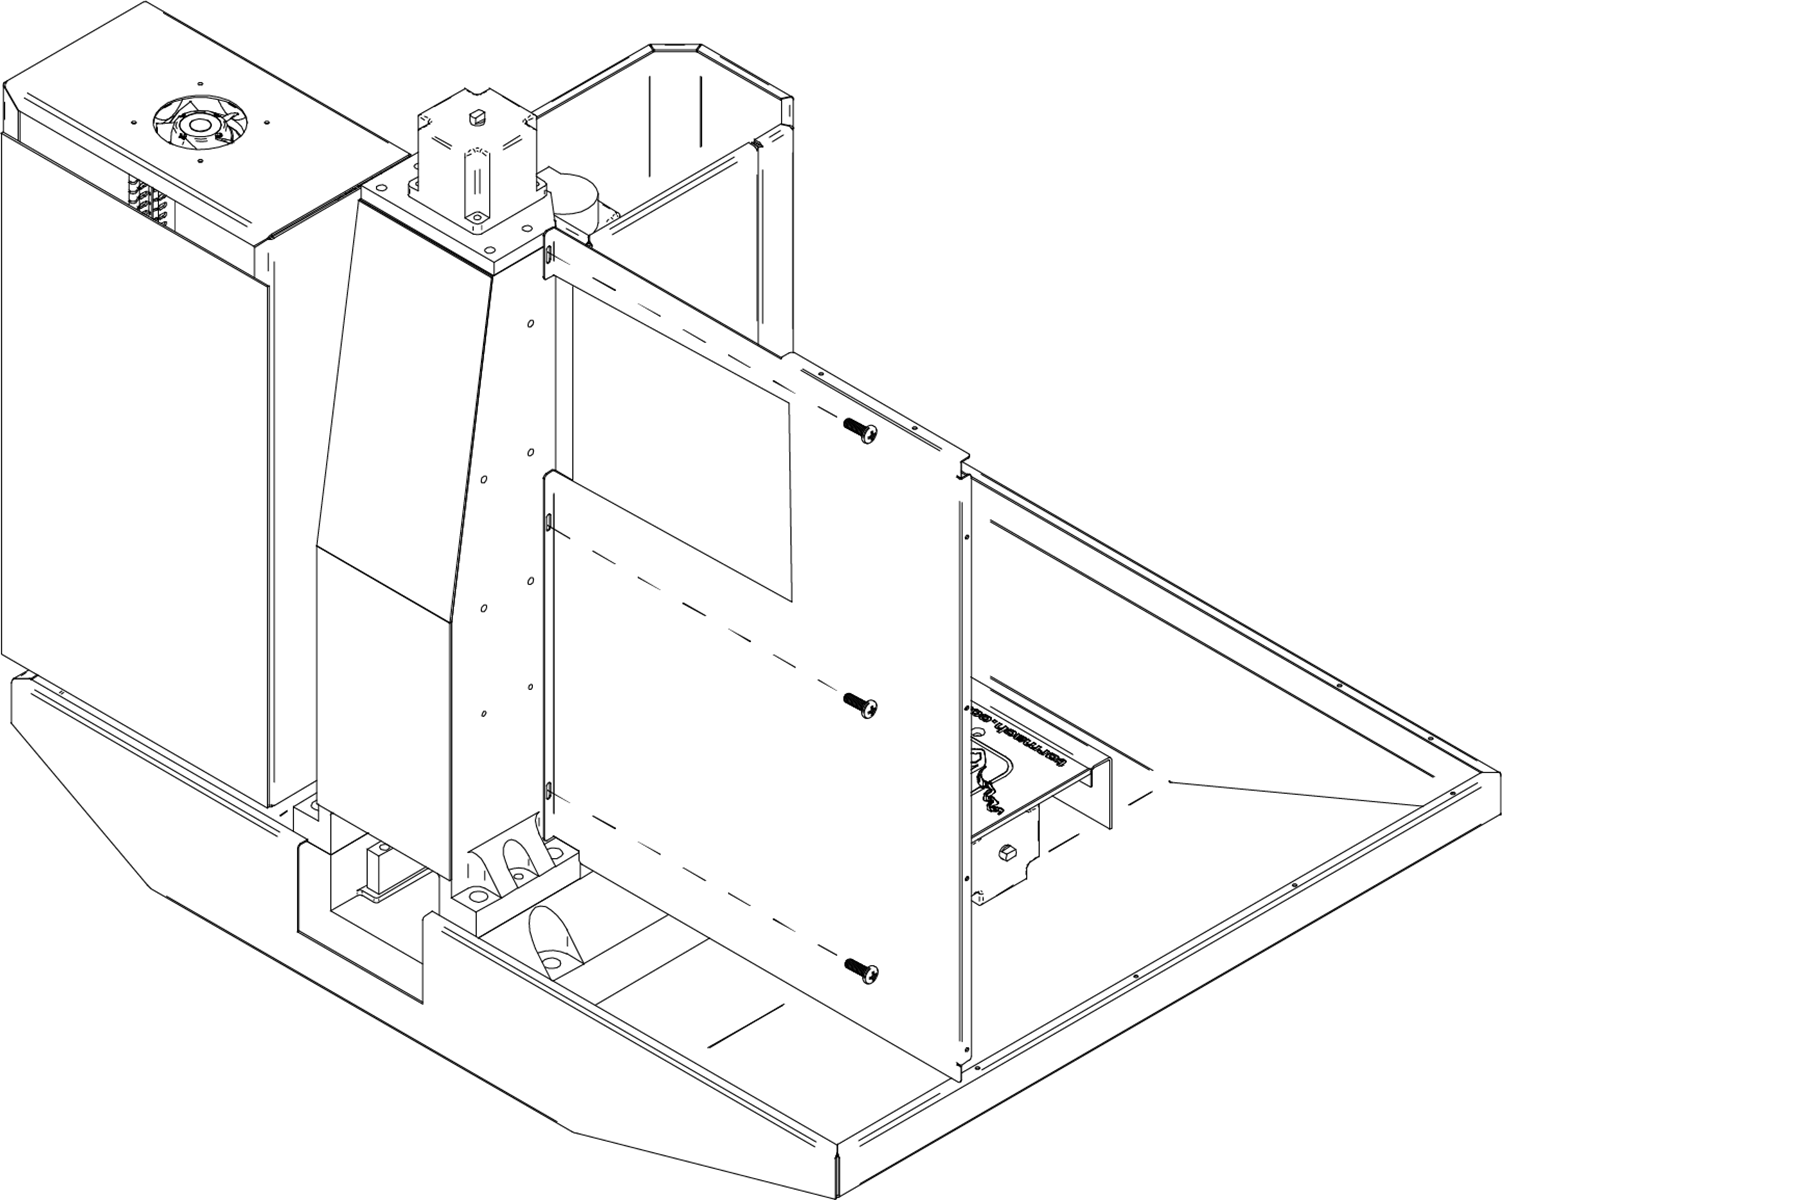
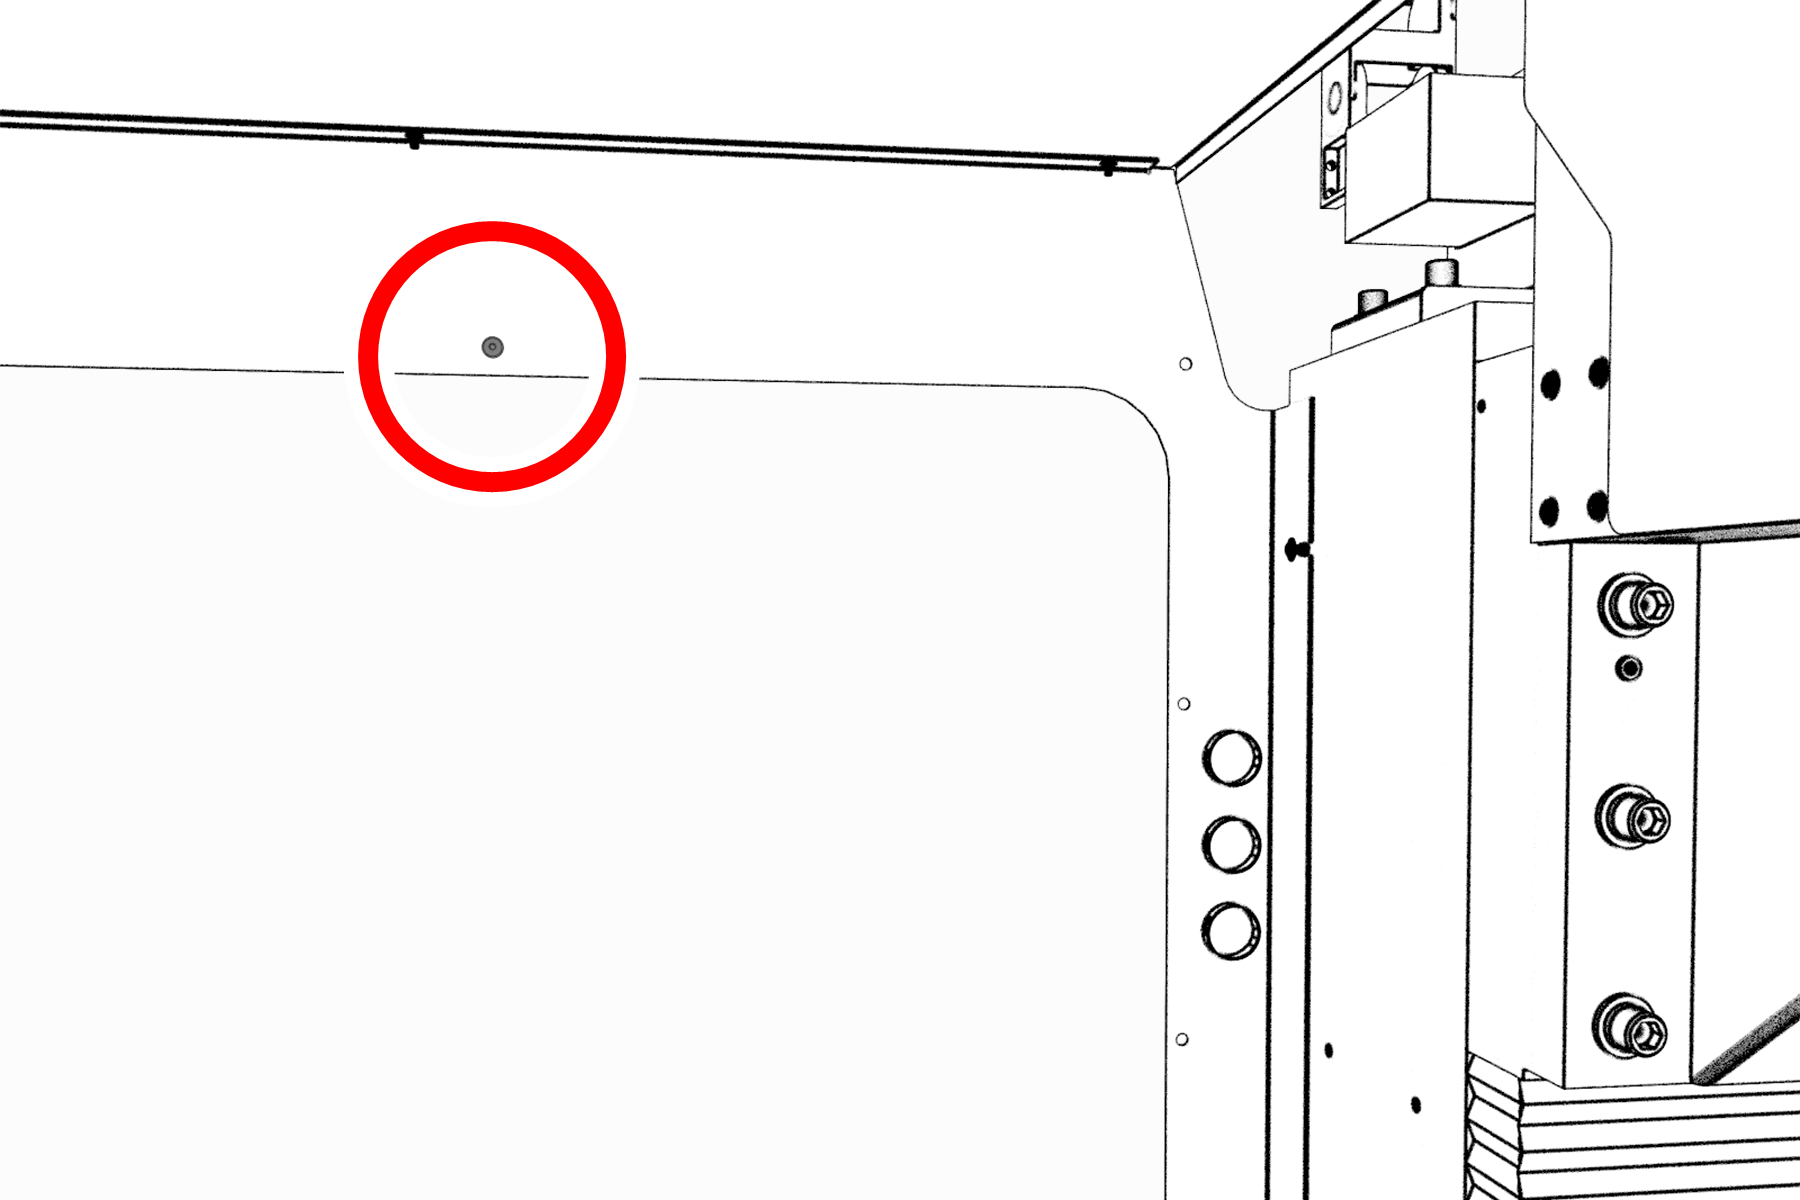
Find the threaded hole toward the top center of the left rear panel. Then, loosely install one M5 × 0.8 - 10 screw from the inside of the enclosure.
This screw supports the access panel while you install the remaining fasteners.

Supporting screw inside the left rear panel.
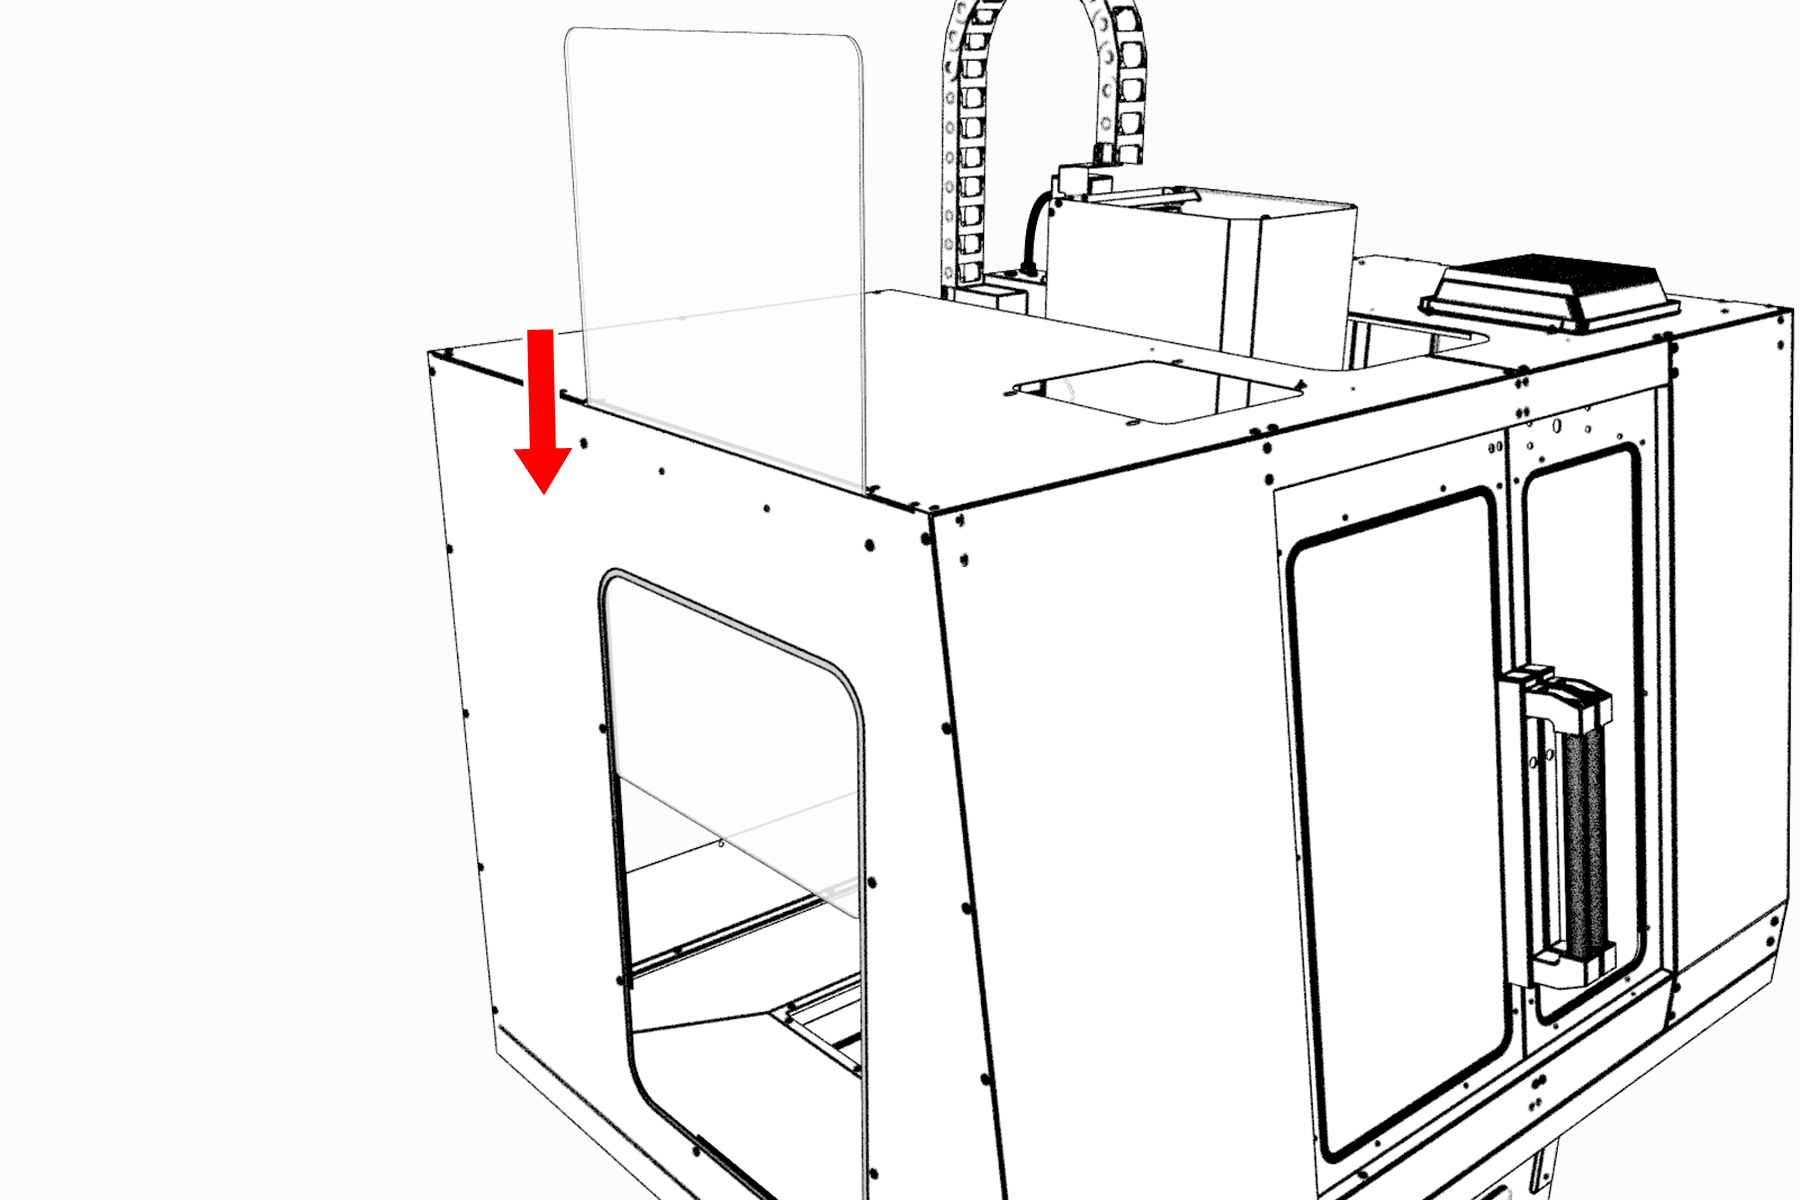
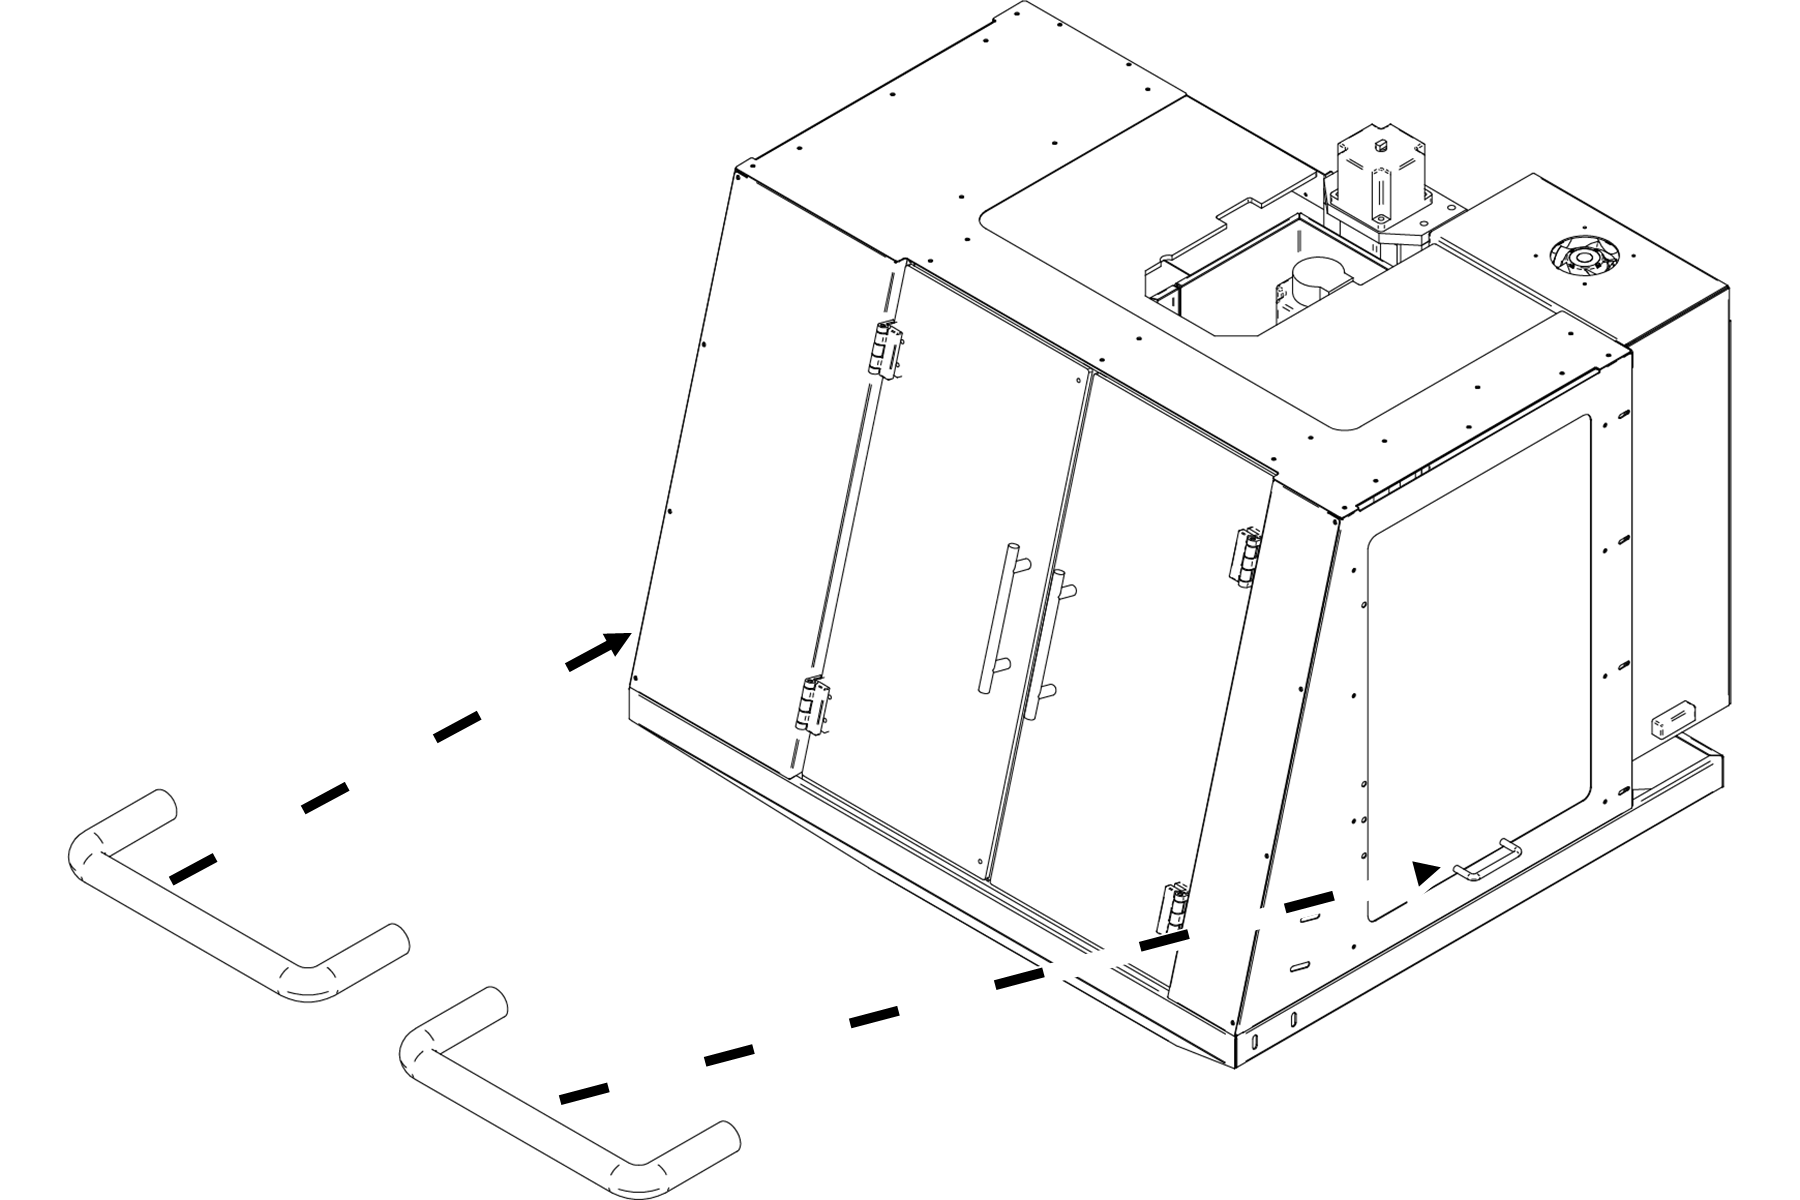
-
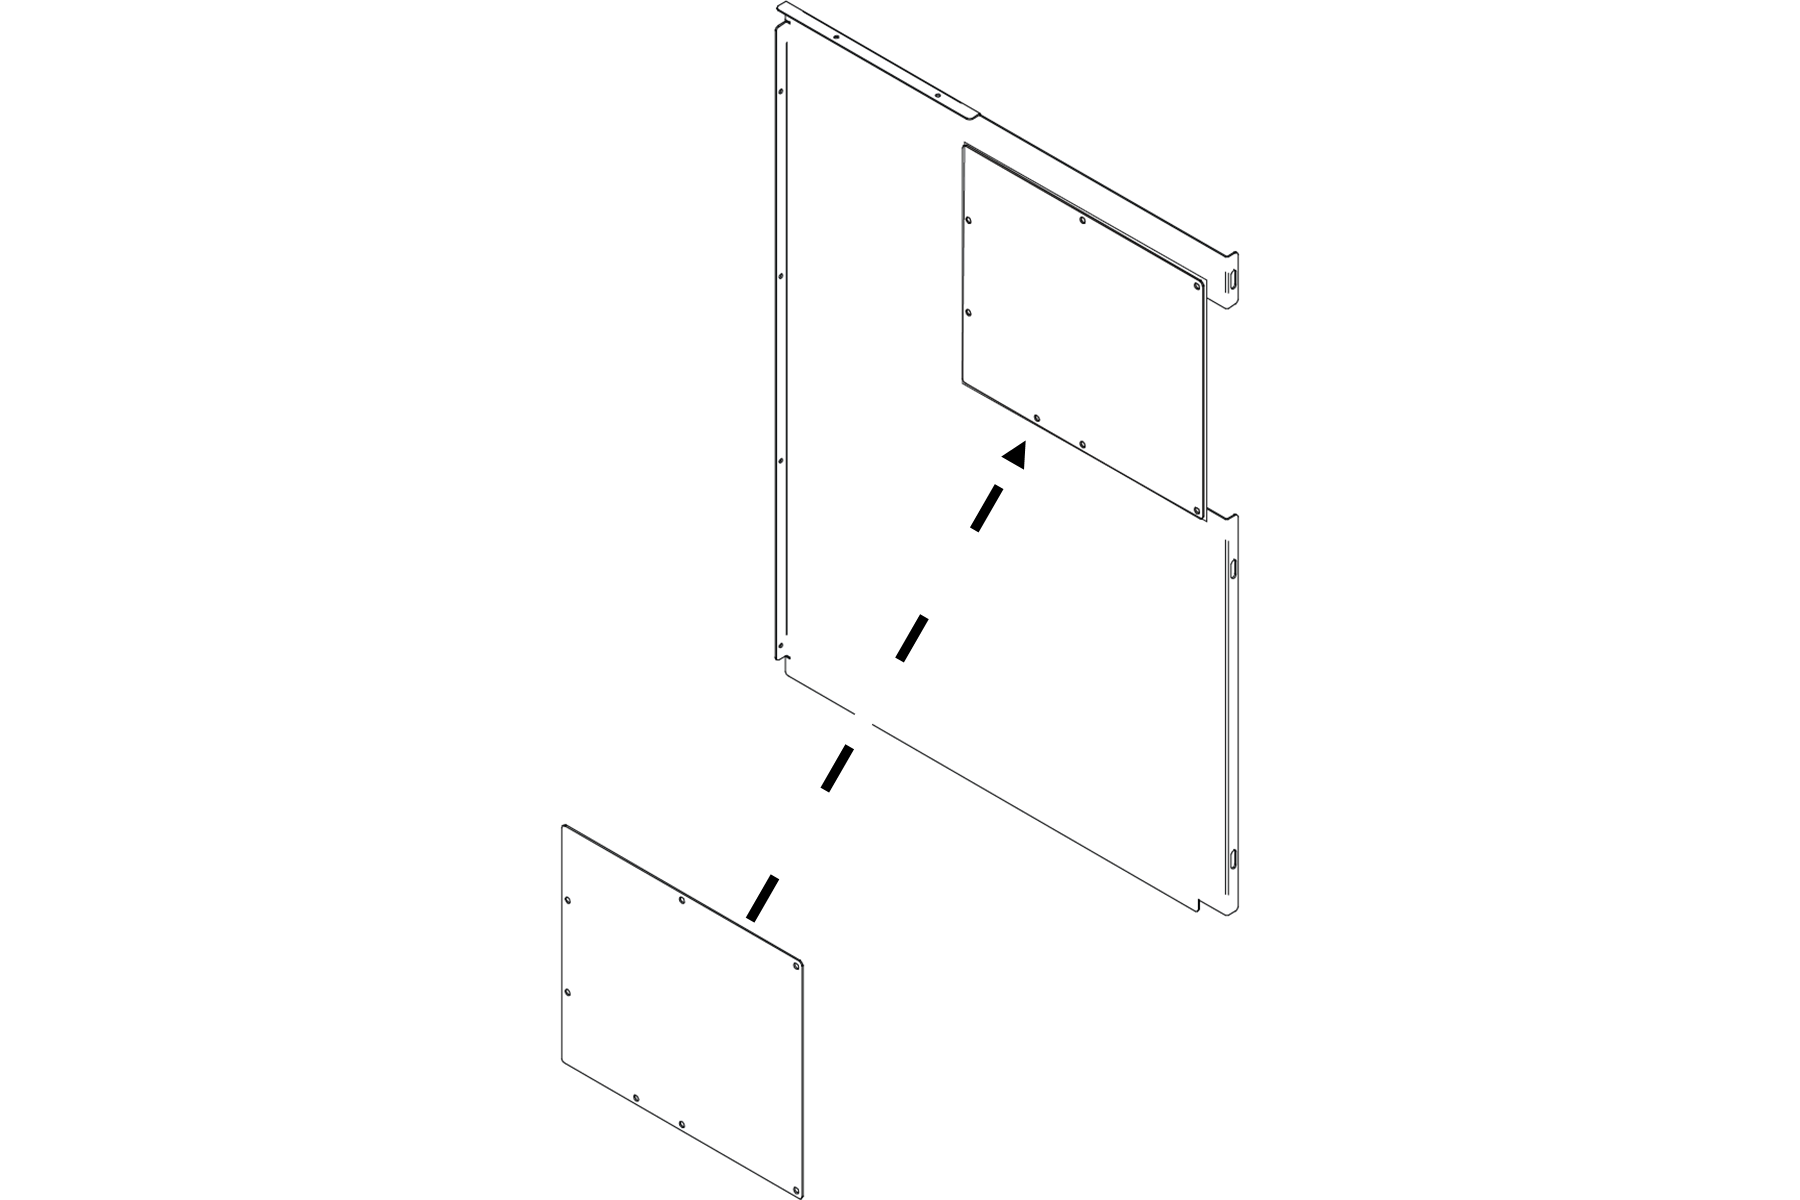
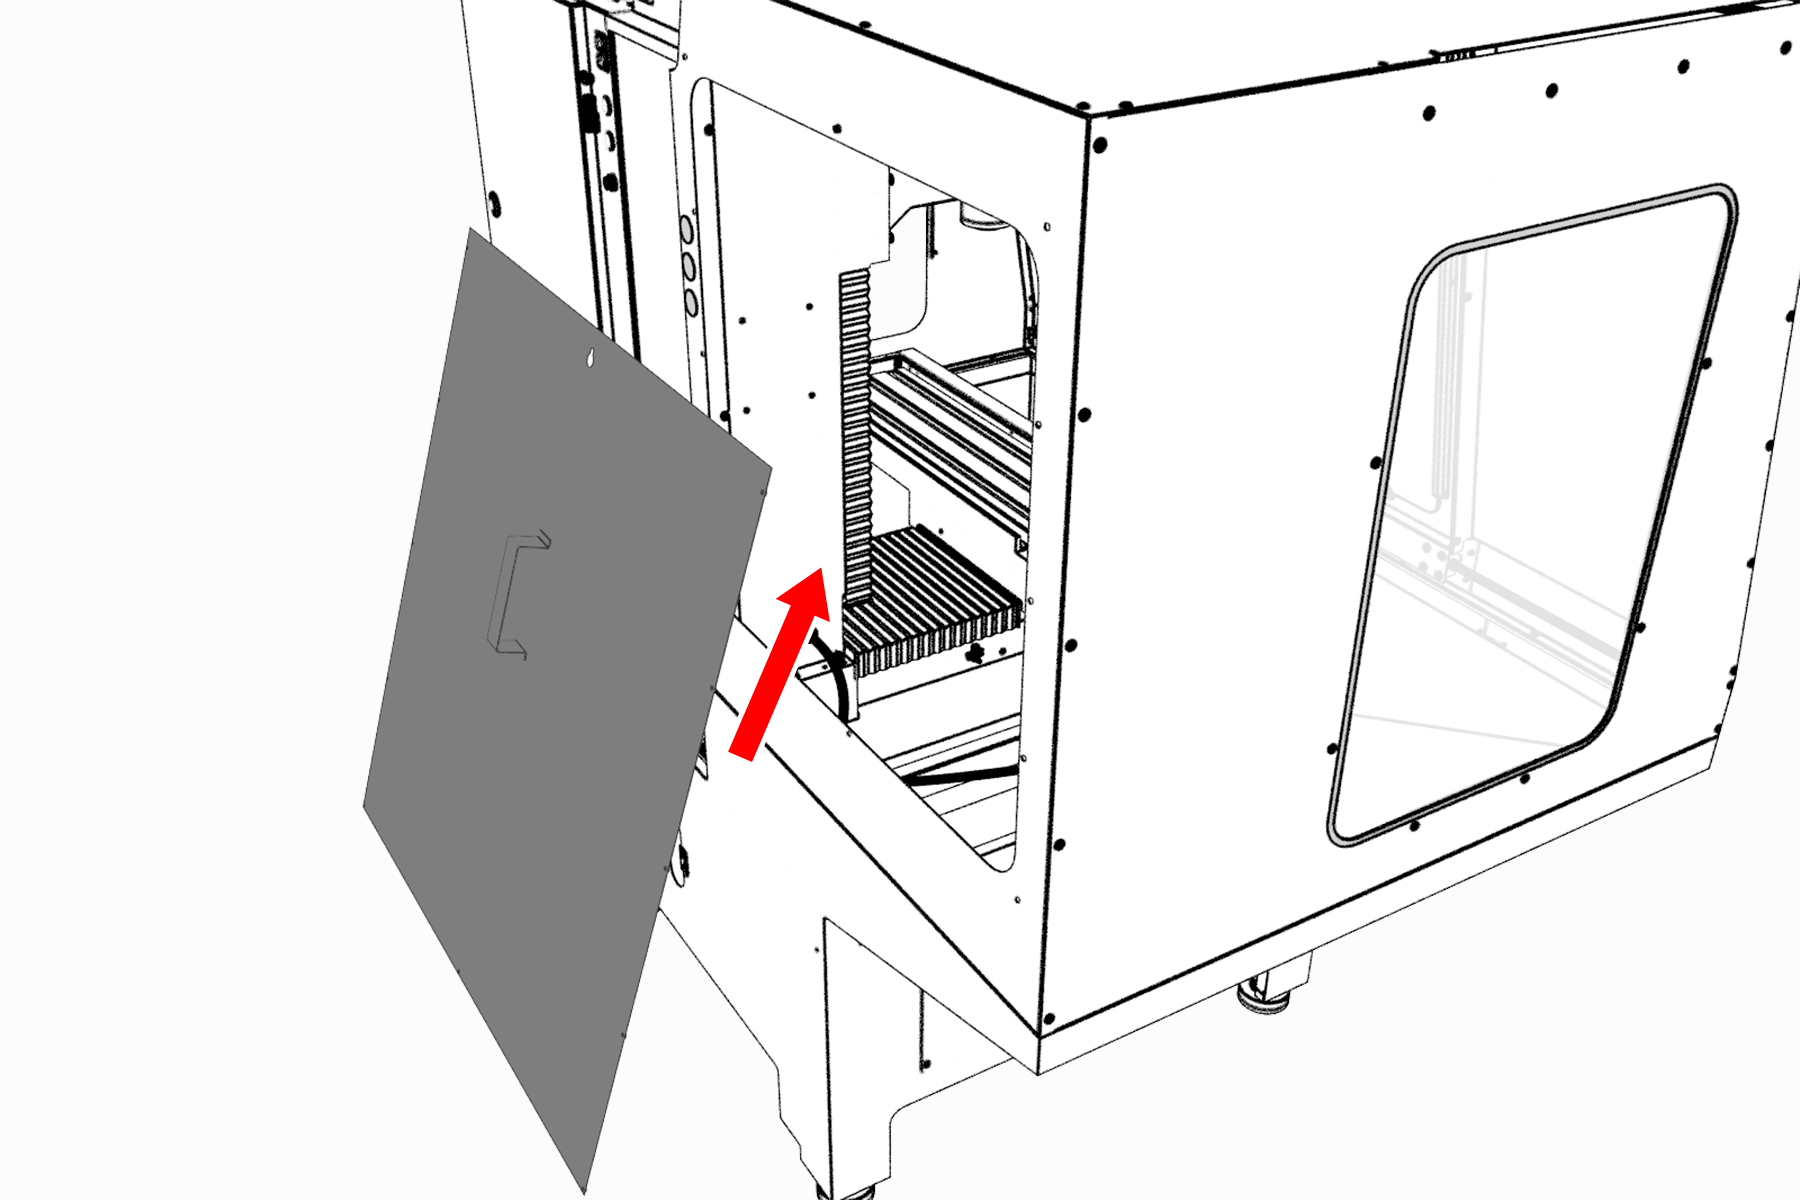
Tilt the access panel and put it through the opening on the left rear panel. Then, hang it inside the enclosure on the installed M5 × 0.8 - 10 screw.

Access panel moving inside the enclosure.
-
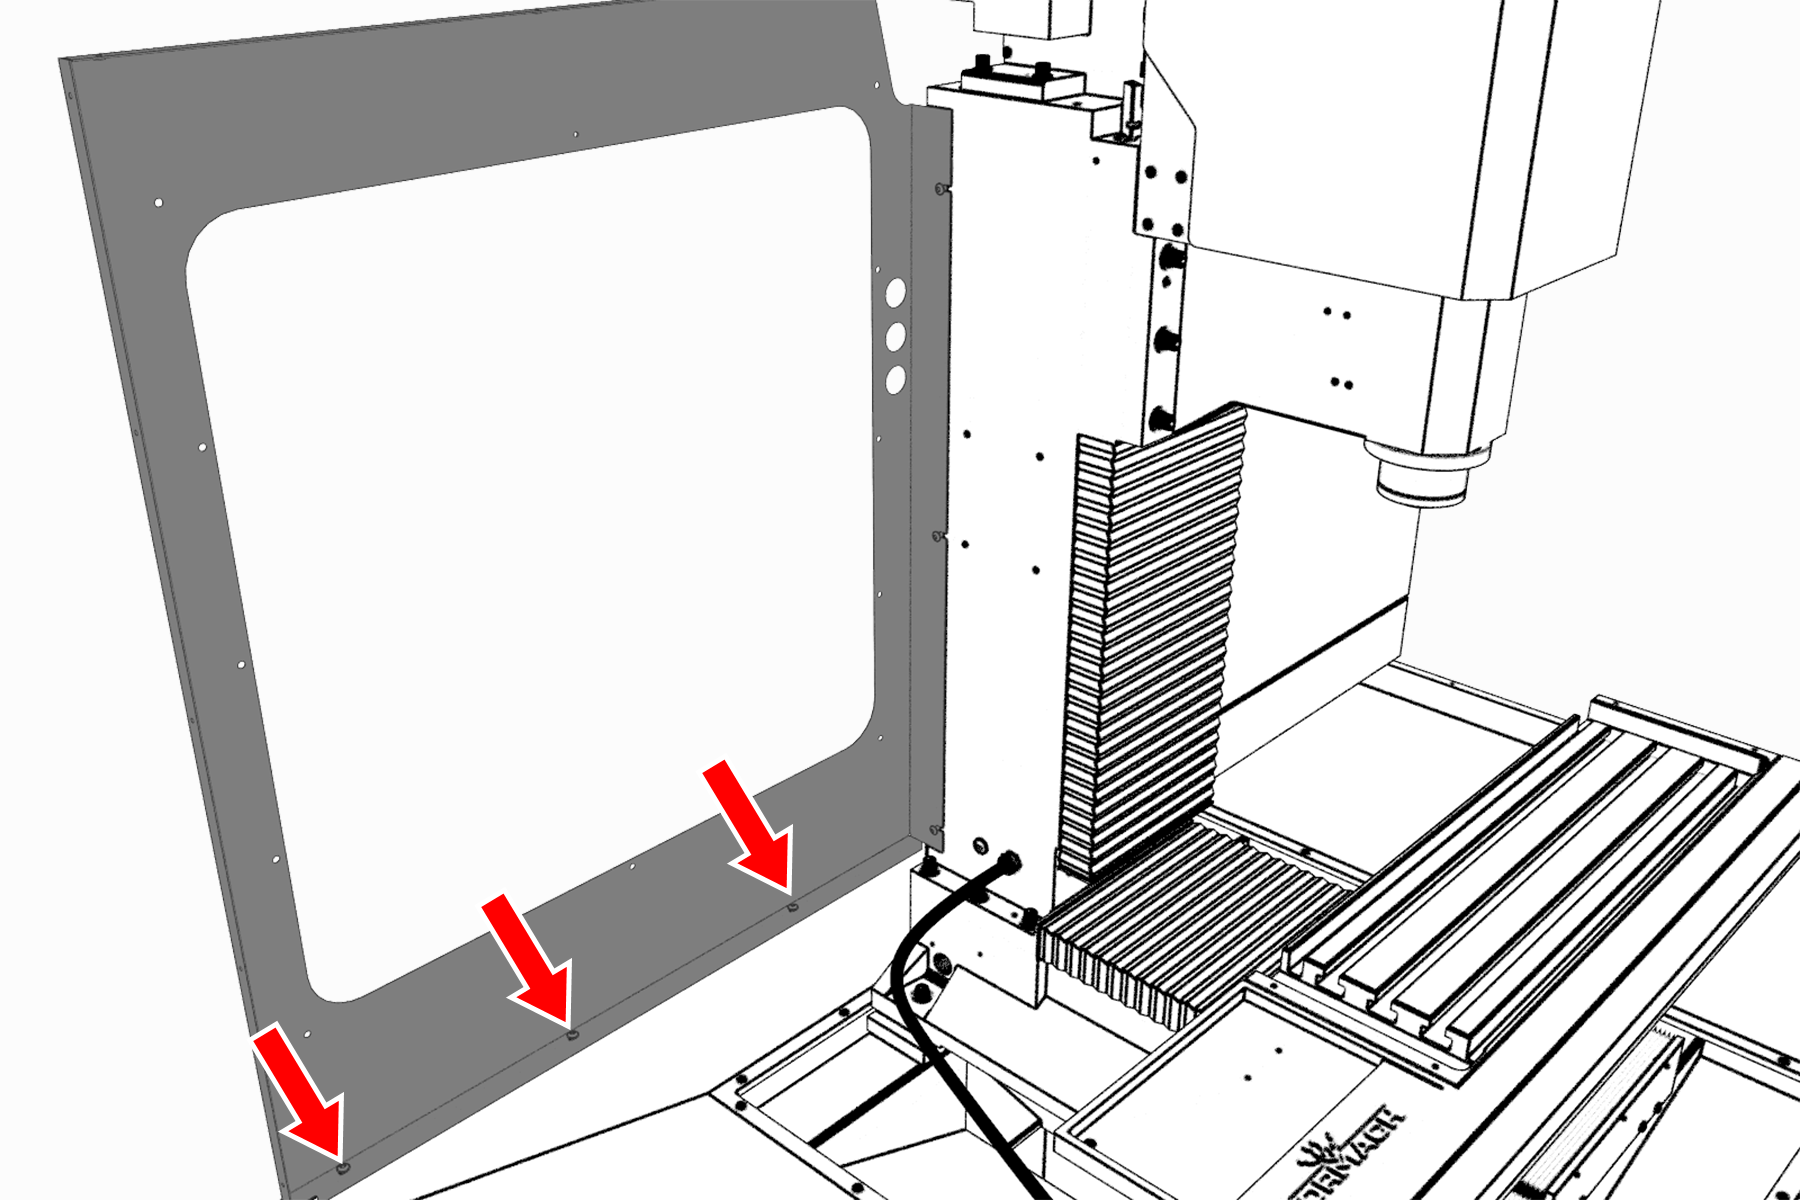
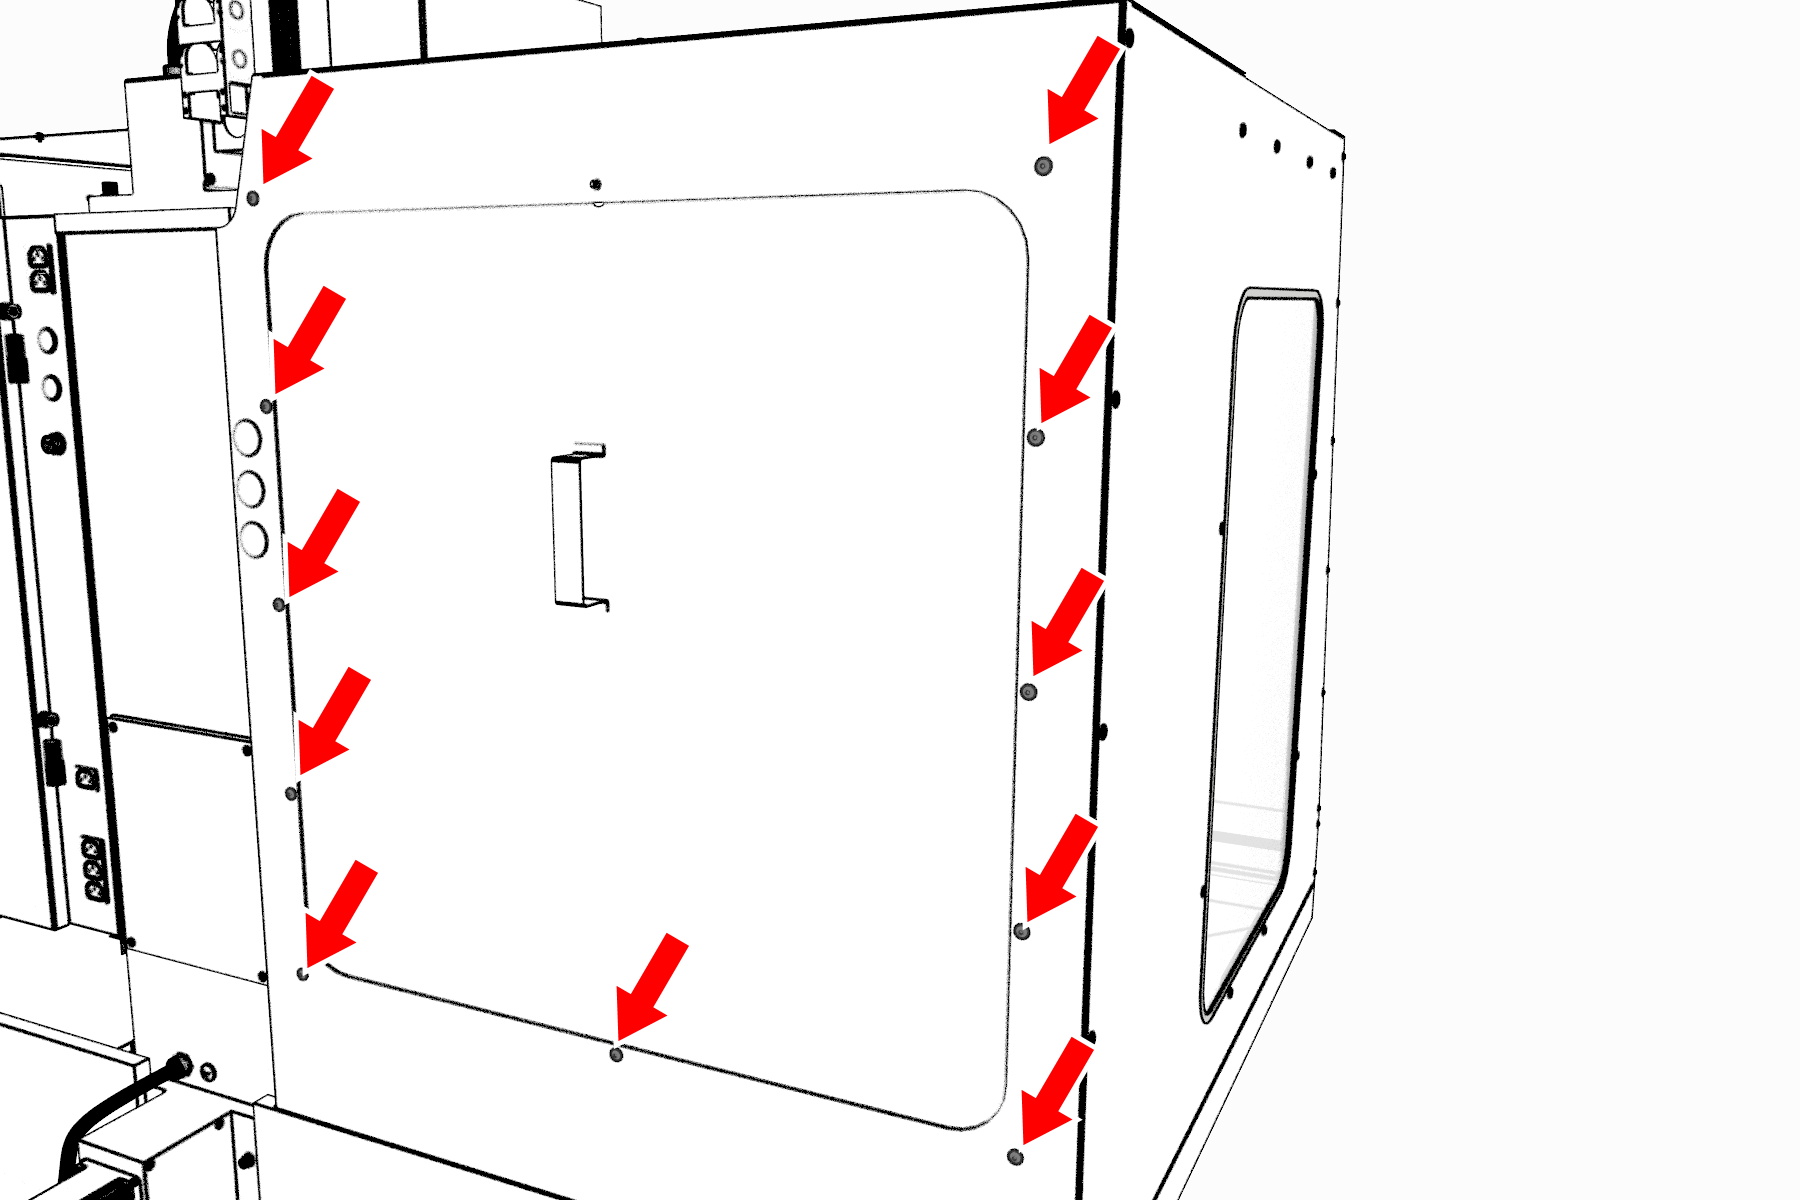
Attach the access panel to the left rear panel from the outside of the enclosure with 11 M5 × 0.8 - 10 screws.

Access panel attached to the left rear panel.
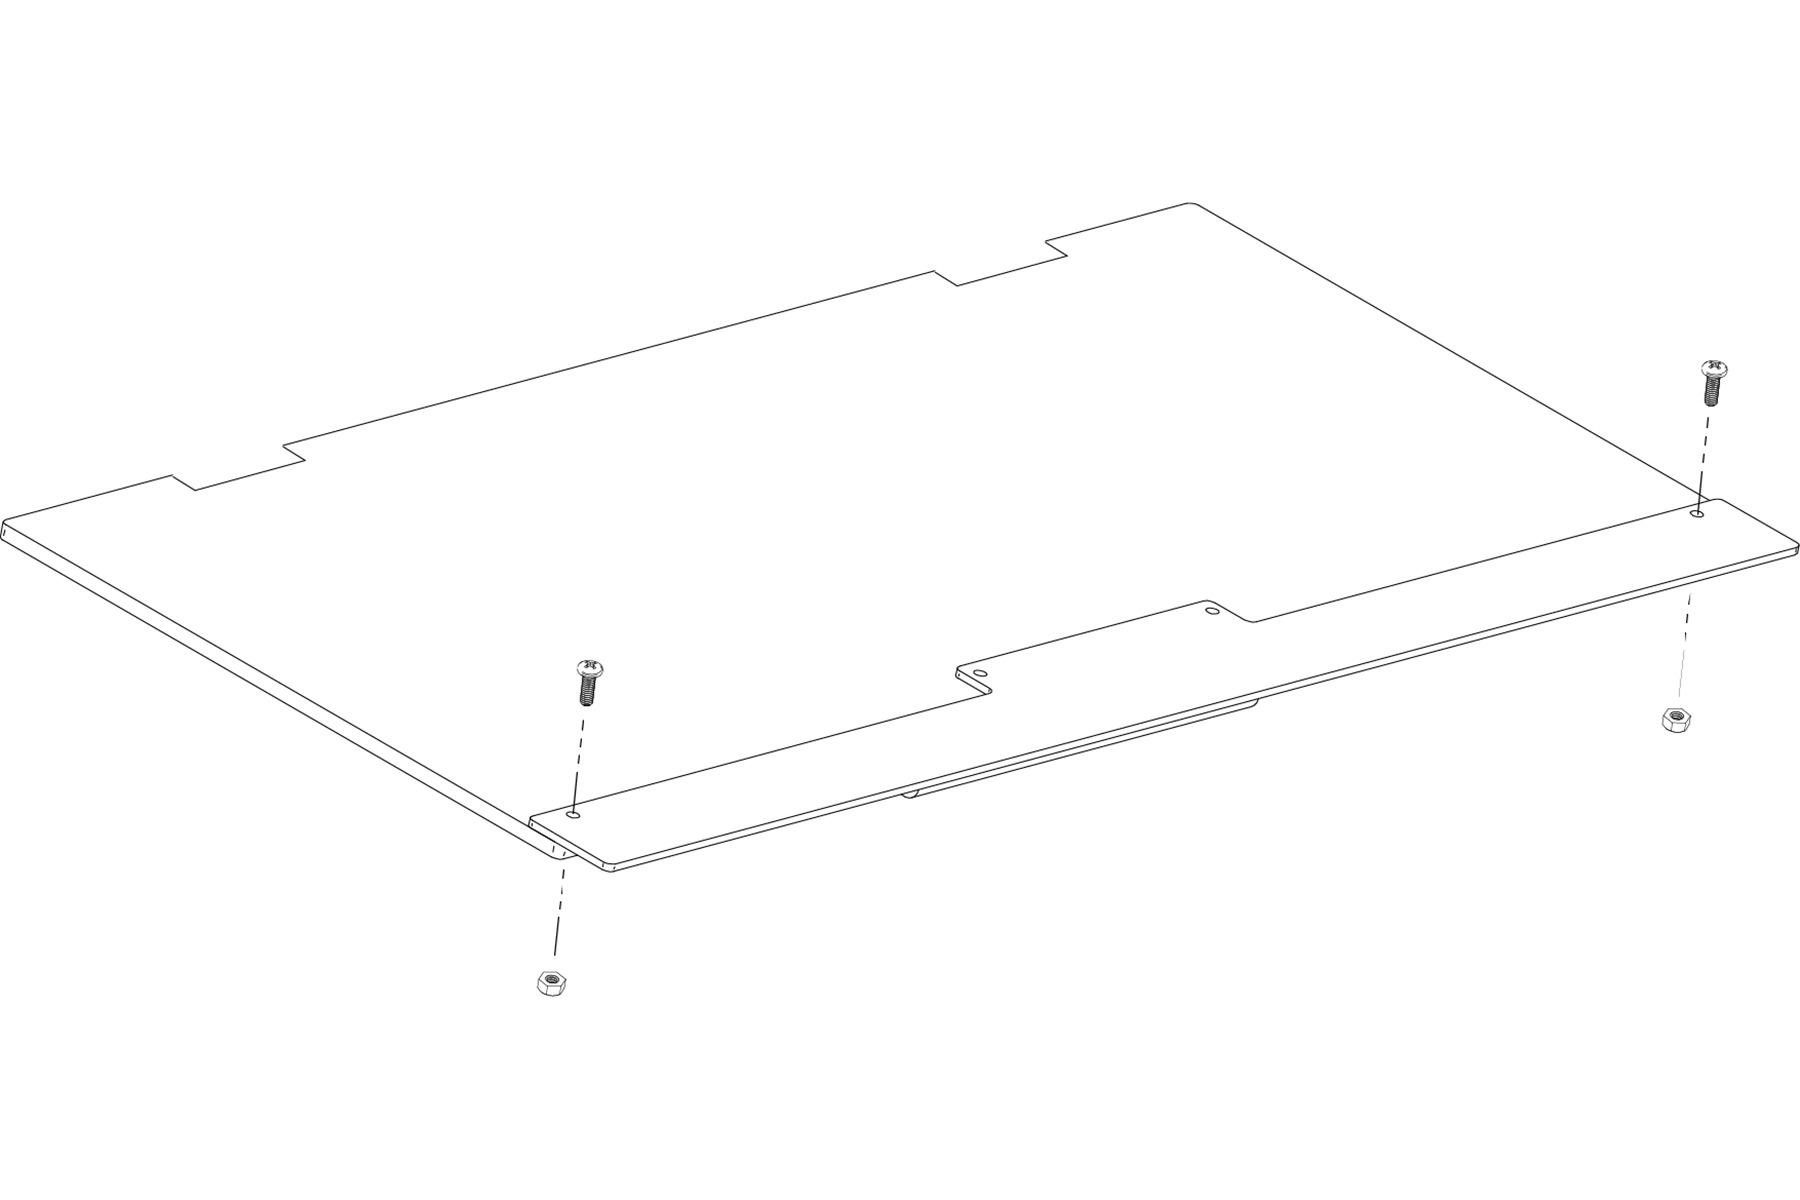
Install the Stainless Steel Wear Guard (1100M/MX, 770M/MX Only)
-
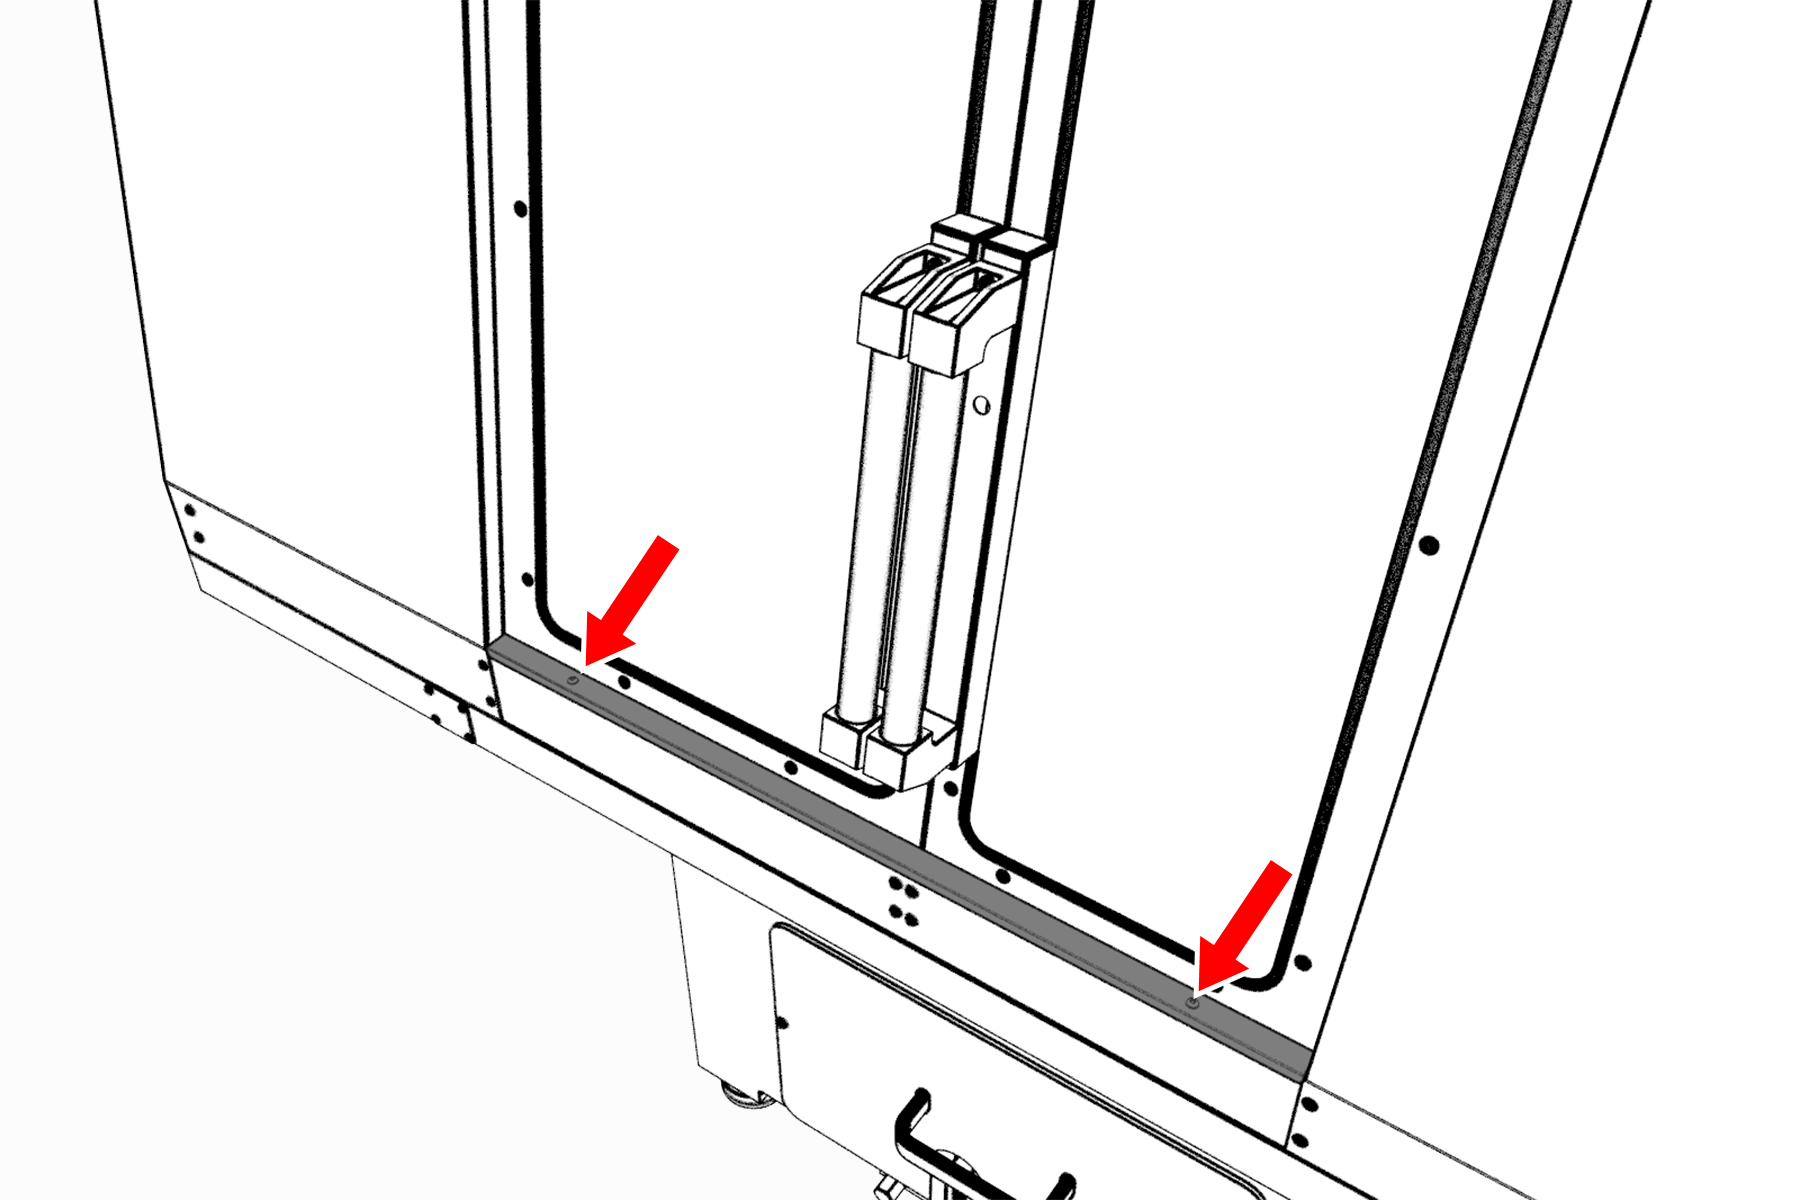
Find the stainless steel wear guard that you set aside earlier.
Attach it to the lower front panel with two M5 × 0.8 - 10 screws.

Stainless steel wear guard attached to the lower front panel.
Use the Maintenance Labels (1100M/MX, 770M/MX Only)
The machine has one maintenance label on each window.

Window maintenance label.
-
Write down today's date on each label with a permanent marker.
You have completed assembling and installing the 1100M Enclosure.
Replace the Windows
When required, replace the windows with the following parts:
- Window, 1100, Side (PN 37648)
- Window, 1100, Left Door (PN 37649)
- Window, 1100, Right Door (PN 37650)
When required, replace the windows with the following parts:
- Window, 770, Side (PN 37625)
- Window, 770M, Left Door (PN 37623)
- Window, 770M, Right Door (PN 37624)